
GH5 High ISO in a studio setting
 This image was captured last weekend at NECCC. Panasonic Lumix GH5 using the original Lumix Vario 35 - 100 mm f/2.8 lens. at 100 mm. Exposure triad f/2.8, 1/160 sec, ISO 3200. The image is straight out of camera with only a minor crop for composition and no retouching. The RAW to JPG conversion was done using Capture One Pro The camera performs exceptionally well as does the lens. there is no lack of sharpness, the color rendition is great as is the stabilization. There is a lot of great video produced using the GH5 but I am so pleased with the performance of this camera for stills.
"Refugees Welcome"
 After a lot of debate I decided to title this image "Refugees Welcome". In the past 6 months the topic of refugees has been dominant in the news. With Canada as one of the countries that has openly welcomed refugees, I felt this image represented the statement appropriately. The concrete totems can be viewed as either emerging or going into the St. Lawrence river in Northern Quebec.A little back story on this image: we had picked a number of location to photograph this morning but the incessant rain messed up our plans. So we stopped for a second breakfast and more coffee. - Well one just cant keep sitting in a restaurant for ever so I decided to get this image rain or no rain. It was pouring but I had my GH5 with the 12 - 35 mm f/2.8 (version 1) lens attached. I wanted to slow the shutter down so as to prevent capturing the water drops splashing on the water but was not going to venture back to the car to get my ND filters. I had my polarizer on so I closed down the aperture to f/18 that was enough to give me a shutter speed of 60 seconds at ISO 100 - yes it was quite dark and miserable. I held my hand over the front of the lens to prevent rain from ruining the image. The camera and lens were soaked but I got the image. I am convinced, first hand - the Panasonic Lumix GH5 is great in the rain. One day I might consider doing a dust test - Africa or India would be great for that.The following images are ones I have already posted on Facebook but wanted to include them as a record of the trip to Northern Quebec and New Brunswick over the 4th of July weekend 2017.


The GH5 continues to excel
With the exception of the last three years we typically go to Damariscotta Maine to photograph the Osprey fishing for alewives. The main reason for not going was the decline in activity. However we did spend this past weekend in a lovely B&B - The Mill Pond Inn in Nobleboro. It is a great place and has two of the finest hosts.My main purpose was to test out the GH5 for its tracking capability and the Dual IS 2 function. Both these images were shot with the GH5 and the Leica 100 - 400 lens, hand-held. Exposure was set to "Manual" and the ISO was set on Auto. The focus was set to 1 Area and reduced to its smallest size. All images processed using Capture One Pro, version 10I intentionally left the shutter speed slow so as to get a lot of motion in the wings and to have the water droplets streak. I panned this shot keeping the 1 Area on the bird's eye. As we waited for more action (that never happened) a Bald Eagle flew by in the distance and finally landed on a tree on the far bank. I knew that the bird was just to far to get a decent shot but I wanted to see what I could get irrespective. Once again this was hand held. I did increase the shutter speed to 1/1600 sec and the lens was out at 800 mm (FF equivalent).This next image is the un-cropped version.
 The next image is a crop at 1400 by 1050 pixels:
 #LumixLounge #wherelumixgoes #lumixusa #lumixGH5 #gh5 #birdphotography#birds #africa #wildlifephotography
GH5 with Leica 12-60mm at Shutterfest
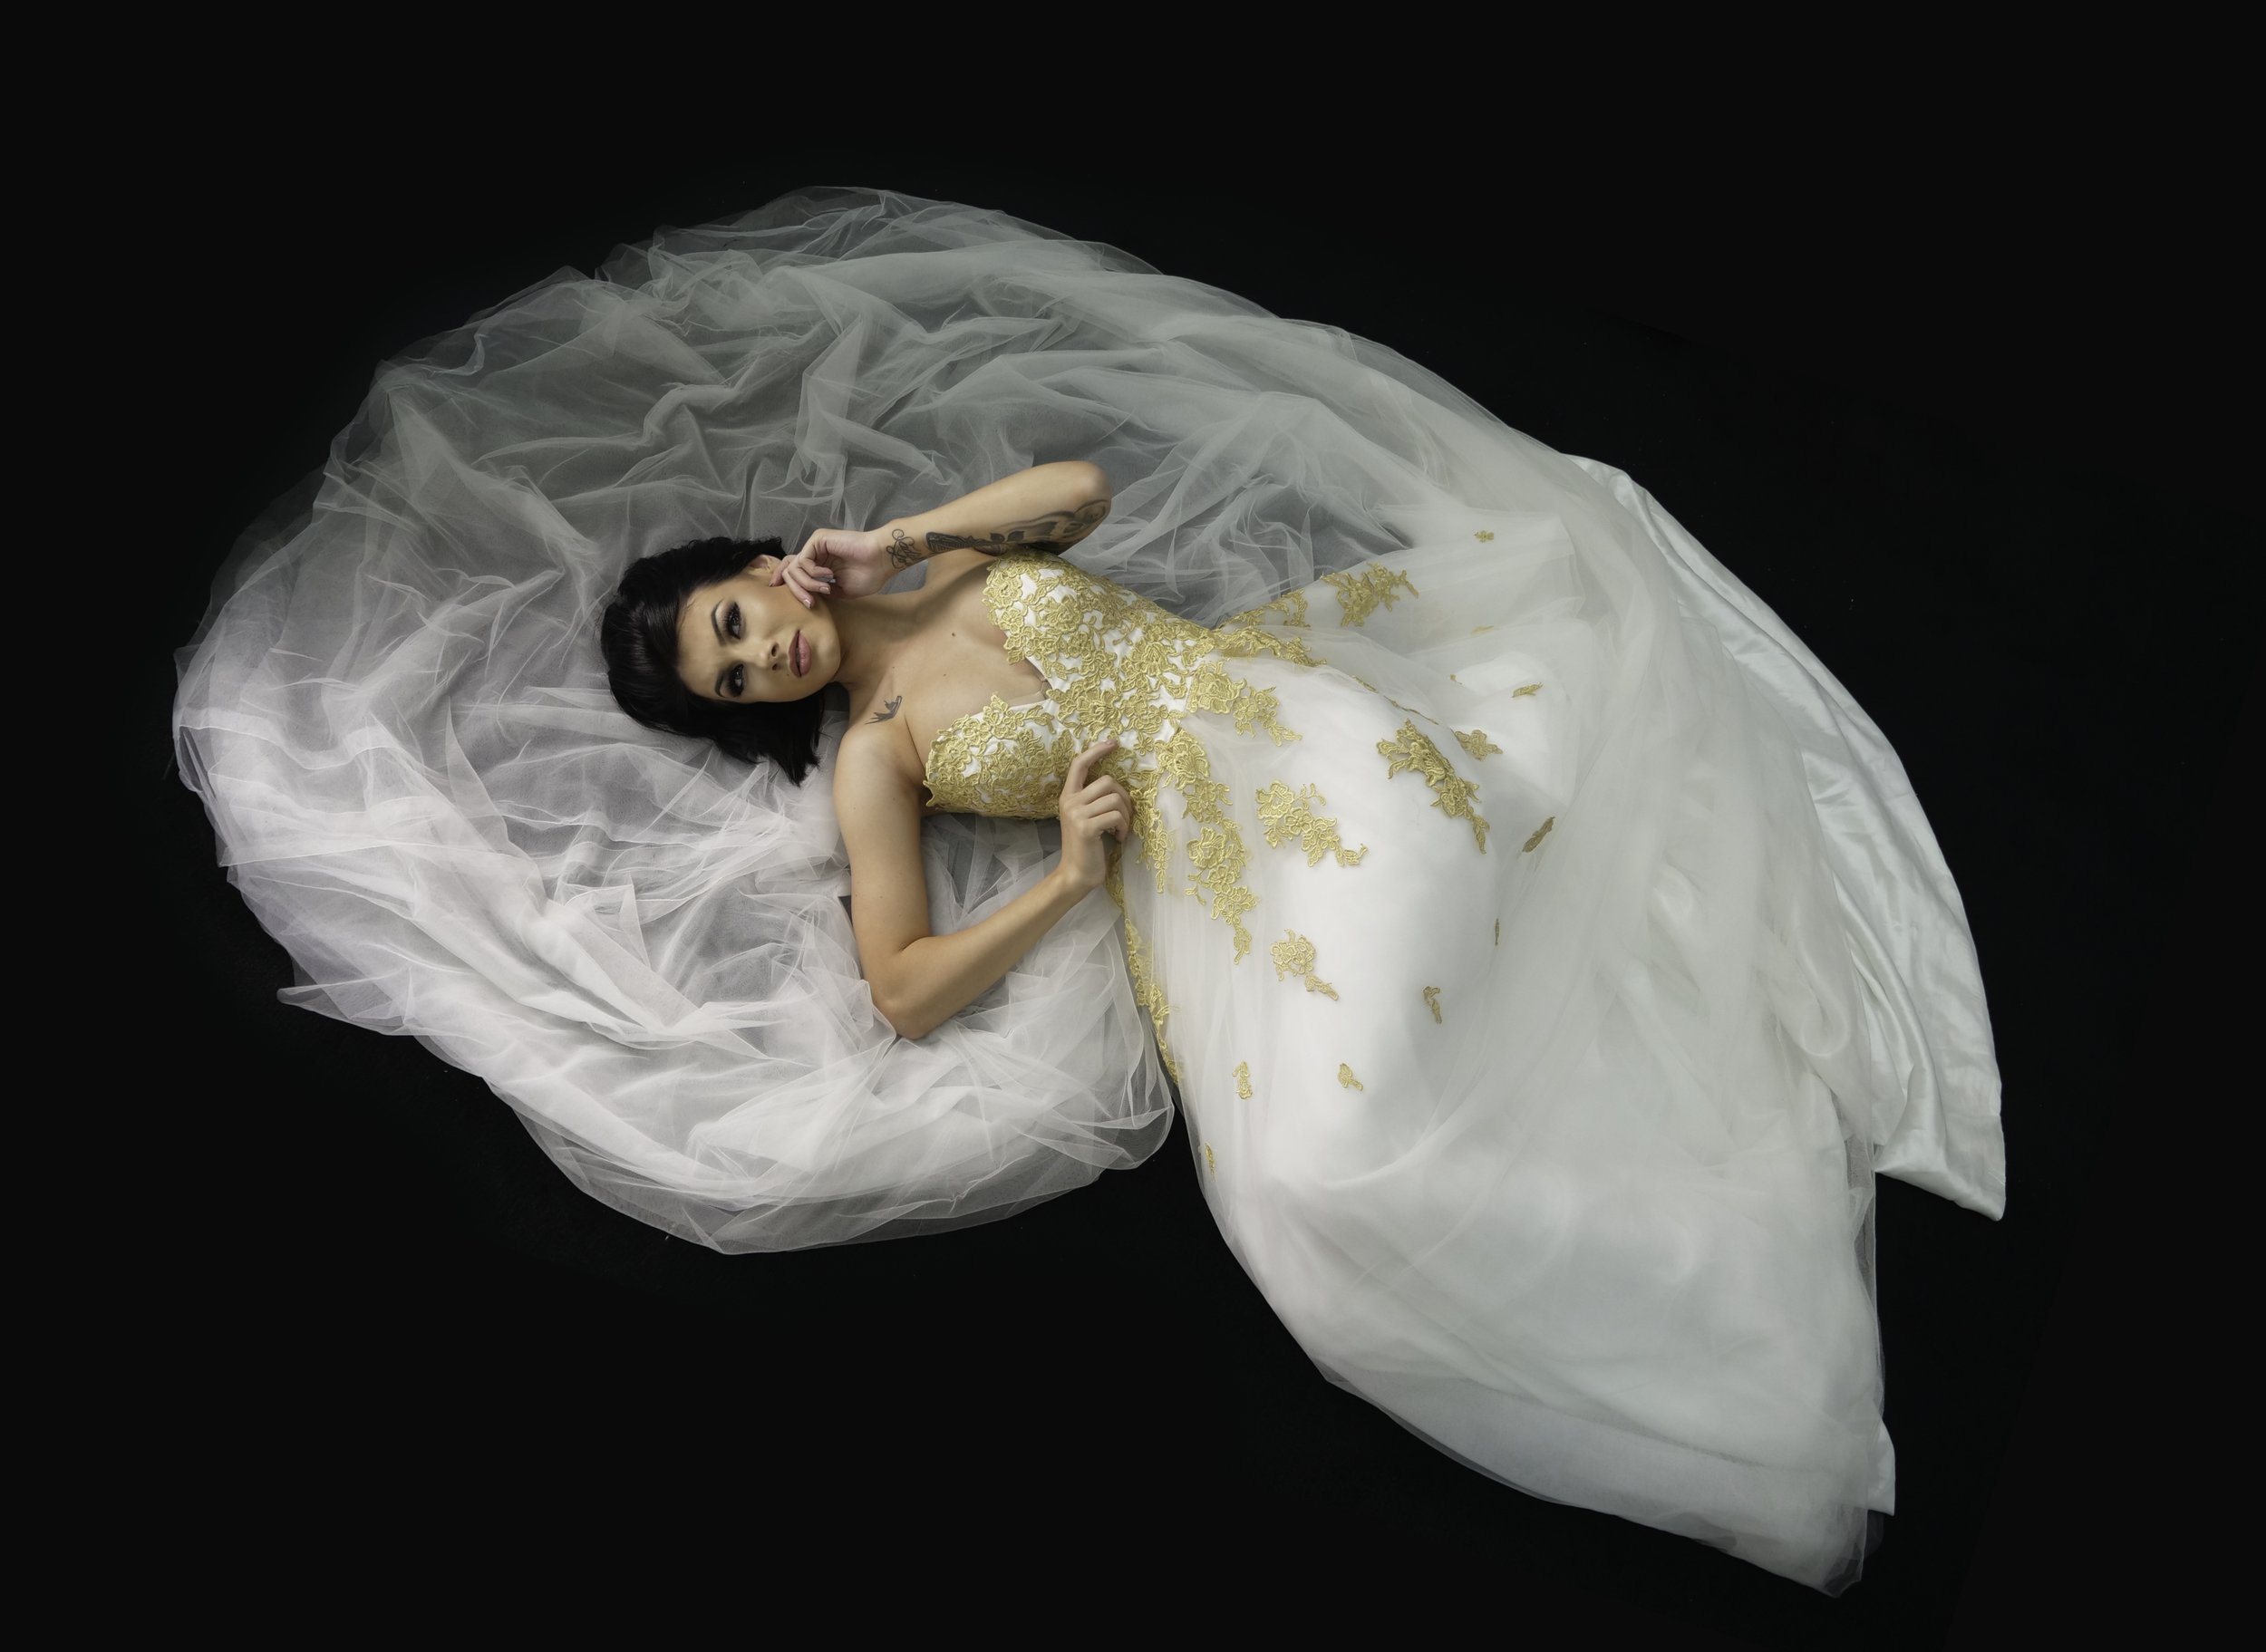 This was one of my very first images captured with the GH5 using the Leica 12 - 60 lens while the model was being prepped. The image is a jpg capture in sRGB. Click on the image to view it larger.
Ding Darling NWR and The Venice Rookery
So impressed with the capability of the the Lumix G85 and Leica 100 - 400 mm combination. Here are a few images from Venice Rookery and Ding Darling NWR.


Ruffled Feathers
A few more images from Ding Darling NWR. Wading birds in breeding plumage just look wonderful when they have their feathers ruffled. 


Reddish Egret at Ding Darling NWR
Managed a little time at the Ding Darling NWR on Sanibel Island. The Reddish were very active but because of the water levels remained at a distance. These two images were captured using the Panasonic Lumix G85 and the Leica 100 - 400 mm lens. It is nice to have an 800 mm equivalence. 

Lumix G85 4K Photo
 On my visit to Ft. Myers I wanted to test the 4K Photo Mode capability of the Panasonic Lumix G85. The image shown was captured in 4K photo mode on March 14, 2017. The entire sequence was imported as a video file. I did not want to select and save a JPEG file in camera. Saving a JPEG is the suggested method for 4K Photos. The video frames were exported at individual TIFF files with a frame resolution of 3328 by 2496 pixels (an 8Mb file) this was processed in Capture One ver. 10 and exported as a JPEG for web display. The camera was mounted with the Leica 100 - 400 mm lens, hand-held using "Dual IS". For reference purposes the scene's exposure triad was ISO 800, f6.3, 1/250 sec.
Lume Cube Review
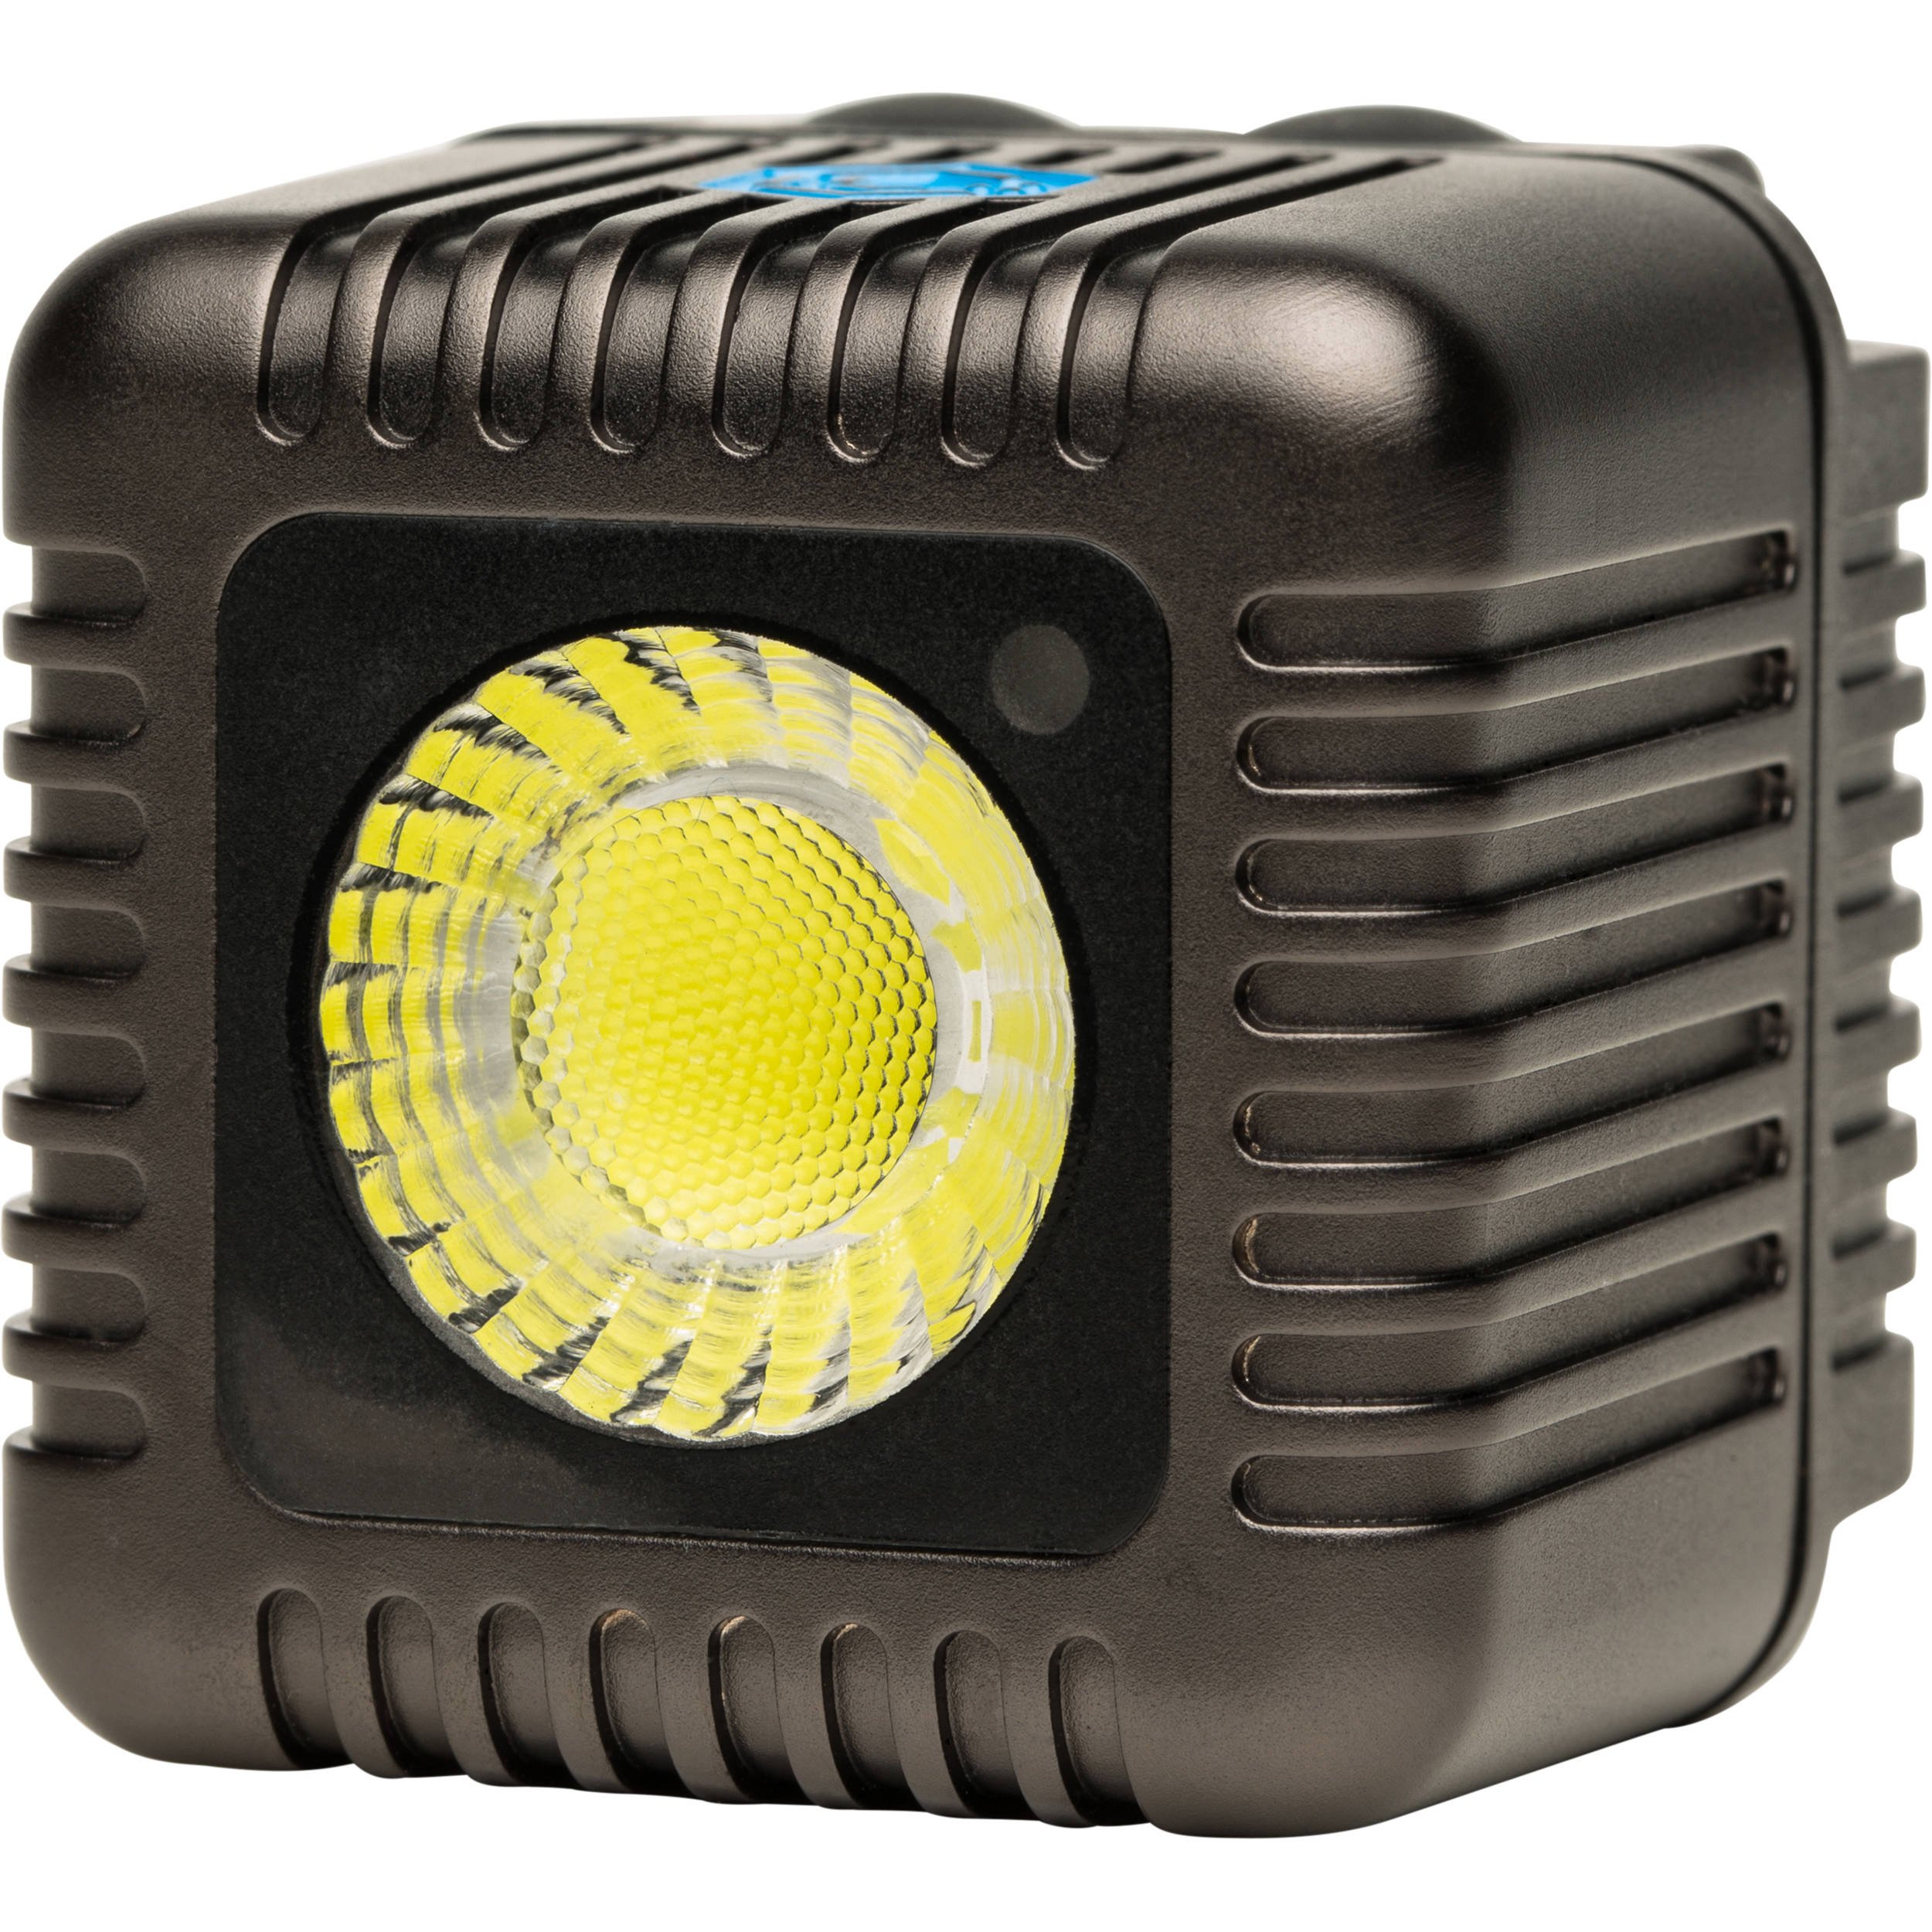 The makers of Lume Cube have a new smaller and less powerful but a highly efficient light designed for phone photography called the Life Lite. This is a smart, Bluetooth controlled, pocket-sized Lifestyle Light for iPhone, Android, DSLR or a GoPro. The Life Light will be available in March.This gadget review however, is of the original Lume Cube and the cheaper version that does not have any bluetooth connectivity. Both are identical in performance and while you can controll one with a smart phone the lite version is all manual. I have been using the Lume Cube for many months and have been most satisfied with its performance and portability. I have used these lights for macro, video and portraiture and love the results they have helped produce.Specs:
- Type LED
- Output Variable: 0 to 1500 Lumens
- Strobe: Variable 1/8000 to 1 second
- Mount Type: 1/4"-20 female
- Power Source: Integrated battery
- Battery Duration: 100% Brightness: 20 minutes; 90% Brightness: 60 minutes; 50% Brightness: 120 minutes
- Power Connector: USB (for charging)
- Waterproof Depth: 100' / 30.5 m
- Dimensions: 1.5 x 1.5 x 1.5"
CLICK HERE TO ORDERThe Lume Cube comes in a small cube shaped cardboard box that contains the Lume Cube and a USB charging cable.You do need to unscrew a small cover to access the charging port. This access cover is a requirement as the Lume Cube is rated to be waterproof to depth of 100 feet.Shaped as a cube, the unit has two rubberized push button switches on the top and a 1/4 20 mount that can be used to mount the light on a light stand, tripod or any flexible light mounting device.The two push buttons control the video light and the alternate flash function of the device. Each time you depress the on/off video switch the light cycles through 10 levels of intensity.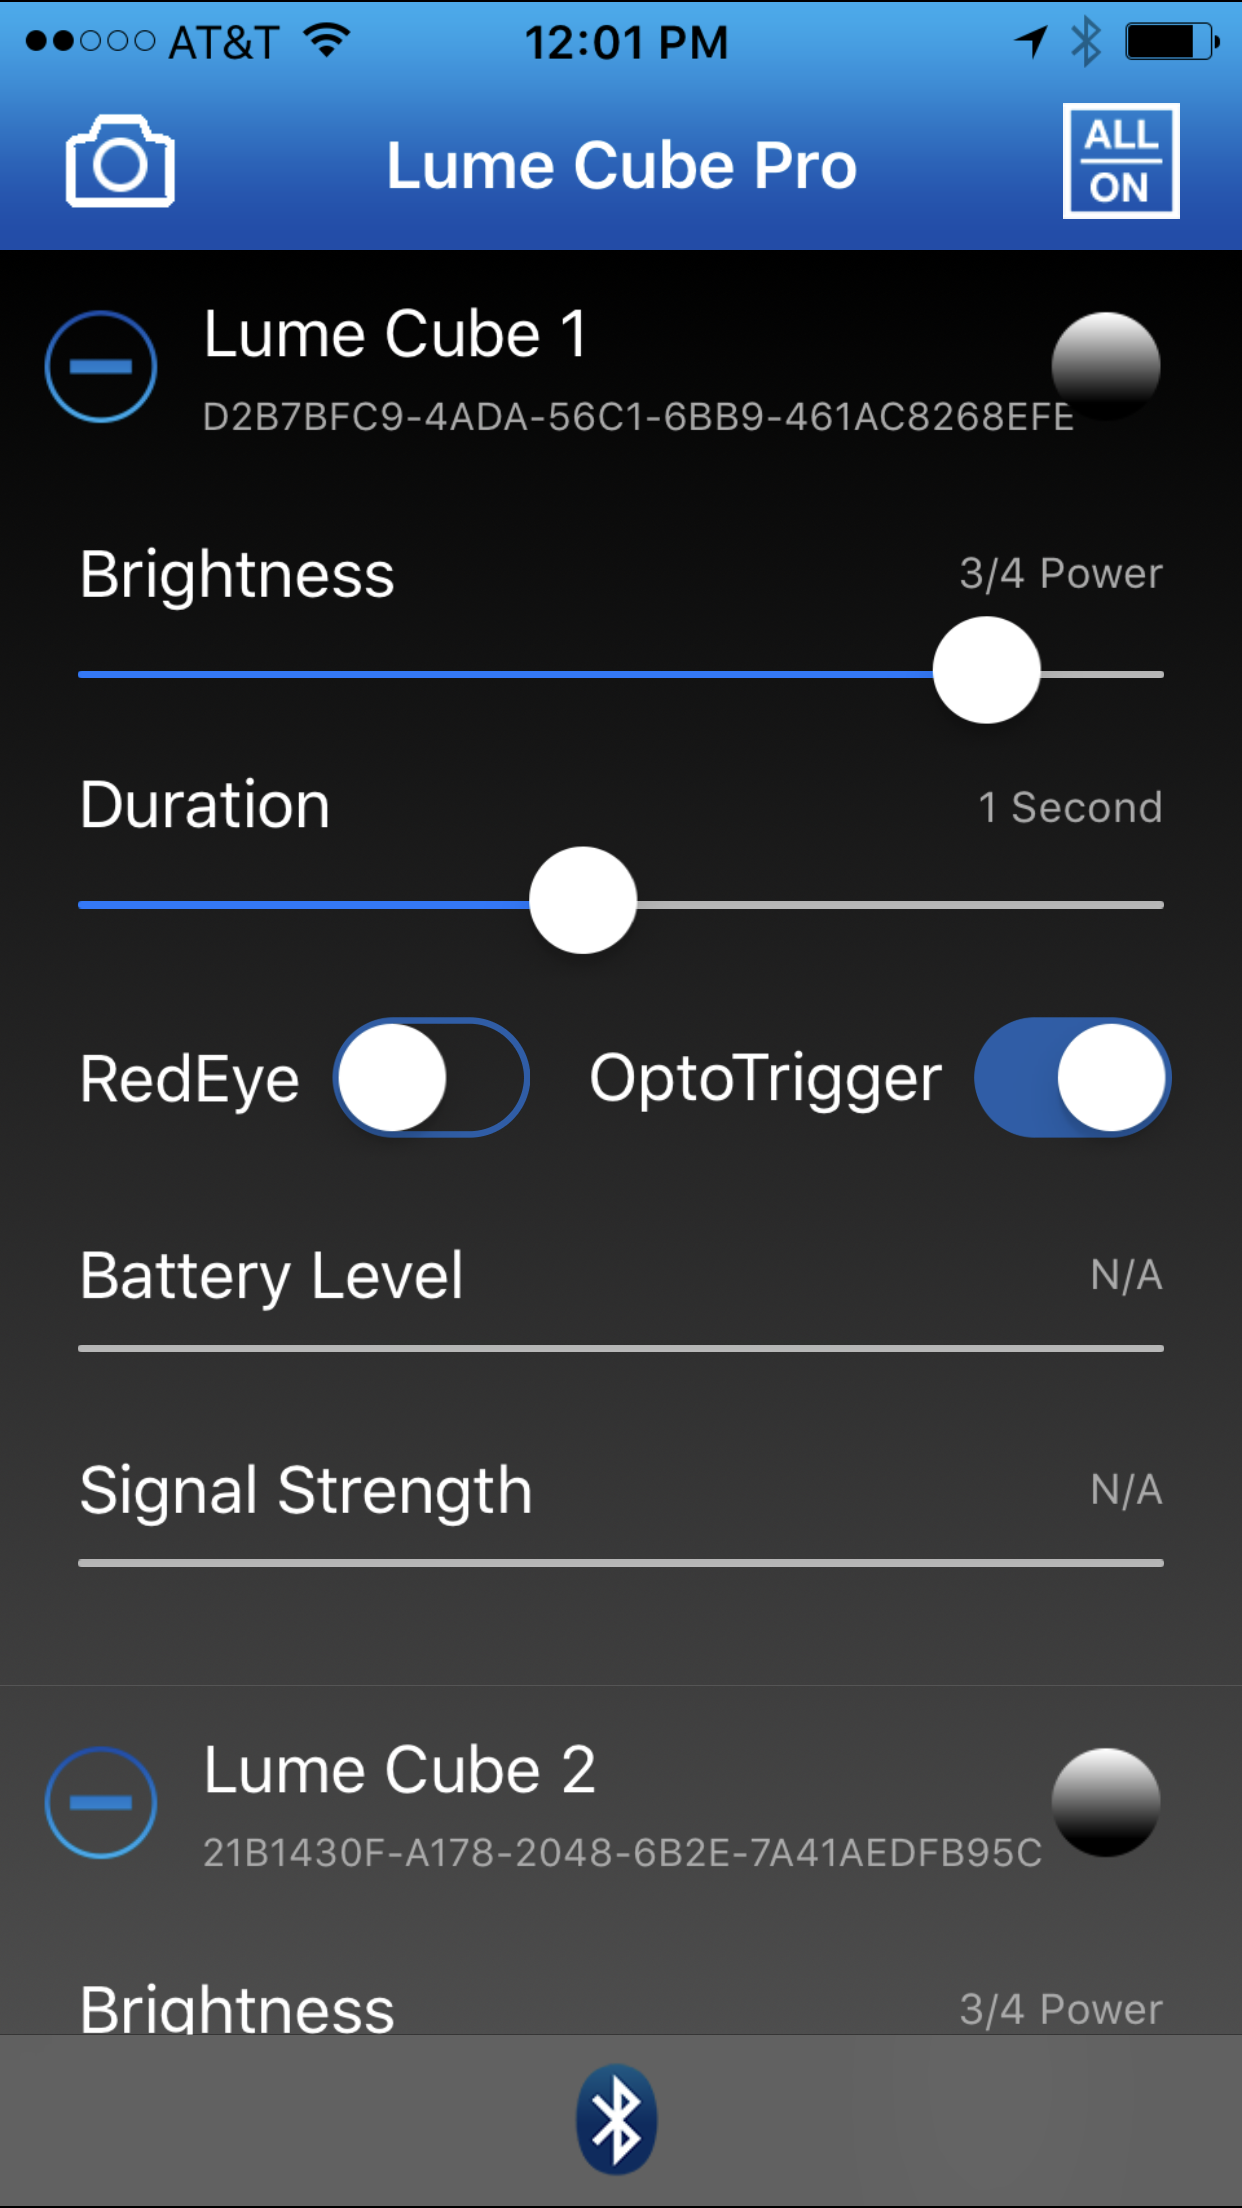 You can also control the Lume Cube using the mobile app. Lume Cube has simplified its lighting controls with a proprietary wireless, Bluetooth-enabled app, available on both Apple iOS and Android. The app is capable of controlling up to 5 Lume Cubes simultaneously. The app allows you to adjust the brightness, flash duration and red eye latency on each Lume Cube independently; and with its onboard optical sensor, Lume Cube can be configured as a slave flash unit to be fired by any other external flash.You have to register your Lume Cube to sync it to your app once registered you can control all your Lume Cube’s power and settings separately.Lume Cube Setup and test for portraitsTo test the Lume Cubes I fitted two Lume Cubes on two separate light stands. The “Main” Lume Cube was place so as to create Rembrandt lighting on the dummy head. The second was place to create a gentle fill. As you can see from the image below, the Lume Cube, due mainly to its size creates a fairly hard light. The settings were ISO 200, f/1.7 at 1/125 sec. using a Panasonic Lumix GX85 body and a Lumix 42.5mm f/1.7 lens wide open. The light emitted is cool and for this test I used an X-Rite Color Checker Passport to balance the temperature.
 The second test was conducted with the same placement of the lights but instead of the Lume Cubes facing the dummy head directly the light was bounced off two Rogue Flash Benders. No Diffusion material was used.As you can see the light was much softer and way more pleasing in the image below. The settings were ISO 640, F/1.7 at 1/80 sec. Clearly there is about 3 stops of light loss when using the Flash Benders. However, the soft light is excellent for portraiture.
 Lume Cube for Macro/Close-up PhotographyThe Lume Cube produces a really hard light as it is a very small light, but also a very powerful one. The Lume Cubes were about 1.5 inches from the subject. Exposure triad: F/4, 1/800 sec., ISO 640. The lens was a 30mm macro with an extension tube. Camera: Panasonic Lumix GX85.The following is the setup:
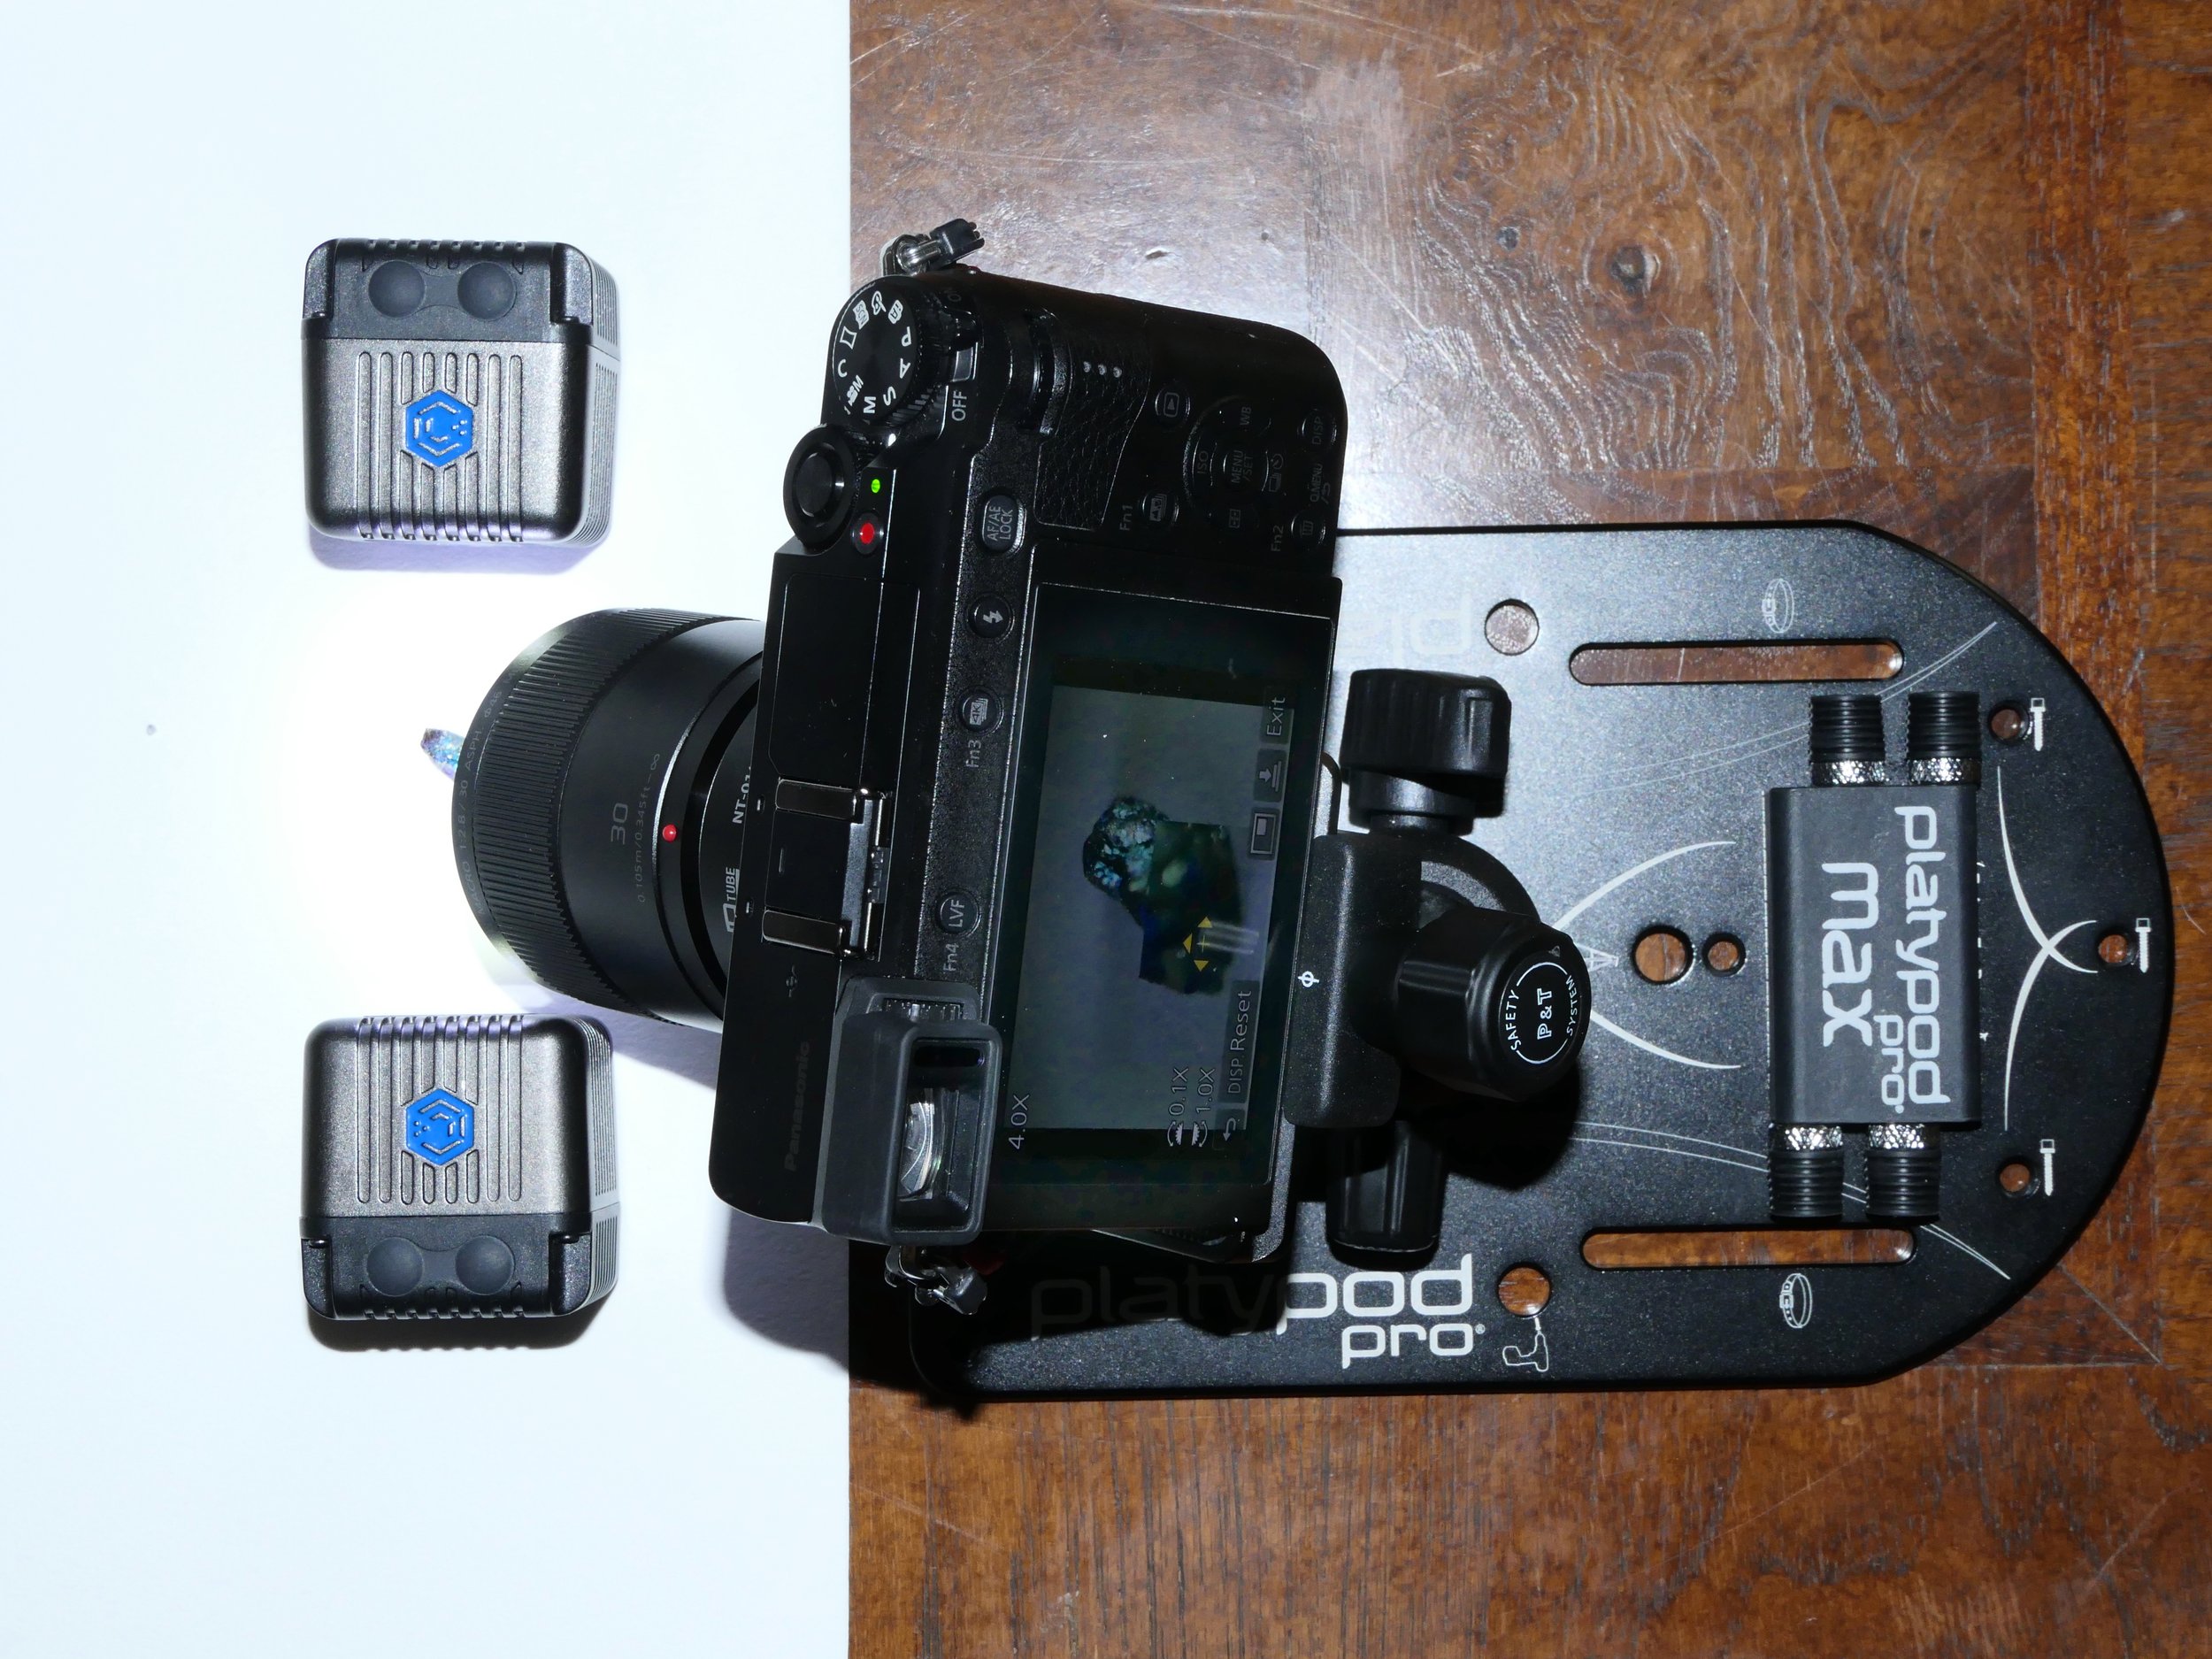 The image shown below is a 45 image stack using the GX85's focus bracketing feature.
 The portability of these little powerhouses has me convinced, and I tend to carry two in my bag at all times.CLICK HERE TO ORDER
Aquatic Birds of Florida
Before I say anything, I want to make it perfectly clear that I am not a videographer. I captured these clips while I was in Florida during the Space Coast Birding and Wildlife Festival, late January 2017. All these were captured during my photo walks/drives in Black Point Wildlife Drive in Merritt Island. The primary purpose was to tryout the "In Body Image Stabilization" aka IBIS of the Panasonic Lumix G85 camera body. The camera was used with the Leica 100 - 400 mm lens at its full extension that is an equivalent of 800 mm (most of the time). All footage was captured hand-held and in many instances during high winds and rain. It is important to note, that all the footage was captured before Panasonic released two major firmware updates, one of the camera and the other for the lens. What this means is that the Dual IS function was not in effect when these videos were captured. I was very impressed with the performance of this camera and lens combination and will be doing a comparison to see the impact of the new firmware when I am at the next conference in St. Augustine in April.To see the video in 4K please CLICK HERE to be directed to YouTube [video type="youtube" id="i1exFCyhtGU" width="600"]Default Message[/video]
Panasonic Lumix GH5 - WOW!!!!
What a great way to start the new year. Panasonic today announced the full specs for their flagship camera the GH5. Here are two links that say it all:https://www.youtube.com/watch?v=1eRbB6kLCE8&t=327sandhttps://www.youtube.com/watch?v=xbYLMFbiMtA
Iceland Sept 2016 - IR was fun
On a whim I took my IR converted Panasonic Lumix G7 to Iceland. Knowing fully well that a lack of deciduous trees could yield not so great IR images but wanted to try it out anyway. Here are a few from various locations. All images were processed using Capture One 9.2 and then converted to Monochrome using Silver Efex Pro.


Panasonic Lumix Post Focus Stack vs. Racked Focus Stacking
This comparison was done using the in camera "Post Focus" feature of the Lumix GX85 for one image and an automated focus rack of the same number of images (40 total) as RAW files. The "Post Focus" video was rendered into an image sequence using Photoshop and the output files were generated as TIFF. Both sequences were stacked using Helicon Focus using the Depth Map option for stacking. Each stack was saved as a TIFF file. The images were cropped to proportion and exported using Lightroom. Both stacks are excellent, further validating the viability of the "Post Focus" capability of Lumix cameras. The lens used was the Lumix H-HS030 30mm f/2.8 macro at f/4.0, ISO 200, 1/100 sec.Please click on the images for a larger view.

Whales - Cape Cod
 We had an exceptional whale watch on July 23rd. Having been on many whale watches, this was my first time experiencing Humpback Whales bubble feeding. This method of feeding behavior is when the whales blow clouds or rings of bubbles around a school of fish. The bubbles then rise around the fish which are trapped inside the column of rising bubbles while the whales rise up with their mouths open and trap the fish using baleen as the filtering mechanism. “Bubble feeding” is unique to the Humpback whales.
 We were also fortunate to watch a fairly recent feeding method that has been adopted by the Humpback Whales - "Kick feeding" where the whale pounds the surface of the water with its tail before diving and blowing a bubble ring. It is believed that the tail pounding stuns the fish and makes them easier to catch.All Monica's images were captured using a Panasonic Lumix GX8 and the Lumix 35 - 100 mm f/2.8 lens


The Joy of Mirrorless and IR
 Typical cameras are designed to capture the visible spectrum. Geting your camera converted to capture IR opens up another world of photography.Keep in mind that IR wavelength is longer than the wavelength range of the visible spectrum and thereby focuses differently. When you convert a DSLR you are limited to certain focus adjustments that must be made so as to achieve the best quality of images with sharp focus. As lenses with different focal lengths behave differently you need to select one lens and have the camera sensor calibrated to achieve sharp focus with that lens. Any other lenses will not be in a position to achieve good focus. Live view can help but it is not the best option.Mirrorless cameras on the other hand rely on the imaging sensor for focus attainment and metering they are able to discern the IR focus shift in real time and adjust accordingly. This feature allows you to use any lens, prime or zoom and capture sharp IR images.In my opinion a mirrorless cameras with no in body image stabilization is a better choice for conversion.Lifepixel is who I use and their service and conversions are exceptional. Click on the icon to get started.
![]() Use the coupon code shivverma50 to get $50 Off with a Priority Processing Upgrade - this coupon code expires on August 6, 2016
Use the coupon code shivverma50 to get $50 Off with a Priority Processing Upgrade - this coupon code expires on August 6, 2016
July 2, 2016 Fireworks in Boston


Panasonic GX85 with the Leica 100 - 400mm lens
I received my GX85 a few days ago but yesterday was the first opportunity to try it out. The GX85 with the Leica 100-400 is a superb combination. Both these images are considerable crops. There are two recently fledged Downy Woodpeckers, a male and a female who frequent the back yard. I am most impressed with the detail from the GX85 (no anti-aliassing filter) and excellent image stabilization.
