
Lume Cube Review
 The makers of Lume Cube have a new smaller and less powerful but a highly efficient light designed for phone photography called the Life Lite. This is a smart, Bluetooth controlled, pocket-sized Lifestyle Light for iPhone, Android, DSLR or a GoPro. The Life Light will be available in March.This gadget review however, is of the original Lume Cube and the cheaper version that does not have any bluetooth connectivity. Both are identical in performance and while you can controll one with a smart phone the lite version is all manual. I have been using the Lume Cube for many months and have been most satisfied with its performance and portability. I have used these lights for macro, video and portraiture and love the results they have helped produce.Specs:
- Type LED
- Output Variable: 0 to 1500 Lumens
- Strobe: Variable 1/8000 to 1 second
- Mount Type: 1/4"-20 female
- Power Source: Integrated battery
- Battery Duration: 100% Brightness: 20 minutes; 90% Brightness: 60 minutes; 50% Brightness: 120 minutes
- Power Connector: USB (for charging)
- Waterproof Depth: 100' / 30.5 m
- Dimensions: 1.5 x 1.5 x 1.5"
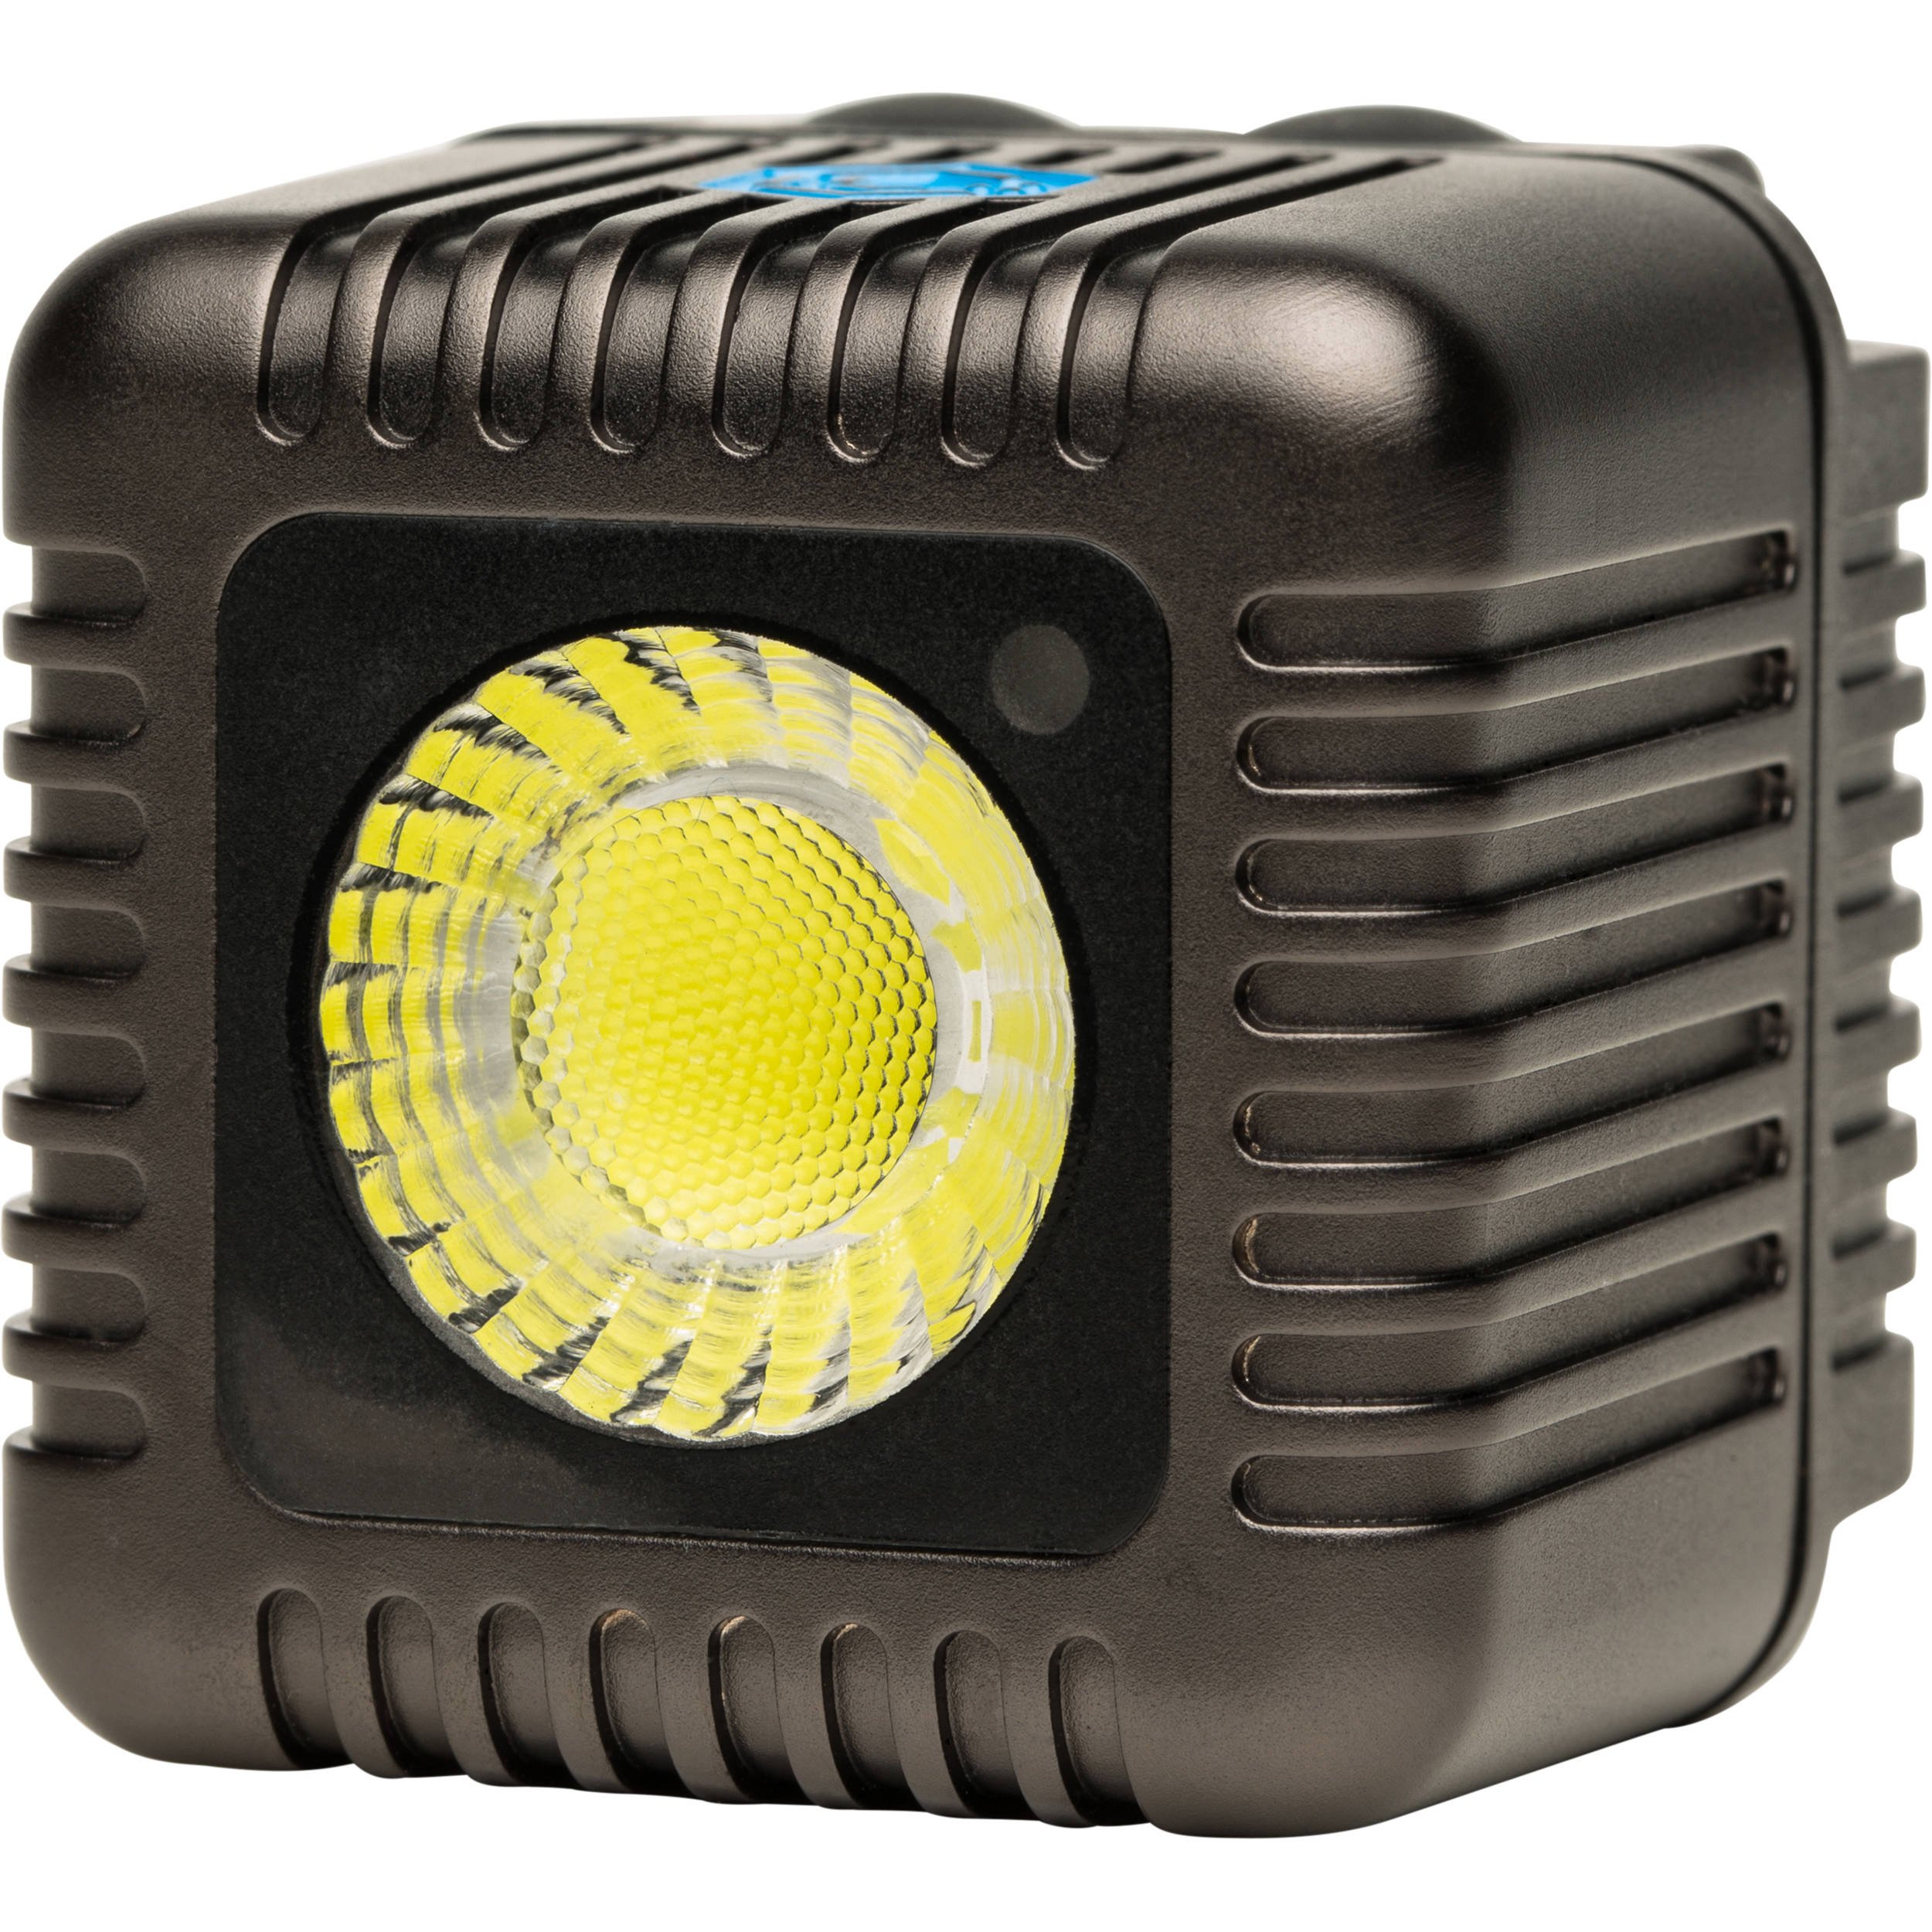
CLICK HERE TO ORDERThe Lume Cube comes in a small cube shaped cardboard box that contains the Lume Cube and a USB charging cable.You do need to unscrew a small cover to access the charging port. This access cover is a requirement as the Lume Cube is rated to be waterproof to depth of 100 feet.Shaped as a cube, the unit has two rubberized push button switches on the top and a 1/4 20 mount that can be used to mount the light on a light stand, tripod or any flexible light mounting device.The two push buttons control the video light and the alternate flash function of the device. Each time you depress the on/off video switch the light cycles through 10 levels of intensity.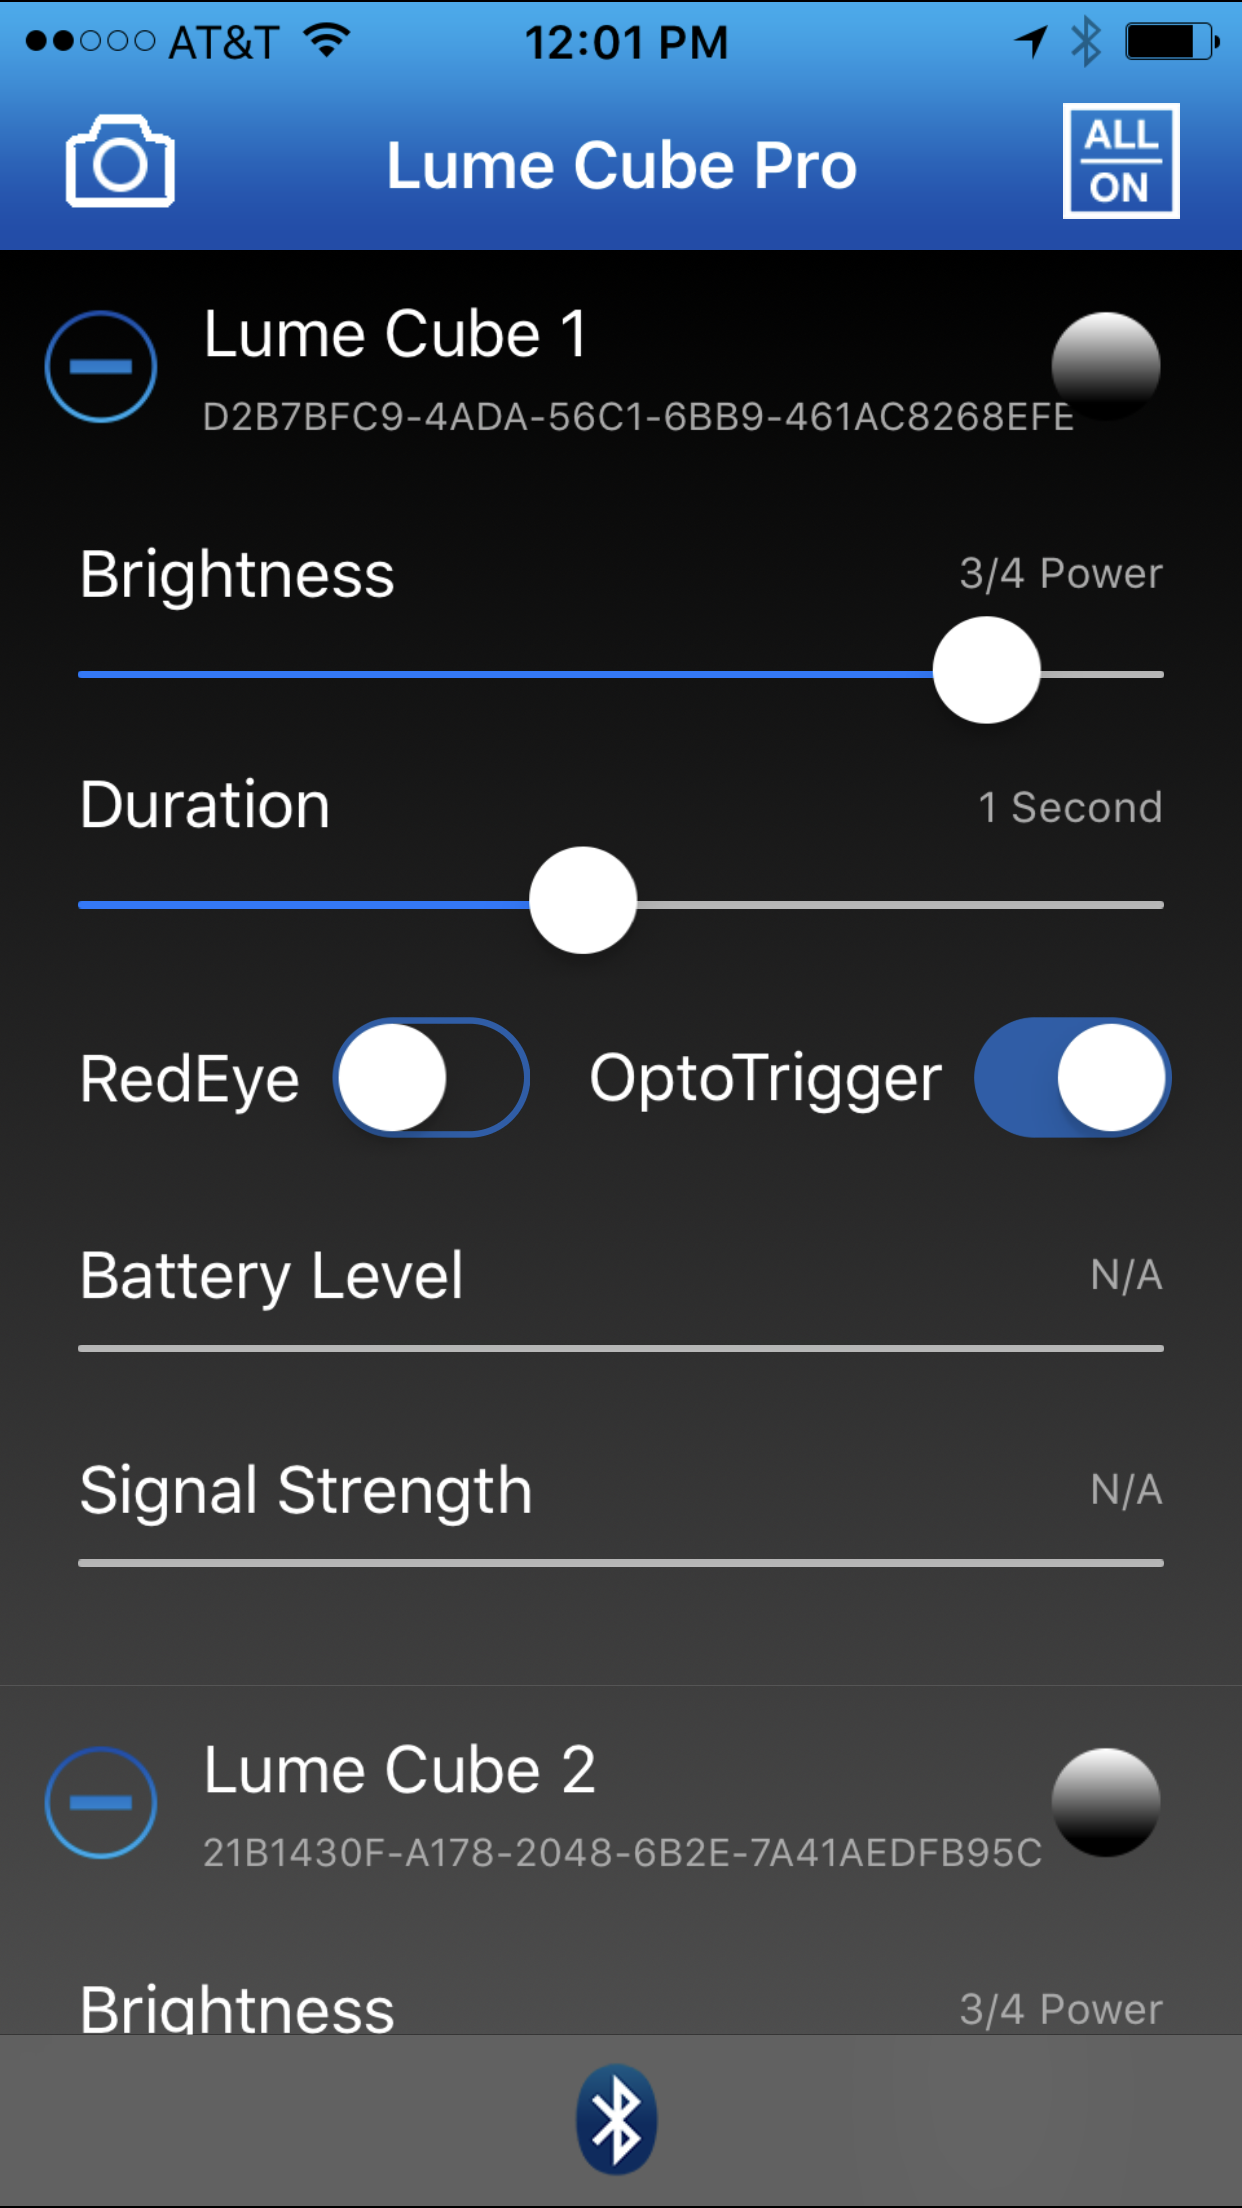 You can also control the Lume Cube using the mobile app. Lume Cube has simplified its lighting controls with a proprietary wireless, Bluetooth-enabled app, available on both Apple iOS and Android. The app is capable of controlling up to 5 Lume Cubes simultaneously. The app allows you to adjust the brightness, flash duration and red eye latency on each Lume Cube independently; and with its onboard optical sensor, Lume Cube can be configured as a slave flash unit to be fired by any other external flash.You have to register your Lume Cube to sync it to your app once registered you can control all your Lume Cube’s power and settings separately.Lume Cube Setup and test for portraitsTo test the Lume Cubes I fitted two Lume Cubes on two separate light stands. The “Main” Lume Cube was place so as to create Rembrandt lighting on the dummy head. The second was place to create a gentle fill. As you can see from the image below, the Lume Cube, due mainly to its size creates a fairly hard light. The settings were ISO 200, f/1.7 at 1/125 sec. using a Panasonic Lumix GX85 body and a Lumix 42.5mm f/1.7 lens wide open. The light emitted is cool and for this test I used an X-Rite Color Checker Passport to balance the temperature.
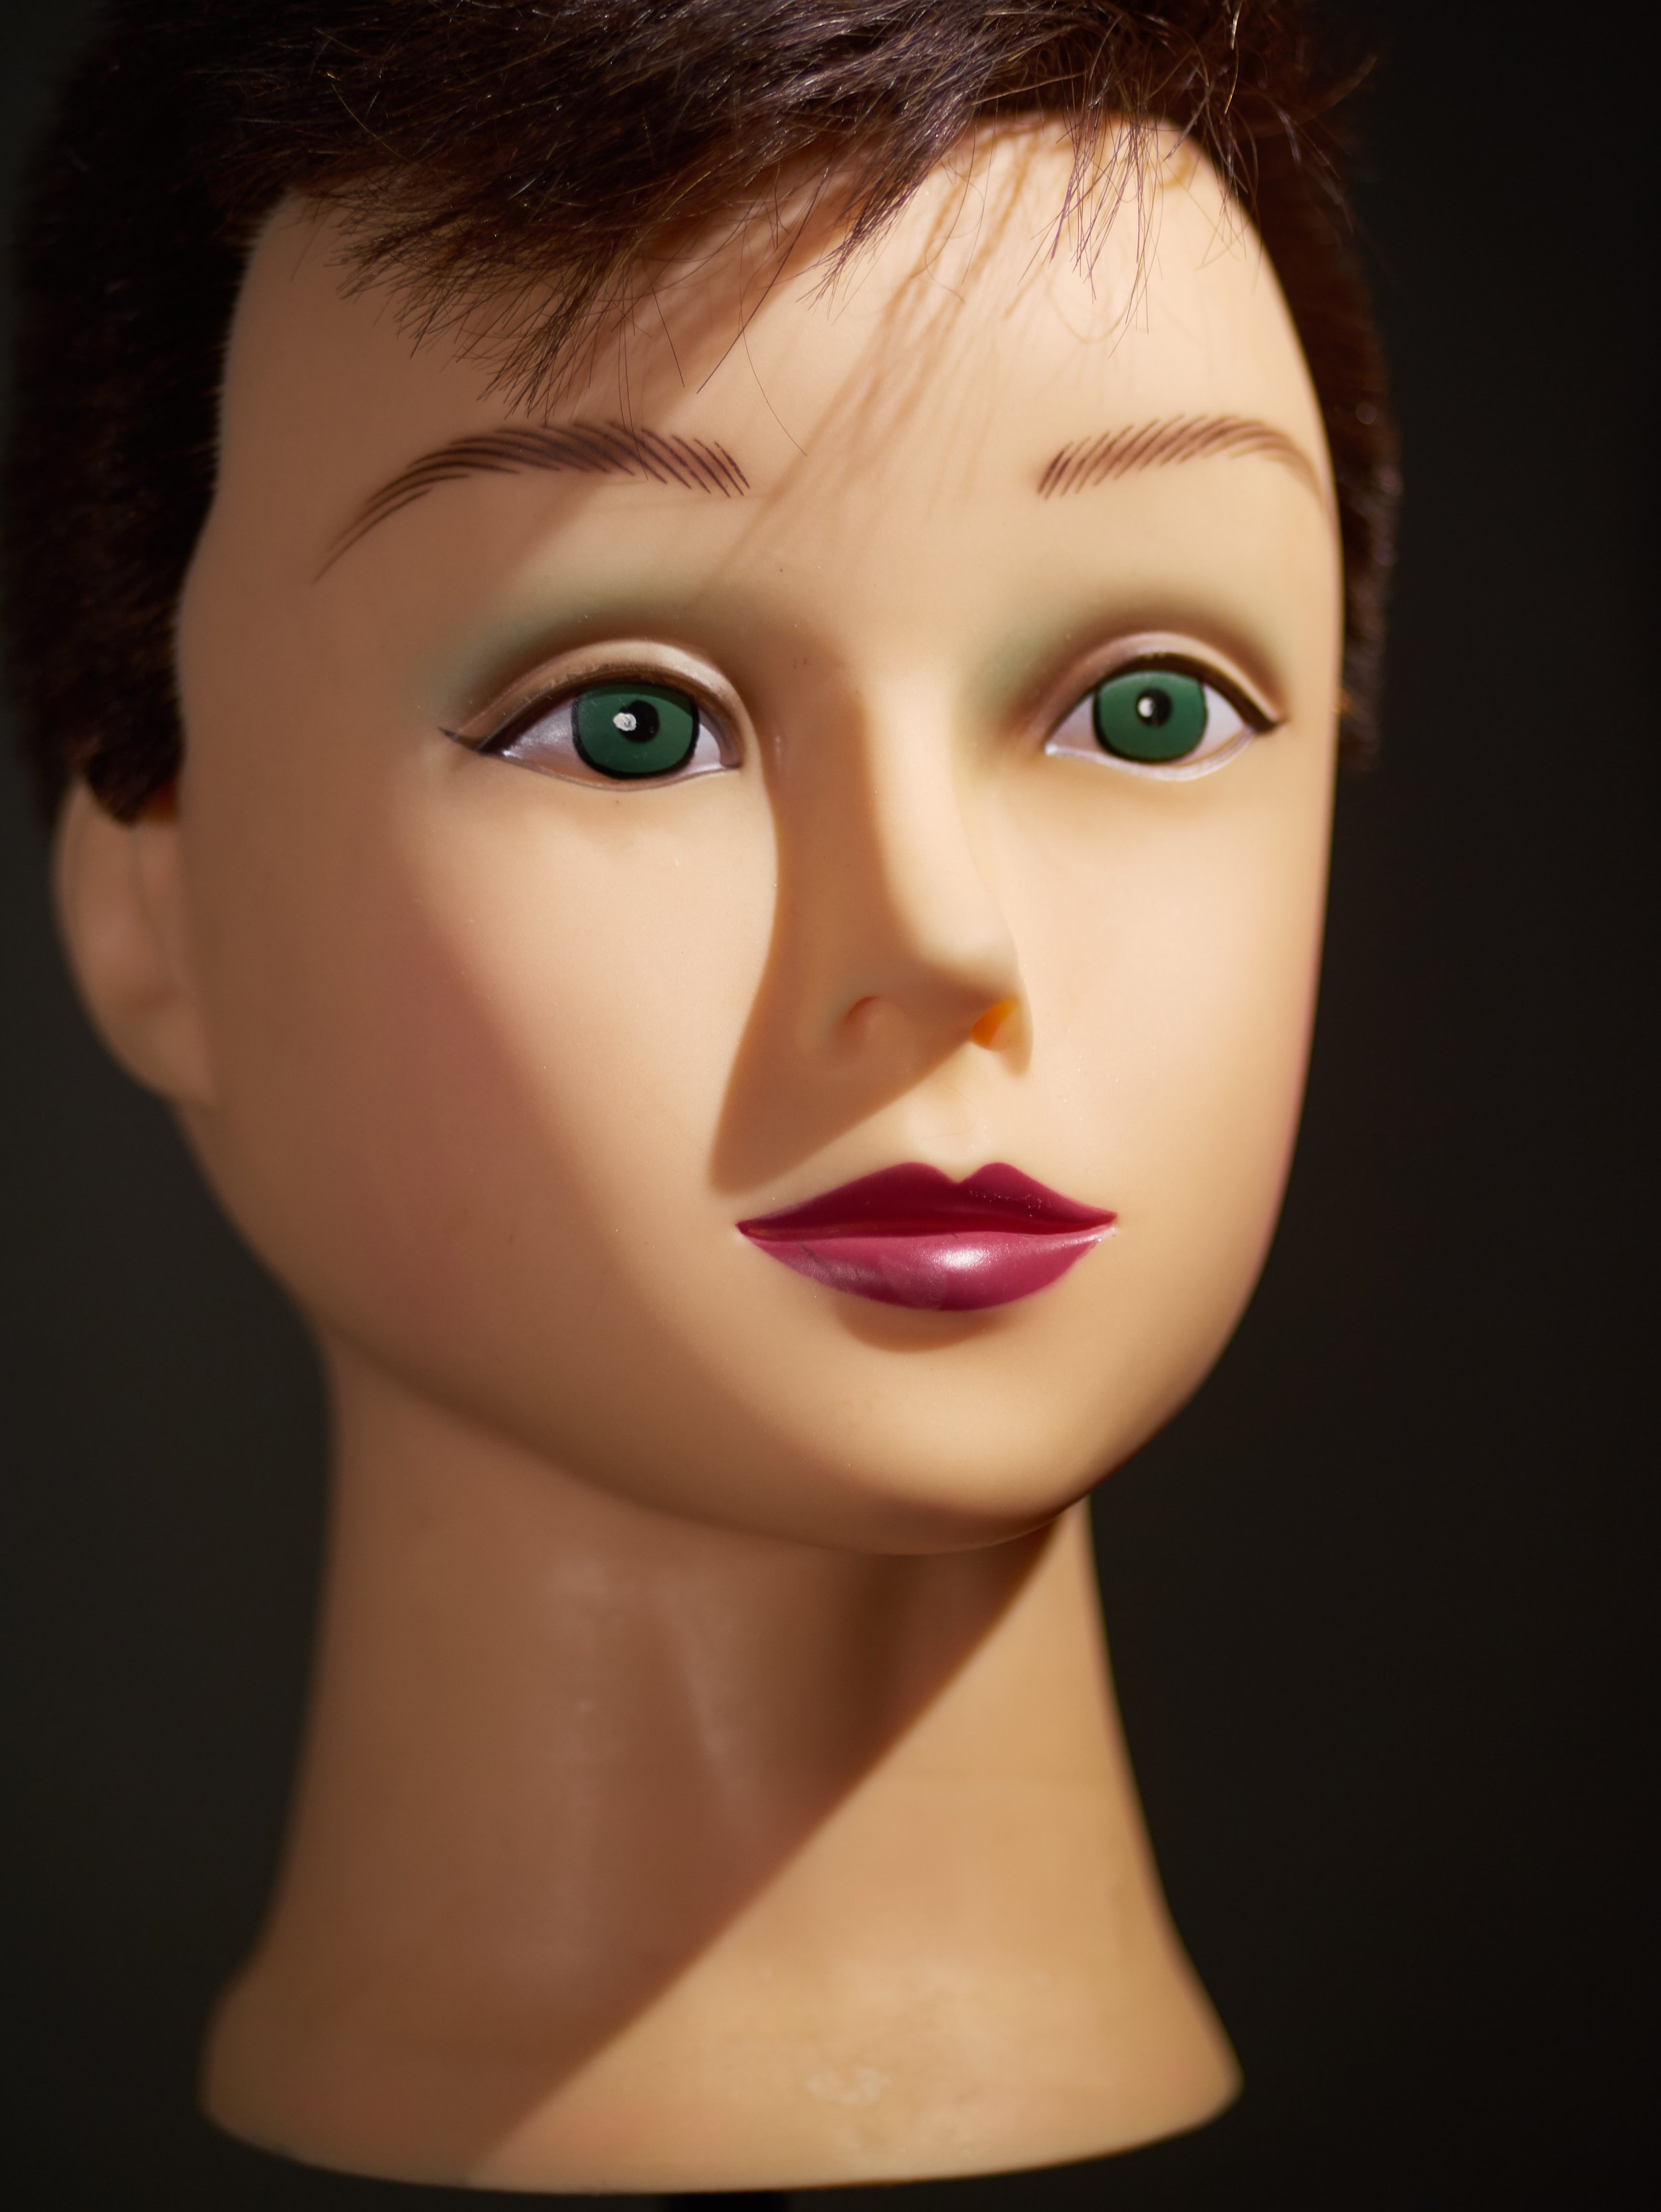 The second test was conducted with the same placement of the lights but instead of the Lume Cubes facing the dummy head directly the light was bounced off two Rogue Flash Benders. No Diffusion material was used.As you can see the light was much softer and way more pleasing in the image below. The settings were ISO 640, F/1.7 at 1/80 sec. Clearly there is about 3 stops of light loss when using the Flash Benders. However, the soft light is excellent for portraiture.
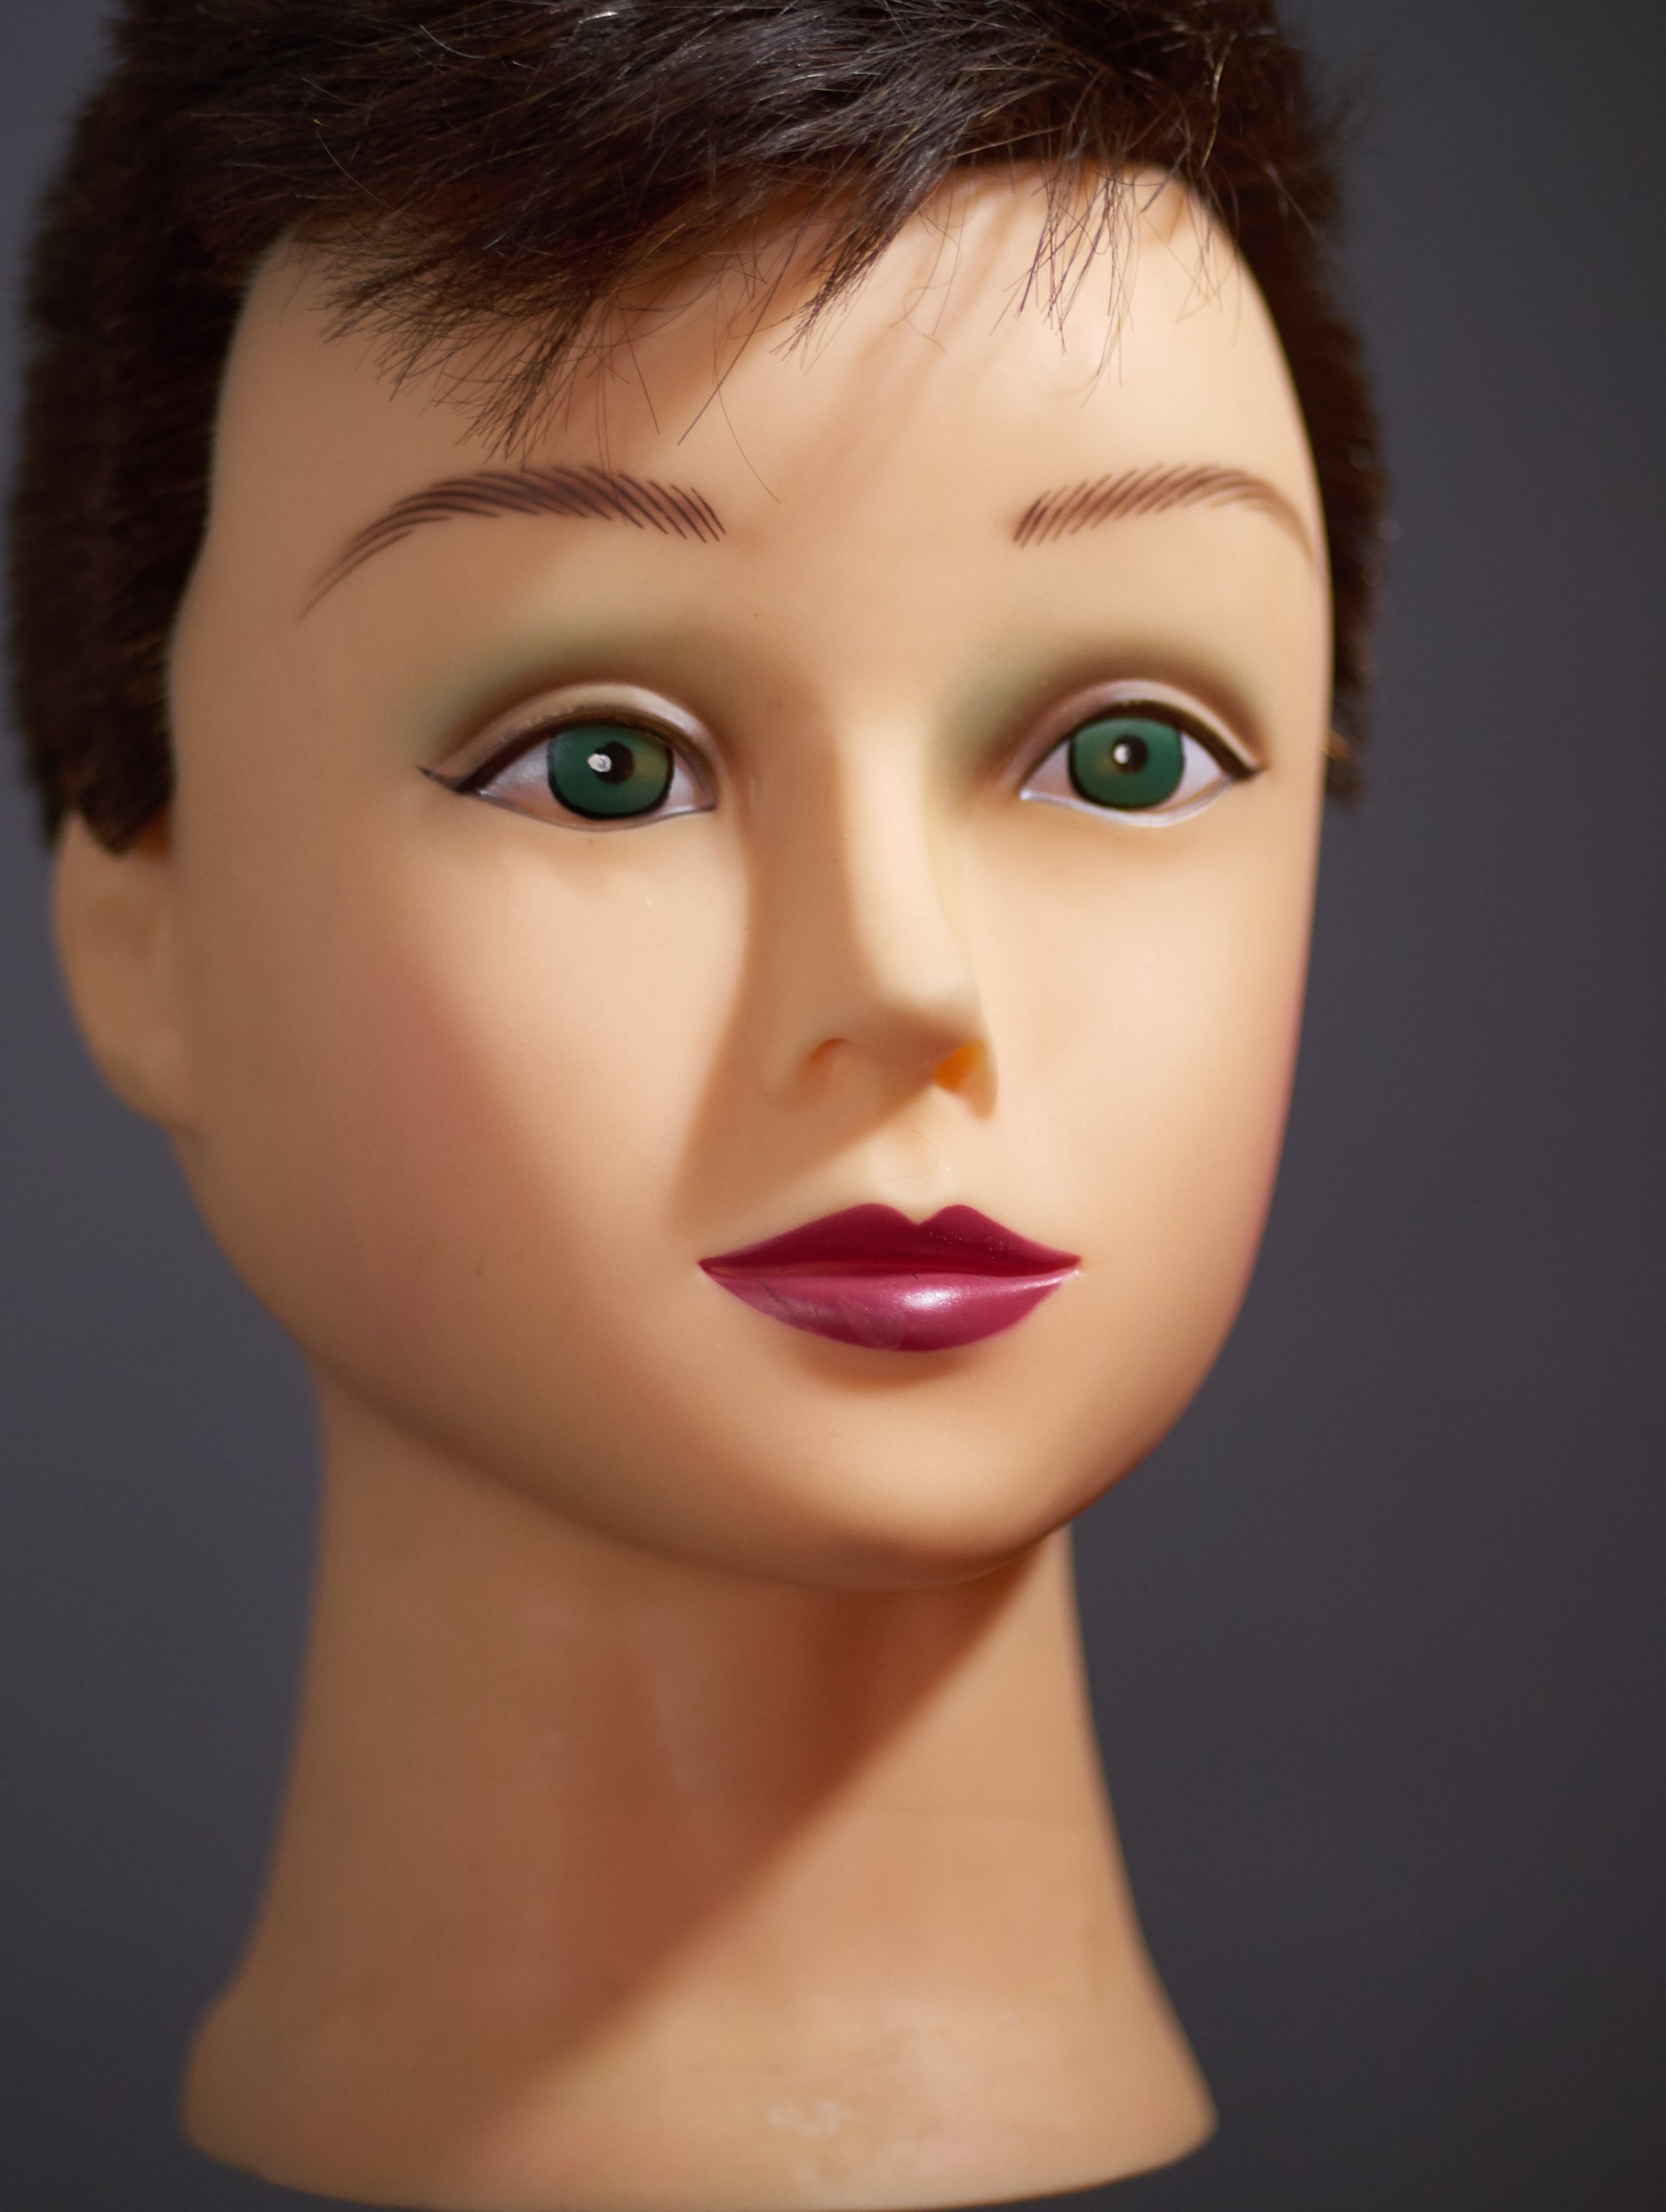 Lume Cube for Macro/Close-up PhotographyThe Lume Cube produces a really hard light as it is a very small light, but also a very powerful one. The Lume Cubes were about 1.5 inches from the subject. Exposure triad: F/4, 1/800 sec., ISO 640. The lens was a 30mm macro with an extension tube. Camera: Panasonic Lumix GX85.The following is the setup:
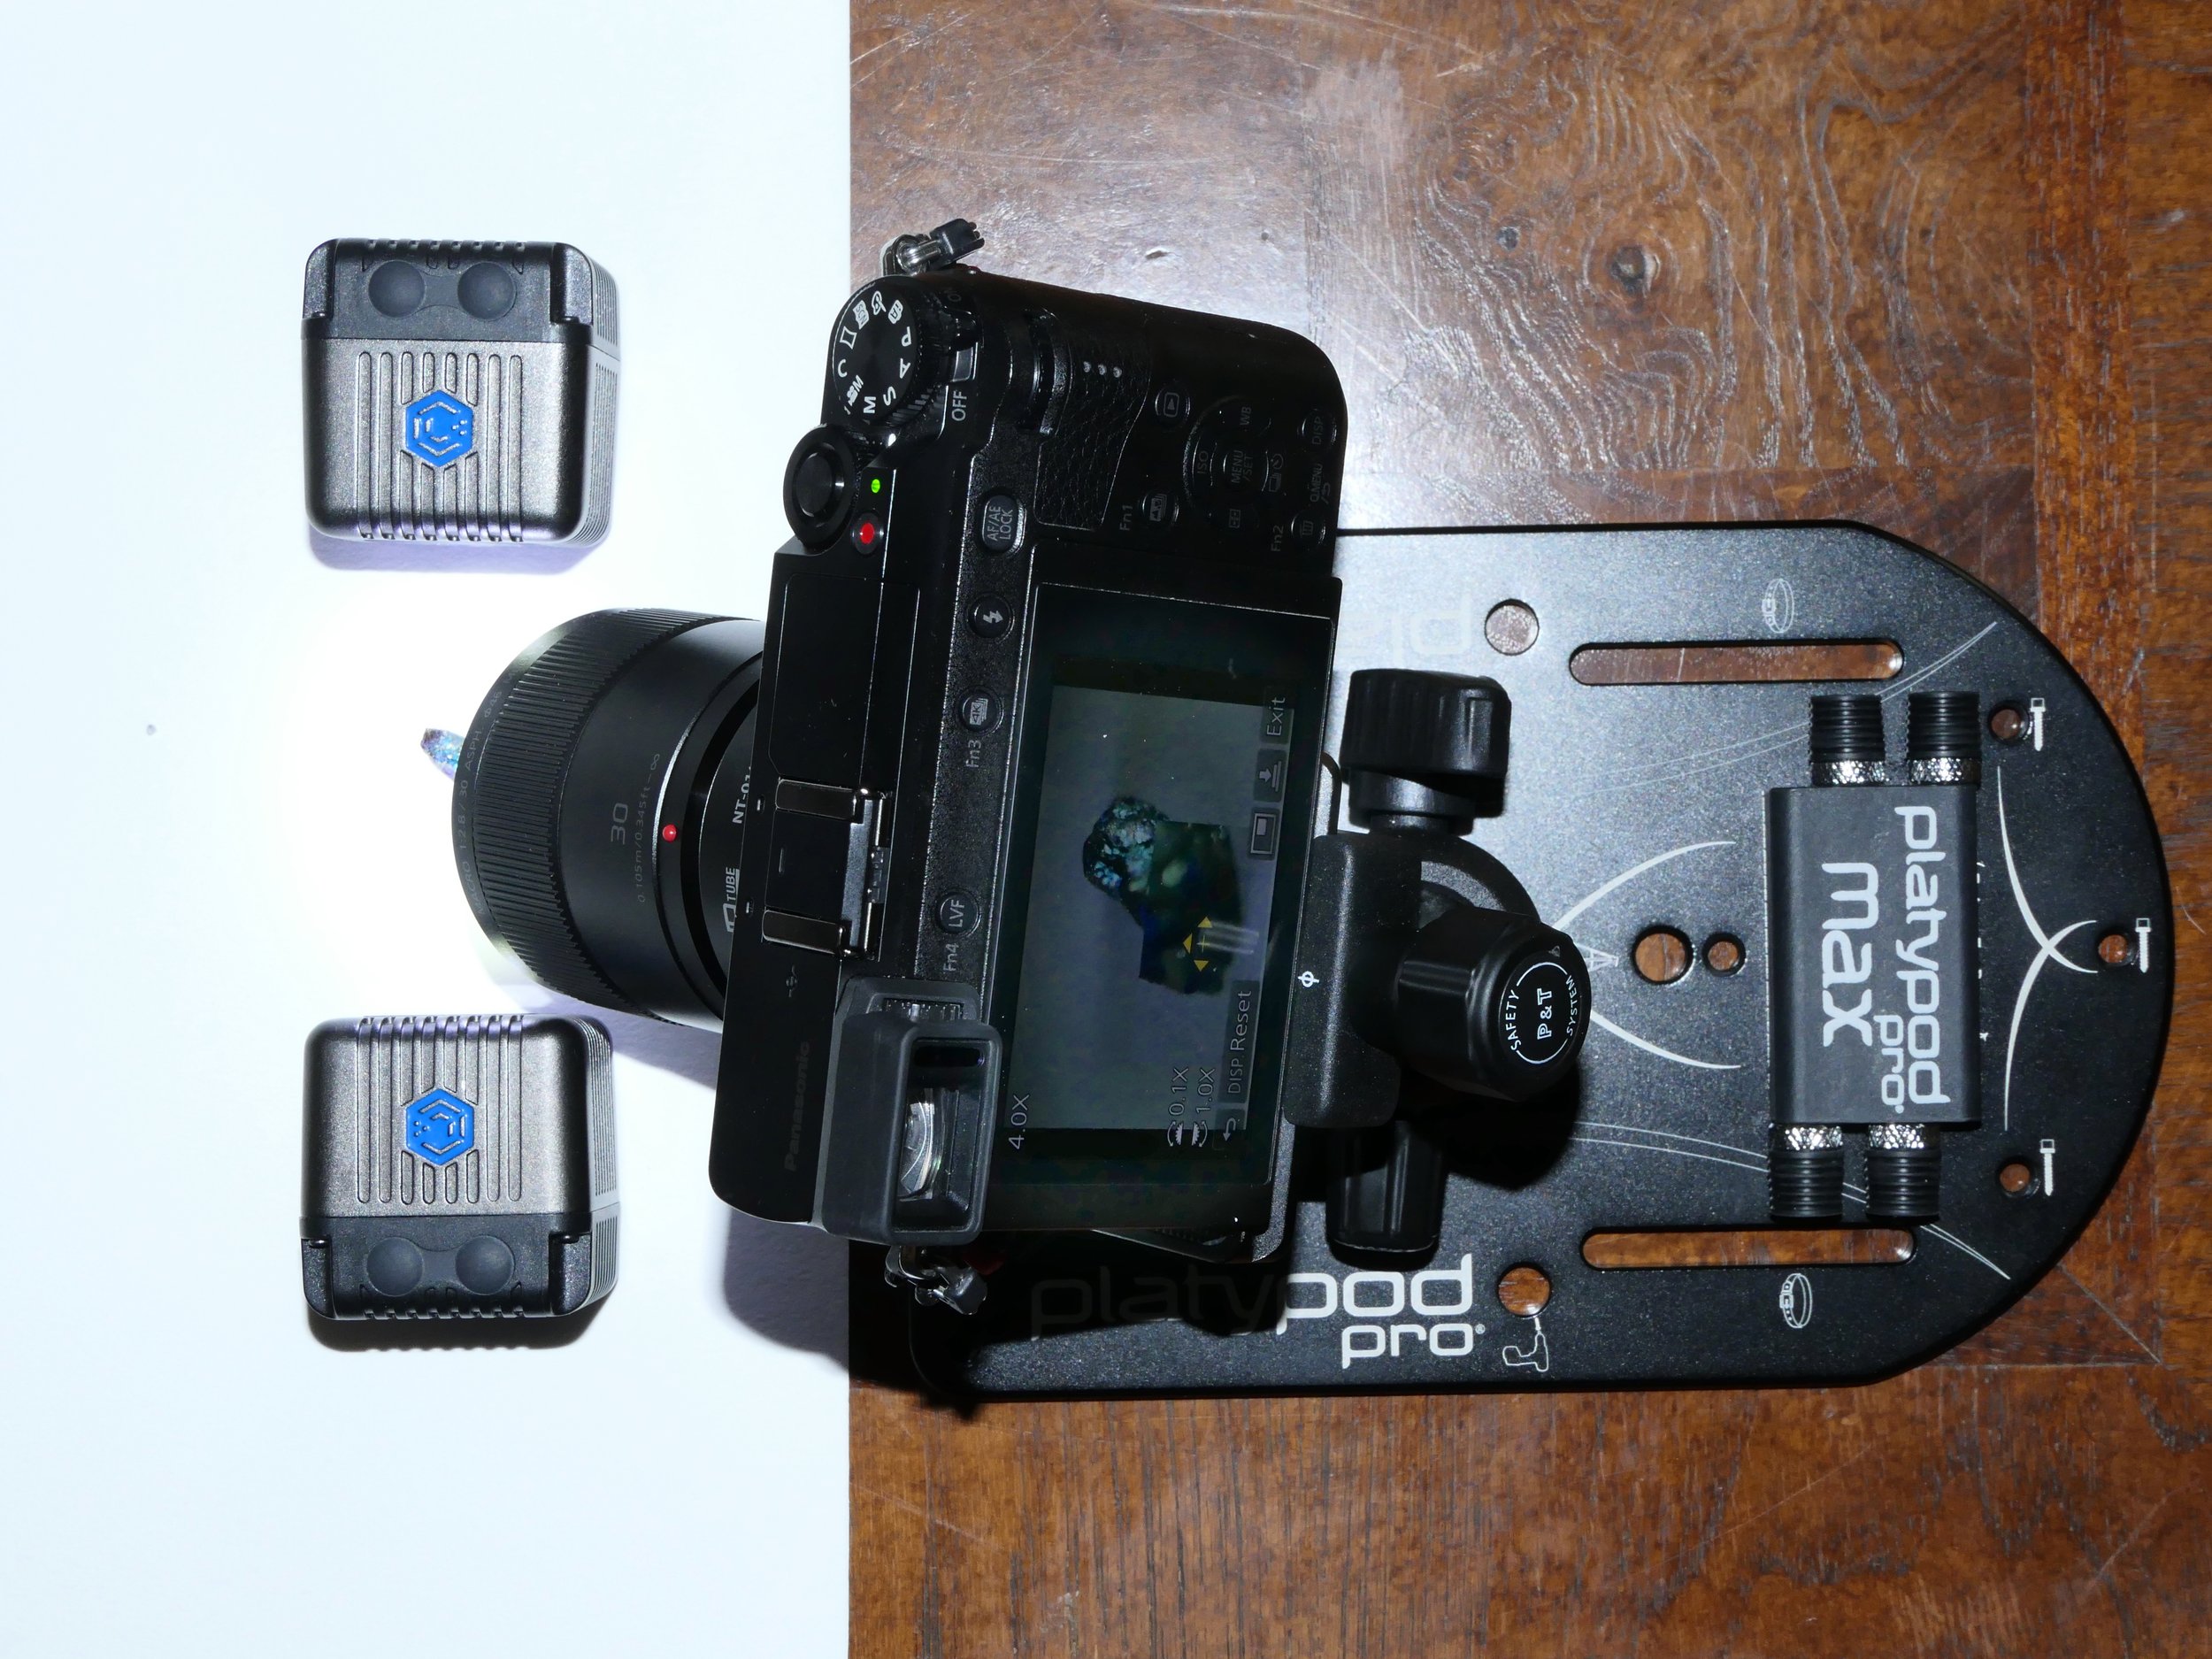 The image shown below is a 45 image stack using the GX85's focus bracketing feature.
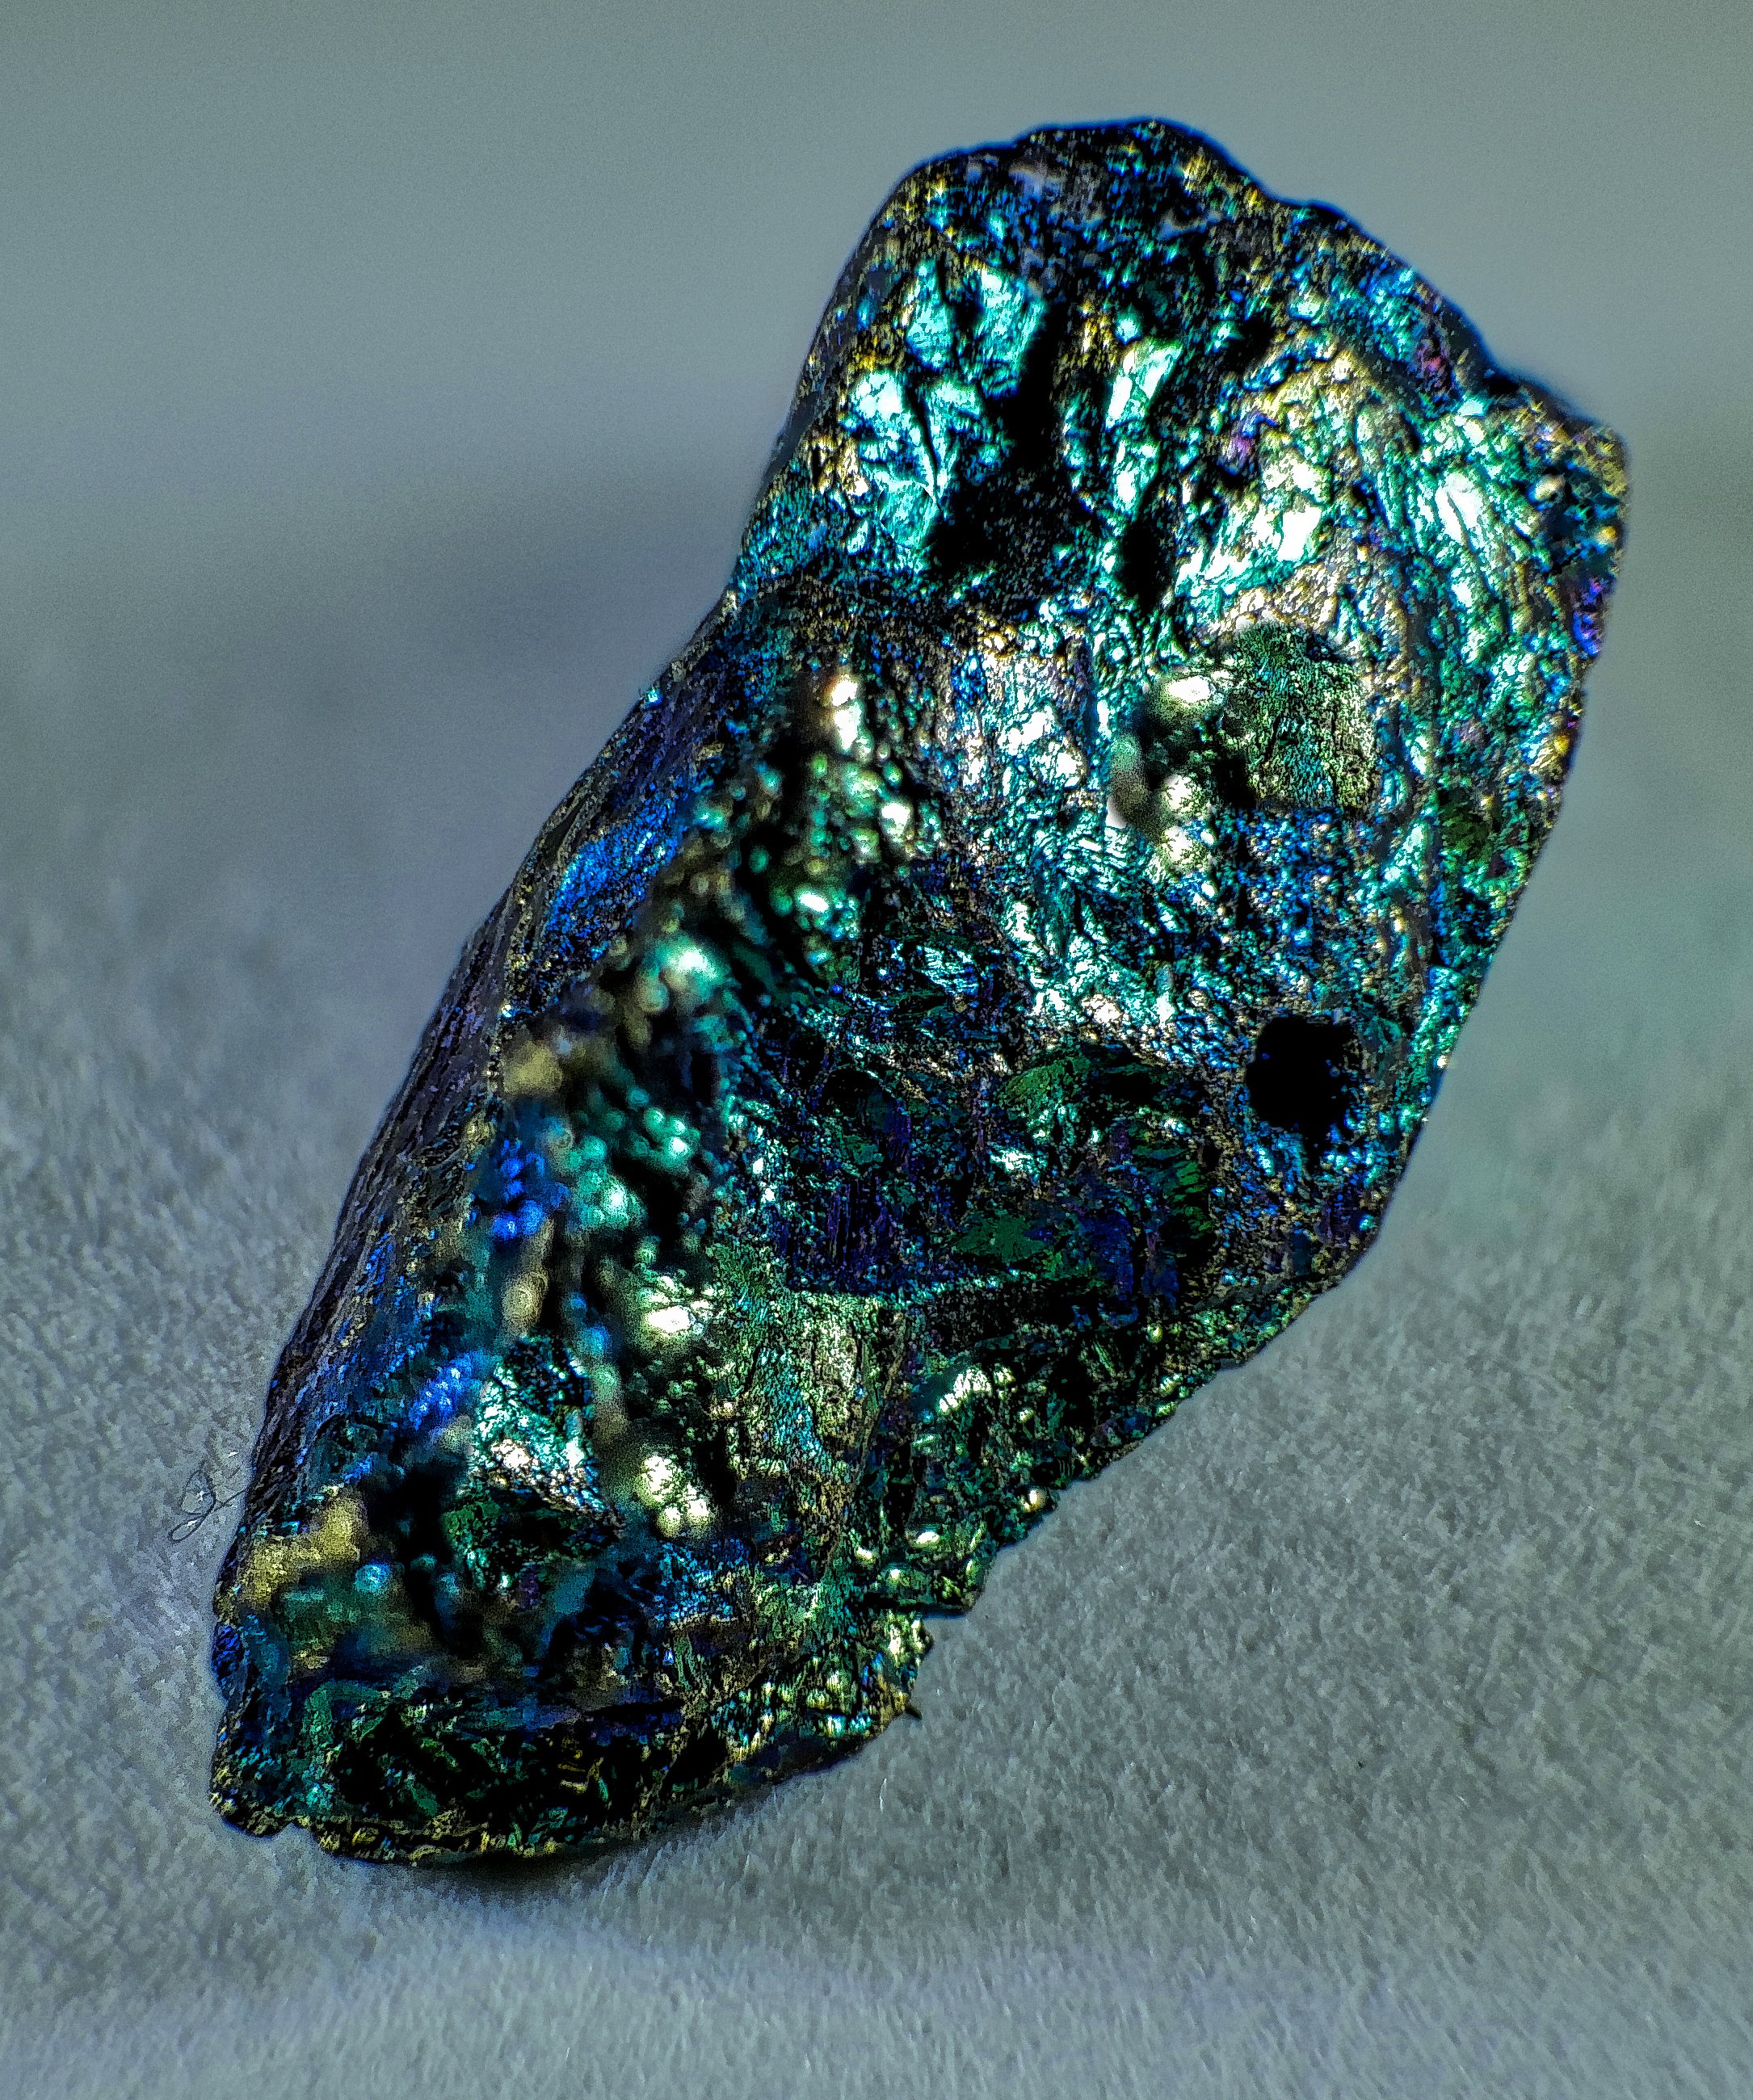 The portability of these little powerhouses has me convinced, and I tend to carry two in my bag at all times.CLICK HERE TO ORDER
Review of the Platypod Pro Max
 A while back I had done a review of the exceptionally versatile and compact Platypod Pro® Deluxe Kit. Now the makers have introduced a follow-up to the Platypod Pro called the Max.Much planning, engineering and fine machining go in to making the Platypod Pro® Max. The Max’s initial form is stamped out of a 5mm thick sheet of aircraft grade aluminum maintaining absolute flatness. Using Computer Aided Manufacturing (CAM), the plate is computer machine precision drilled for all holes and slots. Edges are round-routed and holes either threaded or chamfered to avoid any sharp edges. Key holes slots for attaching the spike screw box are drilled only partway through the plate with very low tolerances to allow easy but firm attachment. These last holes are invisible from underneath the plate.
 I have been informed by the manufacturer that the machining quality and workmanship on the Max is so meticulous that despite computer aided manufacturing the factory can only produce 1500 every 25 days!Like the original Platypod Pro the Platypod Pro Max is a sturdy flat mini tripod ideal for low-angle shots and situations where traditional tripods are cumbersome or impractical. It is however, significantly larger, has four spikes/reversible rubber feet rather than three, a belt loop, a single 3/8 inch 16 ball head mounting screw and a 1/4 inch 20 removable stud to mount accessories.
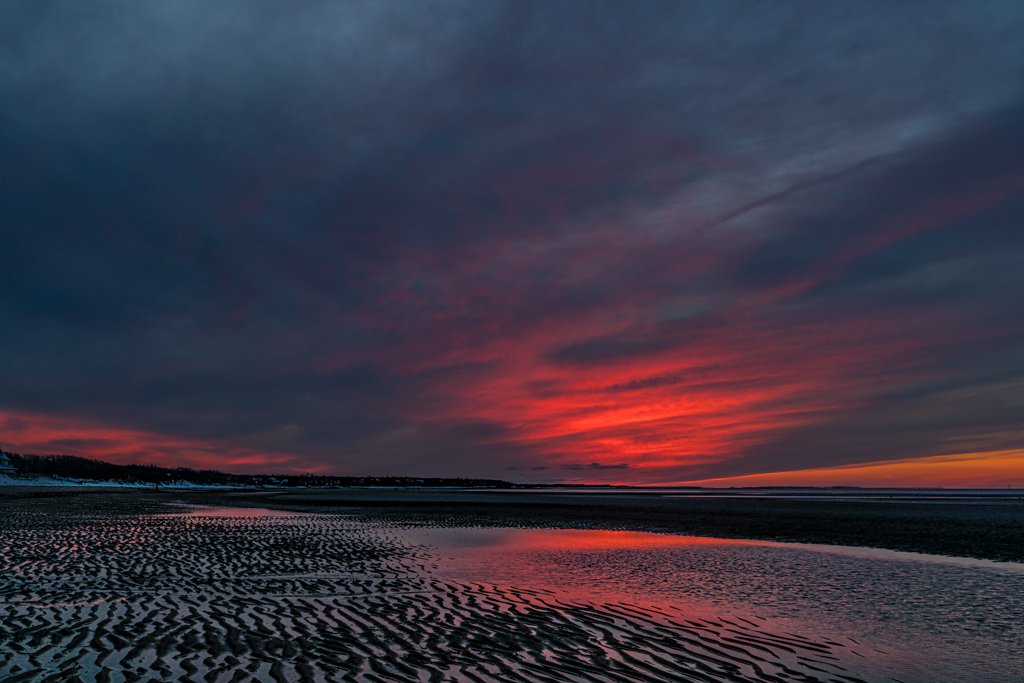
 Here is an image captured with the Max set up on top of the stone wall at Tunnel View - Yosemite NP.
 Unlike its smaller brother the Max supports ball heads of any size and is rated to support 300 pounds. A 3/8 inch 16 threaded screw hole allows you to mount the Max directly to your tripod as and when needed. Made of aircraft grade aluminum anodized black with beautiful self-explanatory laser etchings, the Max comes in a red microfiber drawstring pouch.
 If you already own a Platypod Pro the Max does not replace it, rather it compliments it where situations demand a larger base or when you need to physically move your low lying camera rig across the sand or grass when photographing wildlife.Specifications:
- Base - 6061 black anodized aircraft-grade aluminum. 5 mm thick. 5.25 x 7.75” (5-year warranty—Full replacement of parts for any defect in workmanship.)
- Fiberglass-reinforced nylon removable "bayonet style" storage box mounted onto plate to hold four 1/4-20 spikes, 2 inches long, with heavy-duty rubber feet and locking nuts. Small magnets keep spikes in place for storage.
- Five 1/4-20 threaded holes strategically placed to allow use of spike feet in configurations of one, two, three, or four at a time.
- Two 2-inch belt slots to secure to any cylindrical object or to tape onto floors for remote camera setups.
- 1/4-20 and 3/8-16 accessory threaded holes for attachment to tripods or quick-release devices under the unit.
- 3/8-16 TA2 titanium photographic bolt drilled and countersunk through the plate and welded in place for large tripod ball heads, such as the RRS-BH55, even with spike-feet in place.
- Two non-threaded holes for permanent or semi-permanent mounting to floors, walls, ceilings or panels.
- Weight: 13 ounces, including spikes and storage box.
At approximately 5 x 8 inches it is about the size of an iPad Mini and fits well in any camera case that has a slot or pouch designed to hold a laptop or an iPad. As an option you can use either slot or one of the non-threaded holes and a carabiner to hang the Max from your belt or a loop on your backpack. As compared to the original Platypod Pro, Max’s larger footprint means more stability. Like the Pro, Max is made of aircraft-grade aluminum with an embedded 3/8-inch titanium bolt. However, it does come with a few features, including a pair of slots that can secure Max via a bungee cord, zip-ties or even your belt to freestanding objects and structures. In the center are 1/4- and 3/8-inch holes to attach Max to quick-release devices, such as the Peak Design Capture Clip, or directly onto a tripod center column. A very convenient 1/4 - 1/4-inch male cross-nut allows attachment of flexible arms, speed-lights and numerous accessories. Here I used a Novoflex Flex Arm and a Lume Cube LED to light the crystal. The camera is a Panasonic GH4 with a 30mm Lumix macro lens. A second 1/4 - 1/4 and a second Flex Arm would be ideal for cross lighting a macro subject.The Max‘s larger base allows use of most any ball head. The RRS B55 is the largest ball head I own and I had no problem attaching it to the Max and all the knobs have adequate clearance. As I no longer use large DSLR’s all my tests were done with Sony and Panasonic mirrorless bodies. Using the Max with an A7RII and the 70 – 200 mm f/4.0 lens was a breeze. I also mounted a Panasonic GH4 with the new Leica 100-400 using a Wimberly SideKick for quick reaction time and maneuverability. When using the Sidekick it is imperative that you remove the holder for the spikes with a simple twist and place the cross-nut in one of the corner positions, out-of-the-way. This gives the sidekick the clearance for 360 degree rotation. The Max supported this rig very well.
 With the Platypod Pro you had to be careful mounting heavier gear. It was best to ensure the center of gravity was as close to the center of the Platypod Pro mounted ball-head. With the Max, this is a less of an issue. With a medium or large ball head the Max will comfortably support most DSLRs and mirrorless cameras fitted with normal to long telephoto lenses. A super telephoto lens properly mounted on a good ball head works well too. Here as in the image below I tested it using the RRS BH55 and the Wimberley Sidekick with a Canon 500 mm f/4.0 lens attached to a Sony A7R II using a Metabones IV adaptor.
 Similar to the Platypod the Max is ideal great for ground level photography and videography, a mount for action cameras and for creating panoramas. When creating panoramas use a pan/tilt ball head like the Unique as shown below or attach a leveling base (see following image) below the ball head as shown in an image above where the RSS BH55 is mounted on top of the Acratech 1170 leveling base. As the Max is made of a relatively thin aluminum plate it would be difficult to have a built-in level. A third-party bubble level can be adhered to the max or simply place on it to level the Max. When it is necessary to level the Max it is best to use three of the four spikes or rubber ends. Four legs are great for stability but not so for leveling. The Max is best used without spikes or feet when you want to have the flexibility of sliding it in any direction on flat surfaces, sand or grass. When friction is important then the spikes are the best option. In the reverse orientation the rubber caps not only provide friction preventing the base from sliding around but also prevent damage to furniture, painted surfaces, etc.
 For surfaces like asphalt, rocks and brick the spikes are your best choice for stability. To attach the base plate to a fence post, rail or tree limb, a pair of bungee cords, straps or your belt work great. All you need is to secure the cord around your object and hook the ends into the slots or holes in the base plate. Belts and straps can be passed through the slots on each side of the Max to secure it to any post, tree trunk or similar object.The Max with its little brother the Platypod Pro have a permanent home in my photography kit. I find I am using these support systems more than using my tripods.More on the Platypod products and their web siteAll company names, products and devices mentioned in this review are trademarks of the respective companies, registered in the U.S. and other countries.
One Day Workshop Schedule
ALL ONE DAY WORKSHOPS ARE TEMPORARILY SUSPENDED
Workshop details are available from the Registration Page.
Macro and Close-up Photography
Flash Photography, High Speed flash, creative lighting
Portrait and Lighting Techniques
Digital Photography A-Z. This is a one day three part course that will teach you camera basics, post processing and printing.
The Digital Darkroom - a course that covers image capture, asset management, processing and enhancement, output to print and web media. A one day program for digital image making workflow
Timelapse Photography, post processing and video assembly
If you have any questions or would like more information please call 617-759-0010 or email sv@shivverma.com
Please use this REGISTRATION link to register for these workshops.
Light of Cape Cod - Photo Workshop
 A 4 day 3 night photo workshop that includes lodging and site feesMid Spring in Cape Cod is a multi faceted photo opportunity with truly spectacular scenics and some wildlife. The tourists have not crowded the roads and traffic is not a nightmare. This very special workshop is for all levels of photographers from beginner to advanced. The Cape provides some of the most incredible landscapes and seascapes and the light during spring is exceptional. We will explore and photograph the Cape's classic sea shore, sand dunes, light houses and some wildlife (including migratory birds). We will determine schedules and locations based on weather forecasts, tides and sunrise/sunset times. We may even explore the opportunity to do some night photography.(CLICK HERE FOR DETAILS)
Wild Flowers, Smoky Mountains and Cades Cove - Spring Workshop
 April 17 to 22, 2016 - Six Day 5 Night Photo WorkshopGreat Smoky Mountains National Park is a world-renowned preserve of wildflower diversity over 1,660 kinds of flowering plants are found in the park, more than in any other North American national park. In fact, the park is sometimes referred to as the “Wildflower National Park.” From the earliest hepaticas and spring-beauties in the late winter to the last asters in the late fall, blooming flowers can be found year-round in the park. Wildlife is fairly abundant in Cades Cove and we will have opportunities if lucky, to photograph bears. Landscapes, rivers, waterfalls and much more - a photographer's paradise.CLICK HERE FOR DETAILS
Hummingbird Moth Hemaris thysbe
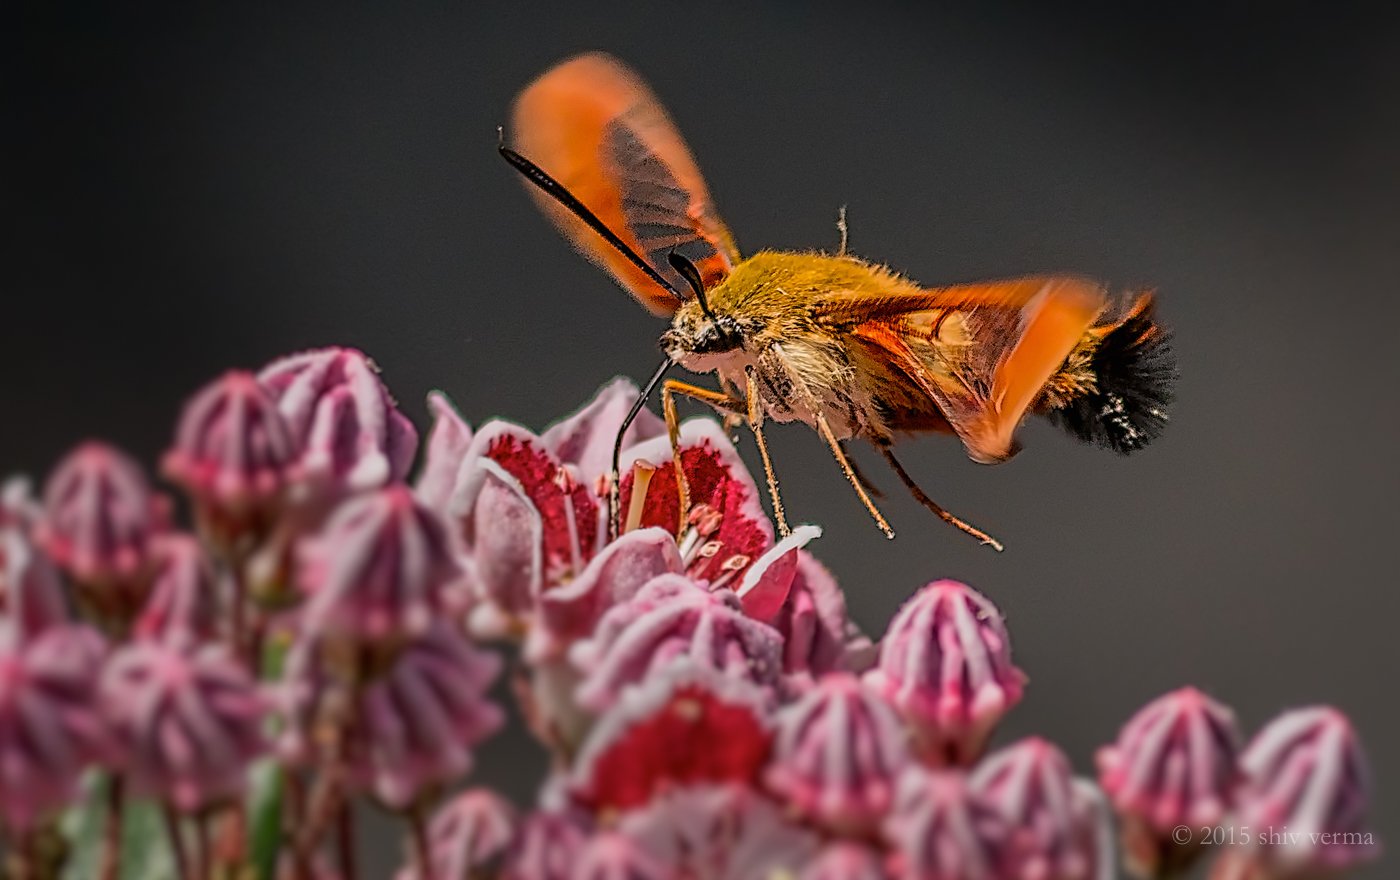 The Hummingbird Moth Hemaris thysbe, unlike most moths that are nocturnal or shade loving, is seen on bright sunny days. It is a fantastic hovering species that flies like a hummingbird and hence its name.They feed on nectar using a very long proboscis. Their wings flap at incredible speeds. This image was captured at 1/1600 sec and I was unable to freeze the wings.
What else is in my bag - Part 1
Apart from cameras, lenses, filters we as photographers carry a number of gizmos to help our image capture. This is part 1 of my list of gizmos. These are all reasonably priced and many are less than $10. Most on-line photography stores carry these items and you should check them out.
- Gray Card – Get your exposure right. Available in cardboard and durable plastic these are one of the most valuable tools for your camera kit. The camera may be smart but it is easily fooled. It will under or over expose very bright or very dark scenes. You should use a gray card to set the exposure for much more accurate results. Some of the newer cards come as sets with a black and white card. This can also help you set your white balance. A step-up would be the X-Rite Color Checker Passport.
- High velocity blower - Never clean your lens without first blowing off any dust, grit or lint. The last thing you want is to scratch your lens as your clean it with a lens pen or lens cloth. A good blower costs under $10 - the one I like is the Visible Dust Manual Blower. Adorama and B&H have these.
- Lens Pen - This is another must have tool for your bag. There are many manufacturers and models available. The ones with a carbon bad need to be activated before each use. Others like the Allsop have replaceable tips. I keep an Allsop in each of my camera bags.
- Lens Cleaning Cloth - A good lens cloth is a must in your bag. Zeiss makes some of the finest and can be purchased from Walmart and B&H for $3 and up.
- 1 or 1.5 inch natural bristle soft painter's brush - An ideal too to get lager dust and sand particles off your equipment. Keep one in your bag - you will be happy you have it on those dusty trips.
- Small micro fiber or cotton hand towel - You never know when you will need it. These are great for wiping of moisture from your gear on those wet days. Grocery stores and Bed Bath & Beyond carry these.
- Spray bottle - You may not always get a dewy morning but you can create dew on flower petals and spider webs with a handy fine-mist spray bottle. Fine mist spray bottles can be found for under $2 at Amazon.
- Bubble level - A three axis bubble level for your hotshot mount will keep your horizons level. If you have an inbuilt electronic level in the camera then you can skip this tool.
- Elastic bands and small ziplock bags - You will find many uses for this combo. A lost lens cap can be a problem but not if you can put a ziplock bag around the front element and secure it with an elastic band. If your zoom lens tends to creep the elastic band can help keep it in place.
- Large garbage bag - During any outdoor shoot I always pack one or two large garbage bags in my bag or in the car. They are great when you need some rain protection, need to keep your equipment on the salty sand, need to lay down at ground level when shooting low to the ground. A black garbage bag acts as a great gobo when needed, translucent bags make great diffusers.
- Gaffer's tape - 1 inch width in black, a small roll is perfect to secure items when needed. This is a must have to tape down your lens at infinity when doing any astro photography. A small piece can be used to cover the eyepiece of the viewfinder, preventing stray light from spoiling the exposure. It is also a great all around repair tool.
- Parchment paper, issue paper, or rip (stock) cloth - A small piece about 4 inches square is good but larger pieces can be useful for other situations. You can tape this (using gaffer's tape to your flash to diffuse the light. If you keep a larger piece you can have someone hold it to diffuse bright sunlight while doing close-up or macro photography. Get parchment paper any kitchen or grocery store. rip stock can be purchased from a fabric store or on-line.
- White foam-core - This makes a great reflector, if you need a silver reflector keep some kitchen foil and fold it over the foam-core. You can use the foam-core as a gobo or even as a white background for small subjects. Staples, Office Max, Michael’s or A.C. Moore are ideal for this.
- LED Flashlight - a must have when you are in the dark. A great tool for light painting and when you need just that added light for filling in shadows or adding a highlight. My favorites are Coast and SureFire (SureFire lights are available from the SureFire website and Amazon). Others can be purchased at Home Depot, Amazon or Lowes carry great LED Lights
- Small notebook and a ballpoint pen - Journaling is key. Write down locations, notes, day and time of best light, etc. Draw sketches of what there is so you can come back for better images. If nothing else - you can use it to jot down names and contact info of fellow photographers you meet.
In the near future I will follow-up with additional items I find useful. Some for the bag and others that are good to have. In the mean time, why don't you use the comment link on the top of this post to share with us some of your special items.If you do plan on getting any of these items please use my affiliate links on the right column of this blog post or use the Products and Discounts Page for additional links.
Nissin i40 - an exceptional pocketable flash
 I had been anxiously waiting for the two evaluation units to arrive and finally they arrived two days ago, December 15, 2014. The small Nissin i40 is made for Canon, Nikon, Micro Four Thirds, Sony and Fuji cameras. With a current street price of $269 this is a very affordable unit.In the box is the flash head, a stand with a metal 1/4 20 thread for mounting on a light stand or other device, a diffuser, and a quick start instruction manual. A nice belt mountable pouch for carrying the unit is provided and they include a carabiner so you can attach the pouch to any belt, strap or camera bag loops and rings. A spare set of AA batteries fits nicely in the diffuser so you can carry enough reserve power in one convenient pouch.The i40 weighs 7 oz and fully extended is under 3 1/2 inches. The unit is powered by 4 AA batteries and unlike the larger Nissin flashes this does not have a cartridge system for the batteries. With a guide number of 40 or at ISO 100 of 131' at 105 mm and 89' at 35 mm position, the unit is suitable for most photographers who like to carry a handy flash for fill as well as indoor photography needs.
 The power zoom range is from 24 mm to 105 mm without the diffuser and 16 mm with the built-in diffuser in position. The flash is mounted on the camera hot shoe using a spring-loaded locking mechanism that is very convenient. The flash-head tilts up 90˚ in four stepped positions and rotates 360˚ in 30˚ steps.In addition to the flash light source, the i40 includes an LED based video light with variable power output.Triggering the i40 requires you to either mount it to a hot shoe or remotely trigger it wirelessly using the cameras built-in trigger.There is no LCD panel and all controls are via dials on the back panel. Unfortunately these are not illuminated and pose a slight problem in a dark environment. Clearly the dials are designed for ease of use and they do just that.
 For purposes of this review I am using the i40 designed for Micro Four Thirds cameras and all my testing was done with the Panasonic GH4 and some additional testing with the Olympus OM-D E-M1.Size and Weight: This is a very small unit comparing it to a Nissin 8000, and the Nissin 466 (also designed for MFT cameras), the i40 is totally dwarfed. Without batteries the unit weighs 7.17 oz and with four AA batteries the unit weighs 11.0 oz. The pouch, diffuser and stand add another 3 oz.
 Battery Compartment: Unlike its larger brothers the i40 does not have a removable battery cartridge. You slide open the door and insert the batteries as marked. The makings are well identified and you are not likely to insert the batteries wrong. To close the battery door you need to push the door down over the batteries and simultaneously slide it into the locked position.
 Mounting to a hot-shoe or stand: All you need to do is to slide the Nissin i40 into the hot-shoe slot. A spring-loaded mechanism secures the unit in place. To remove the flash head, you need to push a small unlock button and then slide the unit off the hot-shoe.
Operation:
To turn on the i40, lightly depress the power button. The power indicator light will turn red and once the unit is charged the light will turn green. Concurrently the zoom feature will initialize.
Controls & Modes
As mentioned earlier, the i40 controls are two dials and indicator LEDs. The dial on the left side of the back panel is used to select operating modes while the one on the right is used to adjust power or exposure compensation (depending on what mode you use).
Modes:
I will address each mode as the mode dial is rotated clockwise.Video (Indicated with a video camera image) — in this position the Video LED is powered on. The LED intensity can be adjusted in 9 steps using the TTL exposure compensation dial on the right.SF - the i40 will trigger on the first flash it sees — this is ideal for use with other flash units set in manual mode or for use with studio strobes.SD - the i40 will ignore any pre-flash from a master unit and trigger on the main flash TTL - TTL is supported and indicated by the two LEDs, the Mode LED and the TTL exposure compensation LED. In TTL you can adjust the flash exposure compensation from + 2.0 to - 2.0 in 0.5 step increments. I found this to be a very easy to use and convenient feature. It is so much easier than having to push +/- buttons and review readings on an LCD window. The performance of the exposure compensation dial and flash out was very accurate as measured with a Sekonic L-758DR Digital Master Light Meter. Tests were done using both a Panasonic Lumix GH4 and an Olympus OM-D E-M1. A (The green A) - This is the Automatic Mode and is identical to the TTL mode without any exposure compensation. In this setting only the mode dial LED is illuminated.
 M - Manual Mode - here the mode dial indicator LED and the middle LED are illuminated. The power output dial shows the output in 1 stop increments from 1/1 to 1/256.A, B, C (white lettering) — this is the slave TTL / Manual mode and the unit can be set to any one of three slave groups A, B or C. Testing this feature with the Panasonic GH4 and Olympus E-M1 allows the camera to control the flash from 1/1 to 1/128 power. This feature is not available on the Fuji version.High Speed Sync (HSS) - This is not an intuitive or marked setting. To set HSS you need to hold the pilot lamp button for 3 seconds till the LED starts blinking. Similarly, to turn it off hold the button down for anther 3 seconds till the lamp stops blinking. Powering the unit on and off does not reset HSS it will say engaged till you turn it off. The i40 will let you use shutter speeds of up to 1/8000 Using this mode I was able to shoot up to 1/8000 shutter speed with no problems. High Speed Sync is only supported in A, M, TTL or wireless mode. To enter HSS mode hold the pilot button (the LED next to the power button) for 3 seconds, or until the left LED starts blinking. To exit HSS mode hold the pilot button for 3 seconds or until the left LED stops blinking. This is true only for the MFT and Sony versions. For canon and Nikon, you activate this function in the menu of the camera and it will pass through to the flash. Fuji does not currently support HSS so it is not a feature on that version of the i40 flash.
 Zooming - the i40 will automatically zoom to the closest focal length of the lens mounted on the camera as long as the lens has electronic communication with the camera body. As many mirror-less camera users are using adaptors with non OEM lenses, there may be no electronic communication with the body and hence the flash will not zoom even when mounted on the camera. To set the zoom manually in such situations or when using it remotely you will need to hold the power button down for three seconds and wait for the pilot lamp to change color. Colors will cycle a deep blue(24mm) to pink(50mm) to blue(80mm) to orange (105 mm). These zoom ranges and colors are conveniently printed on the body of the flash head and exposed by sliding the bounce flap upwards.
Other features:
- Flash Color temperature 5600 K
- Flash duration 1/800 sec full power to 1/20,000 sec on the lowest power
- Focus Assist lamp is positioned immediately above the hot-shoe mount and assists during low light focusing.
- White Bounce Flap is built into the unit and enabled by sliding it upward from the rear of the flash head. Of significance is that the bounce can be used in conjunction with the diffuser in place. This provides for some really nice lighting.
- Wide Angle Diffuser is also built-in and you need to pull it out using a small notch from the front of the flash head. It is spring-loaded and flips flat to the flash head’s lens.
- An optional diffuser is include with the i40 and is easily mounted on the head when needed. It is conveniently stowed in the provided pouch.
- As with most speed-lights excessive firing of the flash at high-powered can result in overheating. The i40 has a built-in thermal protection system. When the thermal protection is triggered, the pilot lamp will blink red.
- Auto focus assist beam with a range of 2.3 to 16.4 feet. Please note that this feature is not available on most Micro Four Third Cameras - Panasonic and Olympus cameras tested do support this feature.
- Good battery life — approximately 220 (full power) to 1,700 (minimum power) flashes on a single set of fully charged batteries
- Video light run time is approximately 3.5 hours
- A well designed stand with metallic 1/4 20 mounting threads.
Pros and Cons
Pros:
- Very light and easy to carry
- Good mechanical mating with the hot shoe
- Easy to use control dials
- Appropriate power for its size
- Good wireless capability
- HSS is a great feature for a flash this size
Cons:
- No audible beeps for flash ready after recycle indication
- Dials can be inadvertently rotated. A push down to adjust feature would be better
- Hard to see dial settings in the dark. Backlit dials would be preferable
Conclusions
Given the Nissin i40’s size and weight it will find a permanent place in my camera bags, particularly for the Panasonic GH4 and Olympus OM-D E-M1 configurations. It has enough power for most indoor situations and is ideal for fill light outdoors. The few points mentioned in the Cons section could be easily implemented in the next generation. On a scale of 1 to 5, I give the i40 a rating of 4.5
Additional Images:


Winter Storm Nika Forces Indoor Photography
 We have about 10 inches of snow, but with the rain the snow is is getting packed down and getting heavier by the minute. It's just not conducive for any outdoor winter photography so decided to play with some water drops. Using a TriggerTrap V1 hooked up to a Nissen 866 flash head, Rogue gels, a dropper and a pan of water. Flash set at 1/64 power backlighting the water drop through an acrylic panel. Camera at ISO 100, aperture f/10 in Bulb mode.
2014 - 1st Quarter One-Day Workshops
Here is the schedule for the first Quarter of 2014. Please use this REGISTRATION link for details about each workshop and to register.REMEMBER ALL ONE-DAY WORKSHOPS INCLUDE A PIZZA LUNCHJanuary 11 - Product Photography and Lighting TechniquesJanuary 12 – Food Photography and Lighting TechniquesJanuary 18 – Lighting for PortraitureJanuary 19 – Timelapse Photography, post processing and video assemblyJanuary 25 - Macro CloseupJanuary 26 – The Digital Darkroom – a course that covers capture to process and enhancement to output to print and web media. A one day program for digital image making workflowFebruary 1 – Flower Photography, Textures, Blending and moreFebruary 2 – Lightroom 5February 8 – HDR – done right using Photoshop, Photomatics, NiK HDR Efex 2, EnfuseFebruary 9 - Macro CloseupFebruary 22 – Timelapse Photography, post processing and video assemblyFebruary 23 - Photography Basics 1 day Class March 1 – Flash PhotographyMarch 2 – Lightroom 5If you have any questions or would like more information please call 617-759-0010 or email sv @ shivverma.com (please remove the spaces)
2013 Remaining Workshops
There are a few spots available for the following:December 7, 2013 - Photography Basics 1 day Class December 8, 2013 - Time-Lapse WorkshopDecember 21, 2013 - Lighting WorkshopDecember 22, 2013 - Macro CloseupClick here for more info.Also checkout Iceland 2 and the India Tigers and More Workshops and Photo Tours. Click here.
One Day Workshop Schedule for December 2013
Here is the schedule for the remainder of 2013. Please use this REGISTRATION link to register and pay for these workshops. Please also fill out and mail or bring with you the Workshop Registration and Waiver Form This is an electronic form, you may print it and then fill it out or fill it out directly and then print the required copies.Click on the links for detailed PDF documents.December 7, 2013 - Photography Basics a one day class December 8, 2013 - Time-Lapse WorkshopDecember 21, 2013 - Lighting WorkshopDecember 22, 2013 - Macro and Closeup PhotographyIf you have any questions or would like more information please call 617-759-0010 or email sv@shivverma.com
Focus Stacking using a Promote Control
 Just finished writing a "Tip" on using a Promote Control to do focus stacking in the field.While I was in the Smoky Mountains I was asked how to do this - so the folks who asked please read on.Here is the link https://shivverma.com//tip-focus-stacking-with-a-promote-control/or click here
Phottix Macro Focusing Rail
I have just finished a review of the Phottix Macro Focusing Rail. The review is a PDF document that you can read on line or download.Phottix Macro Rail Review
Special Products and Special Prices
I would like to take this opportunity to thank each and every one of you for your support and helping my photography Photo Tours and Workshops gain momentum. For all who have participated in any way this year a special thank you and for those who will be joining me next year, I look forward to gaining your confidence.As I look back at 2012, I can't help but feel grateful to the wonderful people who have come into my extended photo family. I have enjoyed every moment with you all.As a small token I requested my friend, supporter and sponsor Gary Farber of Hunts Photo and Video to put together some VERY SPECIAL PRICING on some of my favorite products and accessories. As you look through this list, you might want to avail of these discounts and support Hunts as they have supported the photographic community.Wishing you and yours Happy and Safe Holidays and all the best for the New Year.With warm regards,ShivClick Here for the list and special pricing good through the end of the year
December 2012 - One Day Workshops
The One-Day workshops for December 2012 are now available. Please reserve your spot early as these do fill up fast.Click Here to be directed to the One Day Workshop Page and the reservation form. Call 617.759.0010 if you have any questions.
Late June and Early July One Day Workshops
Some images that hit it off
This past week I posted two images of left over flowers from last weekend's workshop. What wonderful comments and feedback. I truly appreciate what the viewers have to say - thank you all. Both images treated with NiK. Here are the two:

Weekend Workshops
Two awesome days, two awesome workshops with some truly great photographers. Yesterday's Lighting Demystified workshop was great - even the heat and humidity was not a hindrance. The Macro and Closeup workshop had many Ah Ha moments in particular with stacking.Here are a few images form the macro and closeup workshop participants:

