
Edelkrone FlexTilt Head 2
 I have just completed a review of the Edelkrone FlexTilt Head 2. The full article can be seen here.In addition I have added a landing page for this and future product reviews. At some point I will add previous review links to this page. The page is a sub menu under "Products"
Lumix G9 - High Resolution Mode
 Many new cameras have repurposed their in body image stabilization to create high resolution images employing sensor shift capture. The Lumix G9 uses the same concept but shifts the sensor by 1/2 pixel rather than a full pixel. It captures 8 images in raw and combines them in-camera to generate a single 80 MP Raw file. Whats more is that you can capture a single standard resolution RAW file of the same image in addition to the high resolution image. This is a great feature for studio based product photography, still life and architectural photography. As there is (releatively) significant capture time, any scene with moving subject matter is not suitable for High Resolution capture. I set up a simple shot of a Gerbera Daisy with an artificial background to test the resolution and imprtance of this feature. the image above is what I was photographing. The shutter delay was set for 15 seconds to give me enough time to exit the room and to stabilize any vibration or tripod and camera body. The exposure triad:f/8, 1/200 sec at ISO 200.The red stroked are is enlarged below for comparison. Of significance, is the minimal pixilation of theis crop in the hi-res image compared to the standard 20.3 MP file.
 The base file at 300 DPI is approx. 34.5 inches by 26 inches. I have sussessfully enlarged this image to 30 feet by 22.5 feet and the image maintains exceptional quality.
Panasonic Lumix G9 - Announced
 This announcement is not a review of the G9 but having had the opportunity to briefly use and test this camera, I can say, it is as good as the specs and performs exceptionally well.Panasonic's new Lumix DC-G9 is a camera tailored for pro and advanced stills photographers. The camera uses the same 20.3 MP sensor as the GH5 but has processing enhancements for better image quality and can be pixel shifted to produce 80MP RAW files. This sensor ship is ideal for architecture, still life and product photography where high resolutions are demanded. The new High Resolution mode produces an 80-megapixel equivalent (10368 x 7776) image combining 8 consecutively shot images while shifting the sensor. This combined image can not only be set for JPEG but also RAW (in camera).The body has a new control and dial layout and adds a LCD display on the right side of the view finder. The power on and off switch is conveniently located around the shutter release. The mode dial and drive mode dial are concentric and lockable. Drive modes include: Single, Continuous I and II, 6K Photo, Post Focus, Self timer and Time-lapse. The body is slimmer than the GH5 and has a deeper and very comfortable grip.The joystick is similar to the one found on the GH5. What is new is the OLED electronic viewfinder. It has a magnification factor of 0.83 x equivalent and a resolution of 3.68 million dots, it is truly impressive. A 3" fully articulating touchscreen LCD is basically the same as the GH5. However you now have the ability to keep the LCD closed and use the top LCD display to read your camera settings, exposure etc. The body supports two SD card slots, both are UHS-II capable. Ports are similar to the GH5 and include HDMI, microphone, headphone, flash sync, USB 3.0 (Micro B) and remote control. The body is weather sealed and will operate at temperatures as low as -10C.The G9 image stabilization is as good if not marginally better than the GH5, offering 6.5 stops of image shake reduction. With a majority of the newer lenses the system will use the proven combined lens and bod Dual I.S. 2 stabilization.Another major improvement is in the focusing system. The Depth from Defocus system has been significantly refined and now has 225 selectable focus points. This system is not only faster but offers superb tracking that uses a “Deep Learning” technology that detects a human body in addition to the conventional face and eye detection. In addition a new “AF Point Scope” magnifies distant subjects allowing for precise focus and capture.As for speed, the G9 will shoot bursts of 20 fps in continuous autofocus mode using the electronic shutter. In mechanical shutter mode the speed drops to 9 fps. The buffer capacity is 50 RAW files in a single burst. However with single AF engaged the G9 can shoot at a blazing fast 60 fps (electronic) and 12 fps (mechanical). In my brief testing there was no blackout at all using the electronic shutter.The minimum shutter speed is 60 sec. and maximum is 1/8000 sec using the mechanical shutter and 1/32000 sec. using the electronic shutter. The flash sync speed remains at 1/250 sec.Though the G9 is targeted at stills photographer, it is no video slouch. It will shoot 4K video at up to 60 fps, with a maximum bitrate of 150Mbps. For slo motion capture it will shoot 60 fps in 4K and 180 fps if you select Full HD video.The 4K and 6K photo modes are fully supported as they are in the GH5. There is an optional battery grip available. The camera comes with a new charger.The G9 and accessories will ship in January 2018 for $1699 body only. The DMW-BGG9 grip for $349.Extracted from the press release:Optional Accessories Specially Designed for LUMIX G9
- Battery Grip DMW-BGG9 - includes joystick and one additional battery.
- Eye Cup DMW-EC4 for enhanced viewing and comfort.
- Battery Charger DMW-BTC13 - enables rapid charging.
- Shoulder Strap DMW-SSTG9 - length-adjustable and can be detached easily.
MIOPS Smart Trigger Review
 I purchased the MIOPS Smart Trigger last summer after seeing it being used by a few photographers in Europe. This a combination trigger, intervalometer, remote and a whole lot more. The nice part is that it is well built, small and light. The MIOPS can be purchased for $220 to $240 based on the camera cables you need.The unit measures approximately 2.5 in. X 4.0 in. and weighs just under 4.0 oz. including the battery.The MIOPS trigger has six modes of preprogrammed operation and one “Do It Yourself” port. A really useful feature is that you can vary the sensitivity of each of the modes as appropriate. The controller is very durable. I have had it in my bag for over 1 year and is does not show any signs of wear and continues to perform very well.A 128×128 pixel, full-color display, is mounted just above the large buttons, used for operation and selecting menu options on the front of the trigger.The device is powered by a 3.7 V/1020 mAh. lithium-ion rechargeable battery.The MIOPS can be used with Sony, Panasonic, Olympus, Canon and Nikon, as well as other brands. The trigger hardware is identical for all configurations with the exception of the supplied cables that need to match the I/O ports of your camera.
 This allows you to use one MIOPS with various camera models as long as you purchase the right connection cables.The trigger unit is used in two ways, either to trigger an external flash or to activate the shutter of your camera. Flash units are connected via the PC sync jack, and cameras are connected via the remote shutter release jack.
 The MIOPS internal (replaceable) battery can be charged via a micro-USB cable and any USB charger or your PC’s USB Port,The MIOPS is manufactured using a strong plastic with well configured, raised push button controls. The screen is an LED display and is easy to read in most lighting conditions. It has an internal microphone and a light-sensitive sensor for activating laser and lightning modes. For the DIY mode, an additional port is provided that can be connected to an external sensor.The trigger can be mounted using the camera hot shoe or on any support that has a 1/4 20 screw mount.The MIOPS can be used remotely via the free MIOPS smartphone app for IOS and Android phones.For triggering with the MIOPS it is best to set your camera to manual exposure and manual focus.


 HDR Mode: this is a mode that is good for cameras that either do not have an internal bracketing mode or where the camera is limited to just the 3 shot bracket. The MIOPS trigger will allow you to set 3, 5, and 7 shot brackets. I prefer to use the camera’s internal bracketing/HDR modes.
 Scenario Mode: works in combination with the smartphone app. You can store up to three different scenarios to the MIOPS to be executed later. When you create a new scenario and run it, it will be also stored to the MIOPS. You can run each scenario later. To make any change you must do it via the app on the phone. The scenario mode screen lets you choose one of three previously stored scenarios. The screen will display which step is currently running and when the scenario ends, the MIOPS will return to the selection screen.
In conclusion, I have no hesitation in recommending the MIOPS Smart. There are a number of other features that are available when you use the smartphone app that I will leave for a future post.MIOPS Triggers are available at Hunts Photo & Video - here is a link to the Panasonic Version - use the search field for other versions. For more information, you can visit the MIOPS web site at www.miops.com
Lume Cube Review
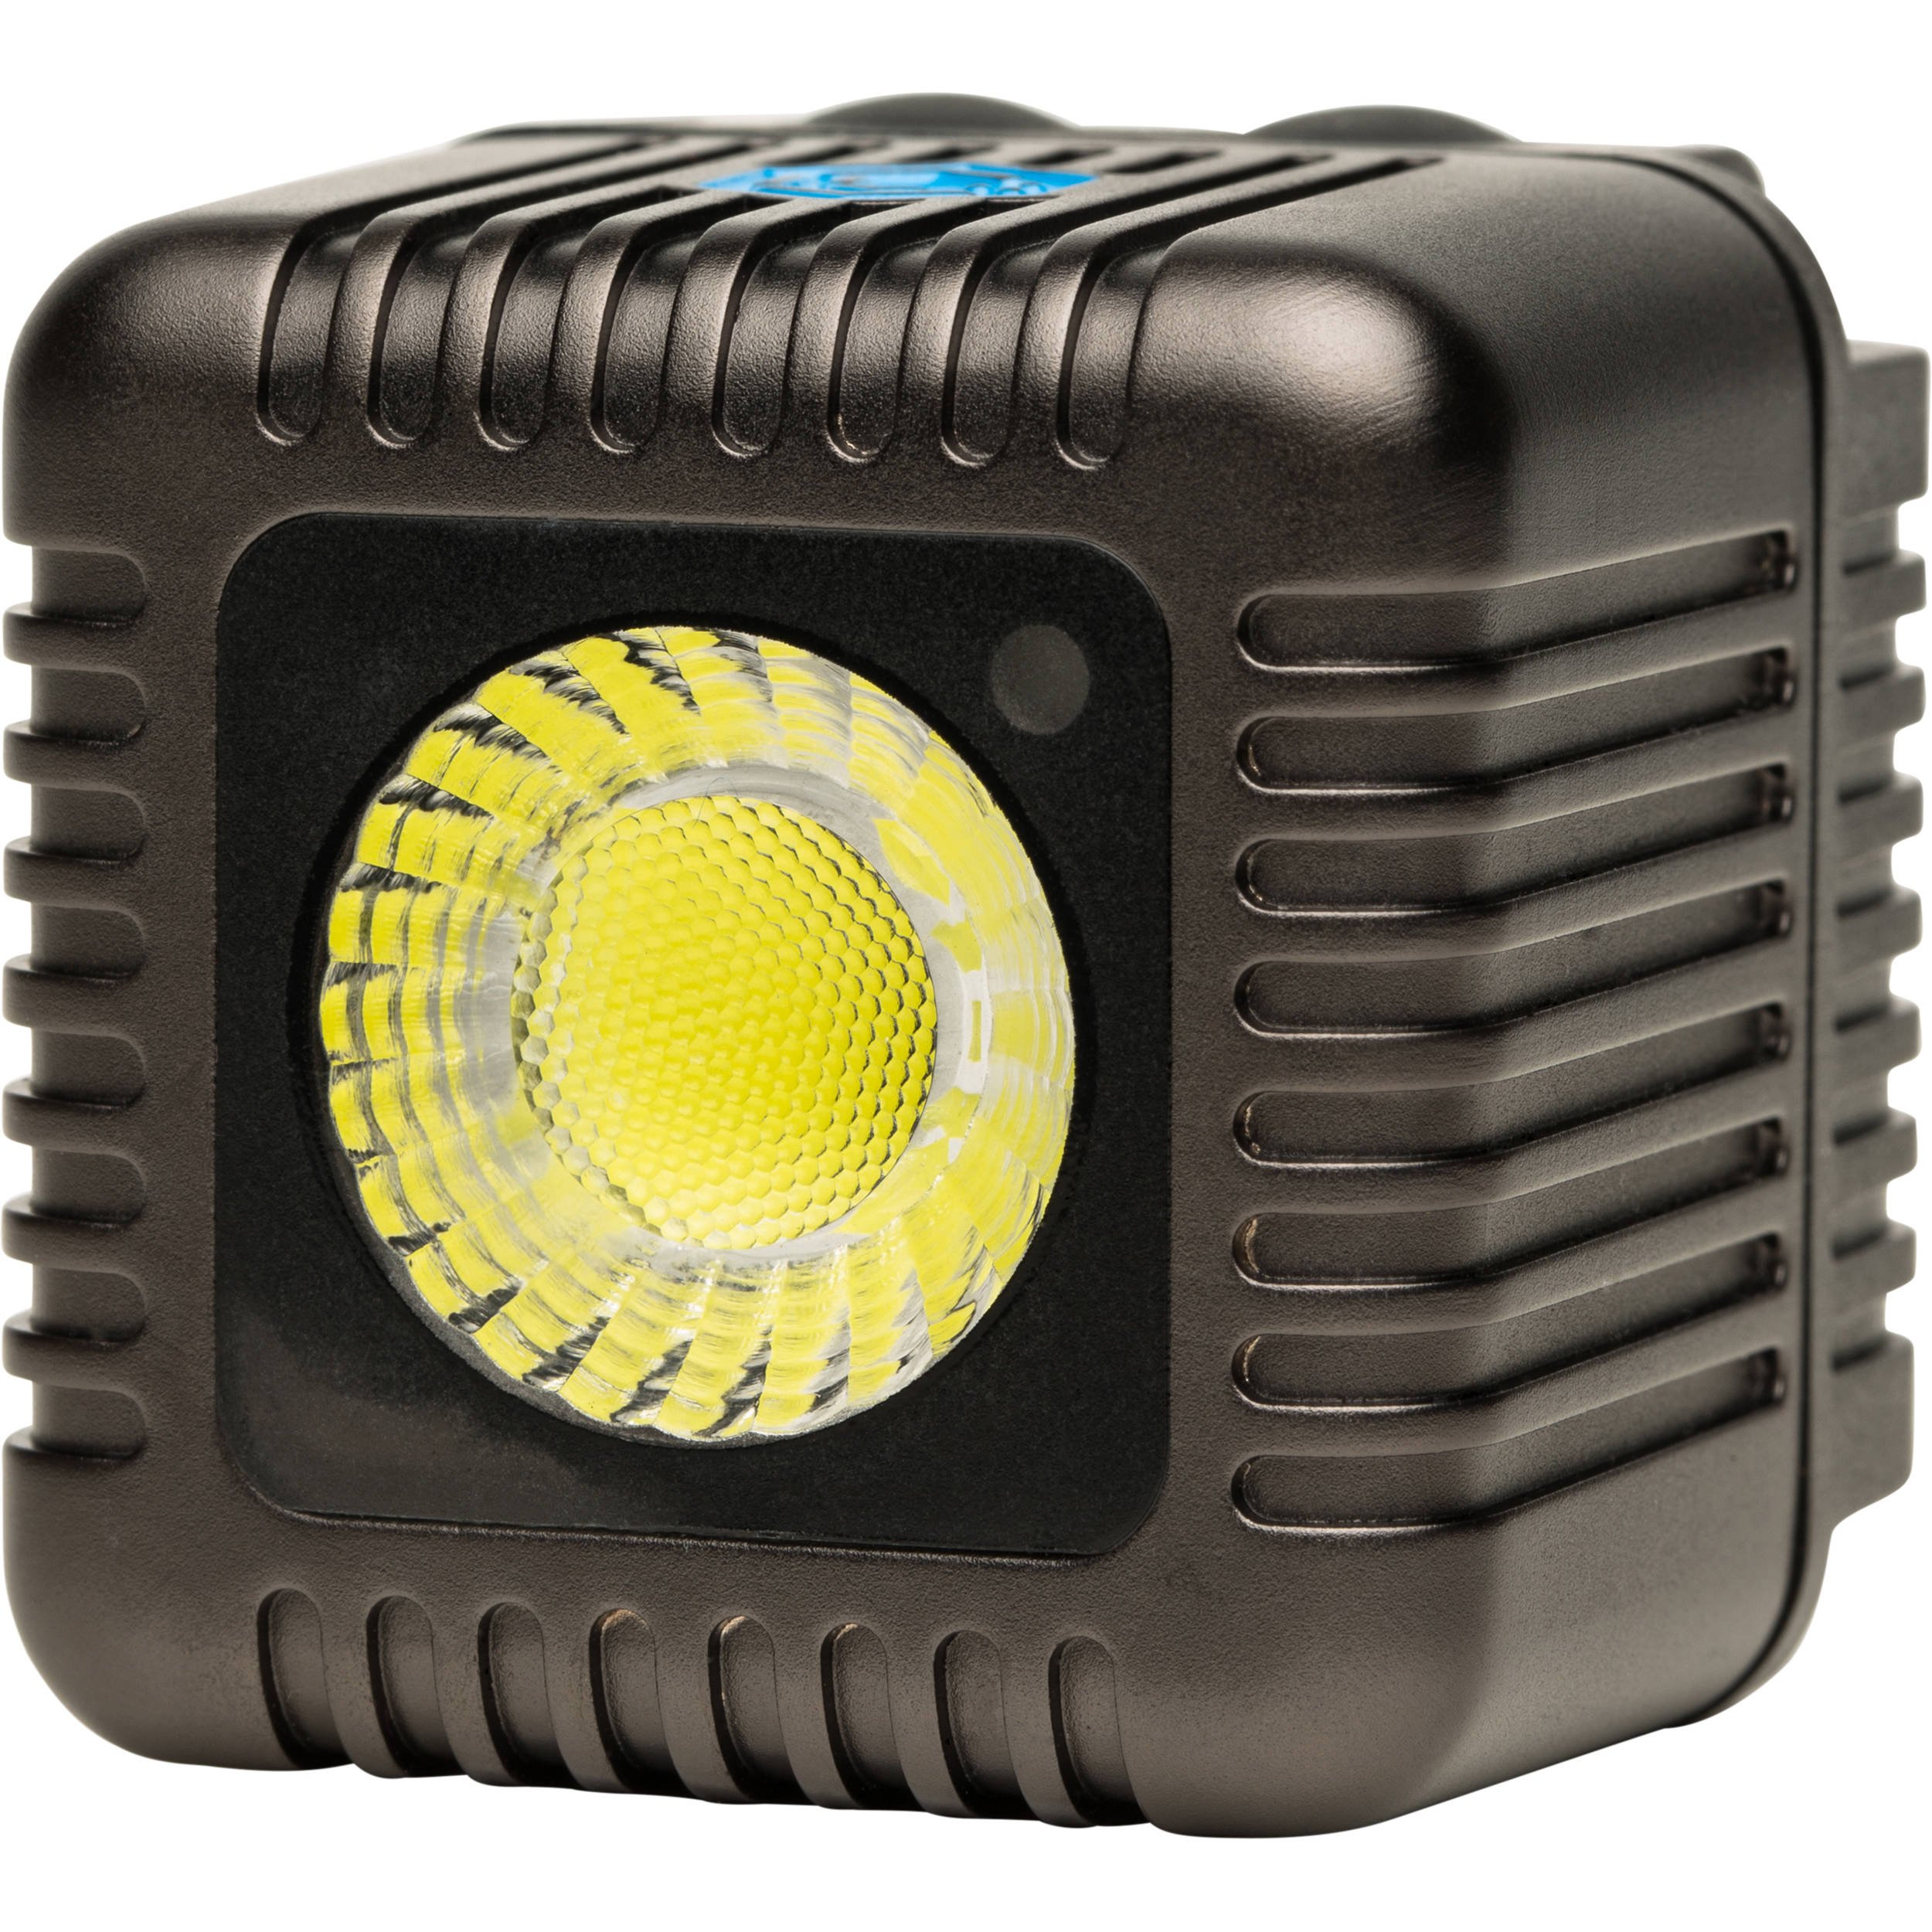 The makers of Lume Cube have a new smaller and less powerful but a highly efficient light designed for phone photography called the Life Lite. This is a smart, Bluetooth controlled, pocket-sized Lifestyle Light for iPhone, Android, DSLR or a GoPro. The Life Light will be available in March.This gadget review however, is of the original Lume Cube and the cheaper version that does not have any bluetooth connectivity. Both are identical in performance and while you can controll one with a smart phone the lite version is all manual. I have been using the Lume Cube for many months and have been most satisfied with its performance and portability. I have used these lights for macro, video and portraiture and love the results they have helped produce.Specs:
- Type LED
- Output Variable: 0 to 1500 Lumens
- Strobe: Variable 1/8000 to 1 second
- Mount Type: 1/4"-20 female
- Power Source: Integrated battery
- Battery Duration: 100% Brightness: 20 minutes; 90% Brightness: 60 minutes; 50% Brightness: 120 minutes
- Power Connector: USB (for charging)
- Waterproof Depth: 100' / 30.5 m
- Dimensions: 1.5 x 1.5 x 1.5"
CLICK HERE TO ORDERThe Lume Cube comes in a small cube shaped cardboard box that contains the Lume Cube and a USB charging cable.You do need to unscrew a small cover to access the charging port. This access cover is a requirement as the Lume Cube is rated to be waterproof to depth of 100 feet.Shaped as a cube, the unit has two rubberized push button switches on the top and a 1/4 20 mount that can be used to mount the light on a light stand, tripod or any flexible light mounting device.The two push buttons control the video light and the alternate flash function of the device. Each time you depress the on/off video switch the light cycles through 10 levels of intensity.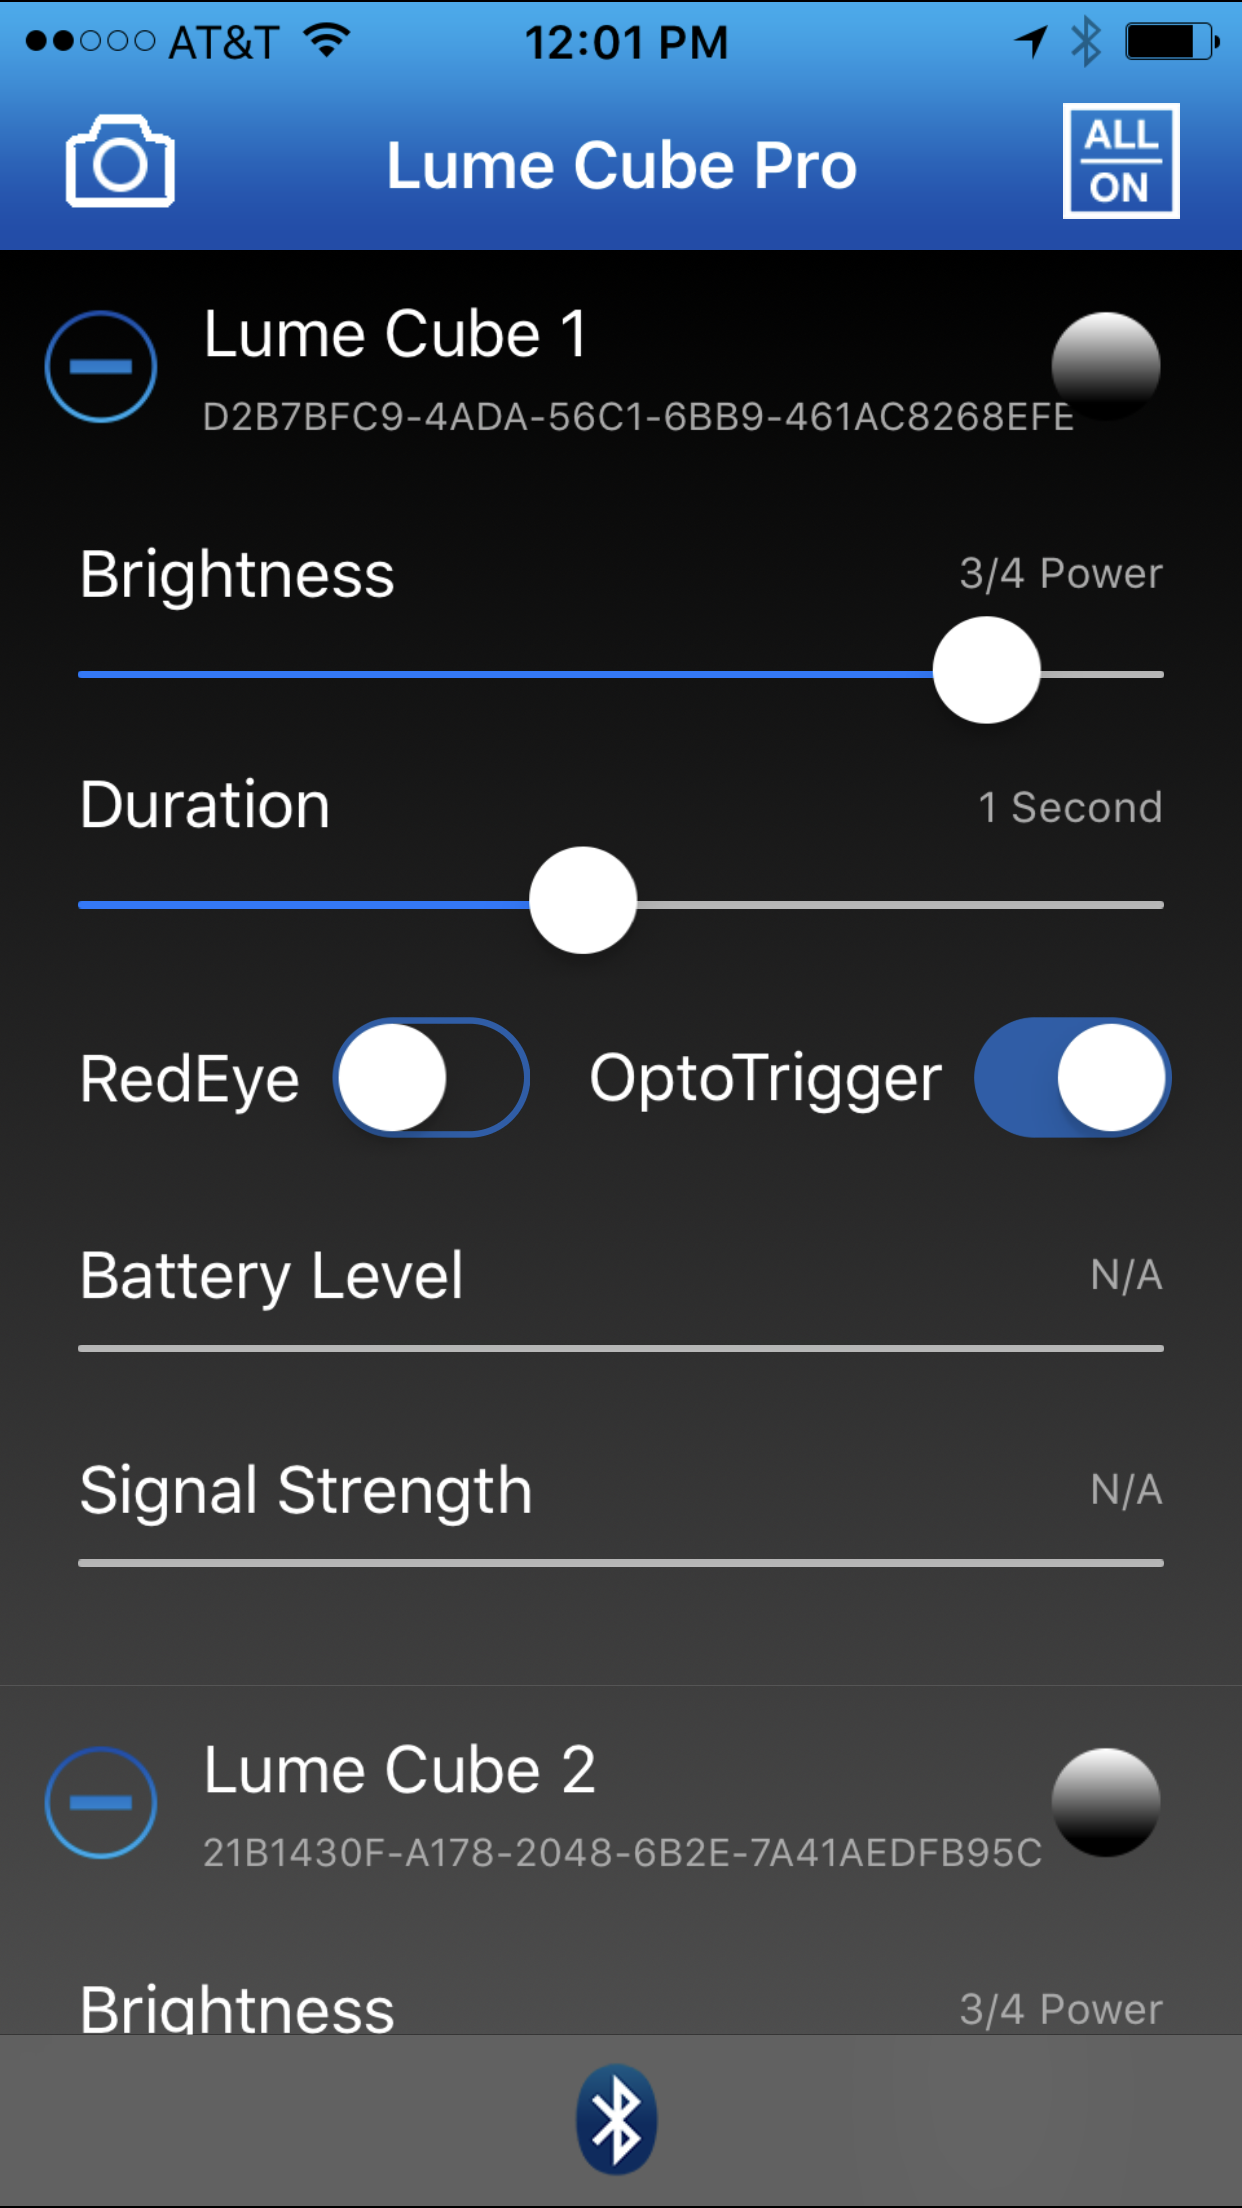 You can also control the Lume Cube using the mobile app. Lume Cube has simplified its lighting controls with a proprietary wireless, Bluetooth-enabled app, available on both Apple iOS and Android. The app is capable of controlling up to 5 Lume Cubes simultaneously. The app allows you to adjust the brightness, flash duration and red eye latency on each Lume Cube independently; and with its onboard optical sensor, Lume Cube can be configured as a slave flash unit to be fired by any other external flash.You have to register your Lume Cube to sync it to your app once registered you can control all your Lume Cube’s power and settings separately.Lume Cube Setup and test for portraitsTo test the Lume Cubes I fitted two Lume Cubes on two separate light stands. The “Main” Lume Cube was place so as to create Rembrandt lighting on the dummy head. The second was place to create a gentle fill. As you can see from the image below, the Lume Cube, due mainly to its size creates a fairly hard light. The settings were ISO 200, f/1.7 at 1/125 sec. using a Panasonic Lumix GX85 body and a Lumix 42.5mm f/1.7 lens wide open. The light emitted is cool and for this test I used an X-Rite Color Checker Passport to balance the temperature.
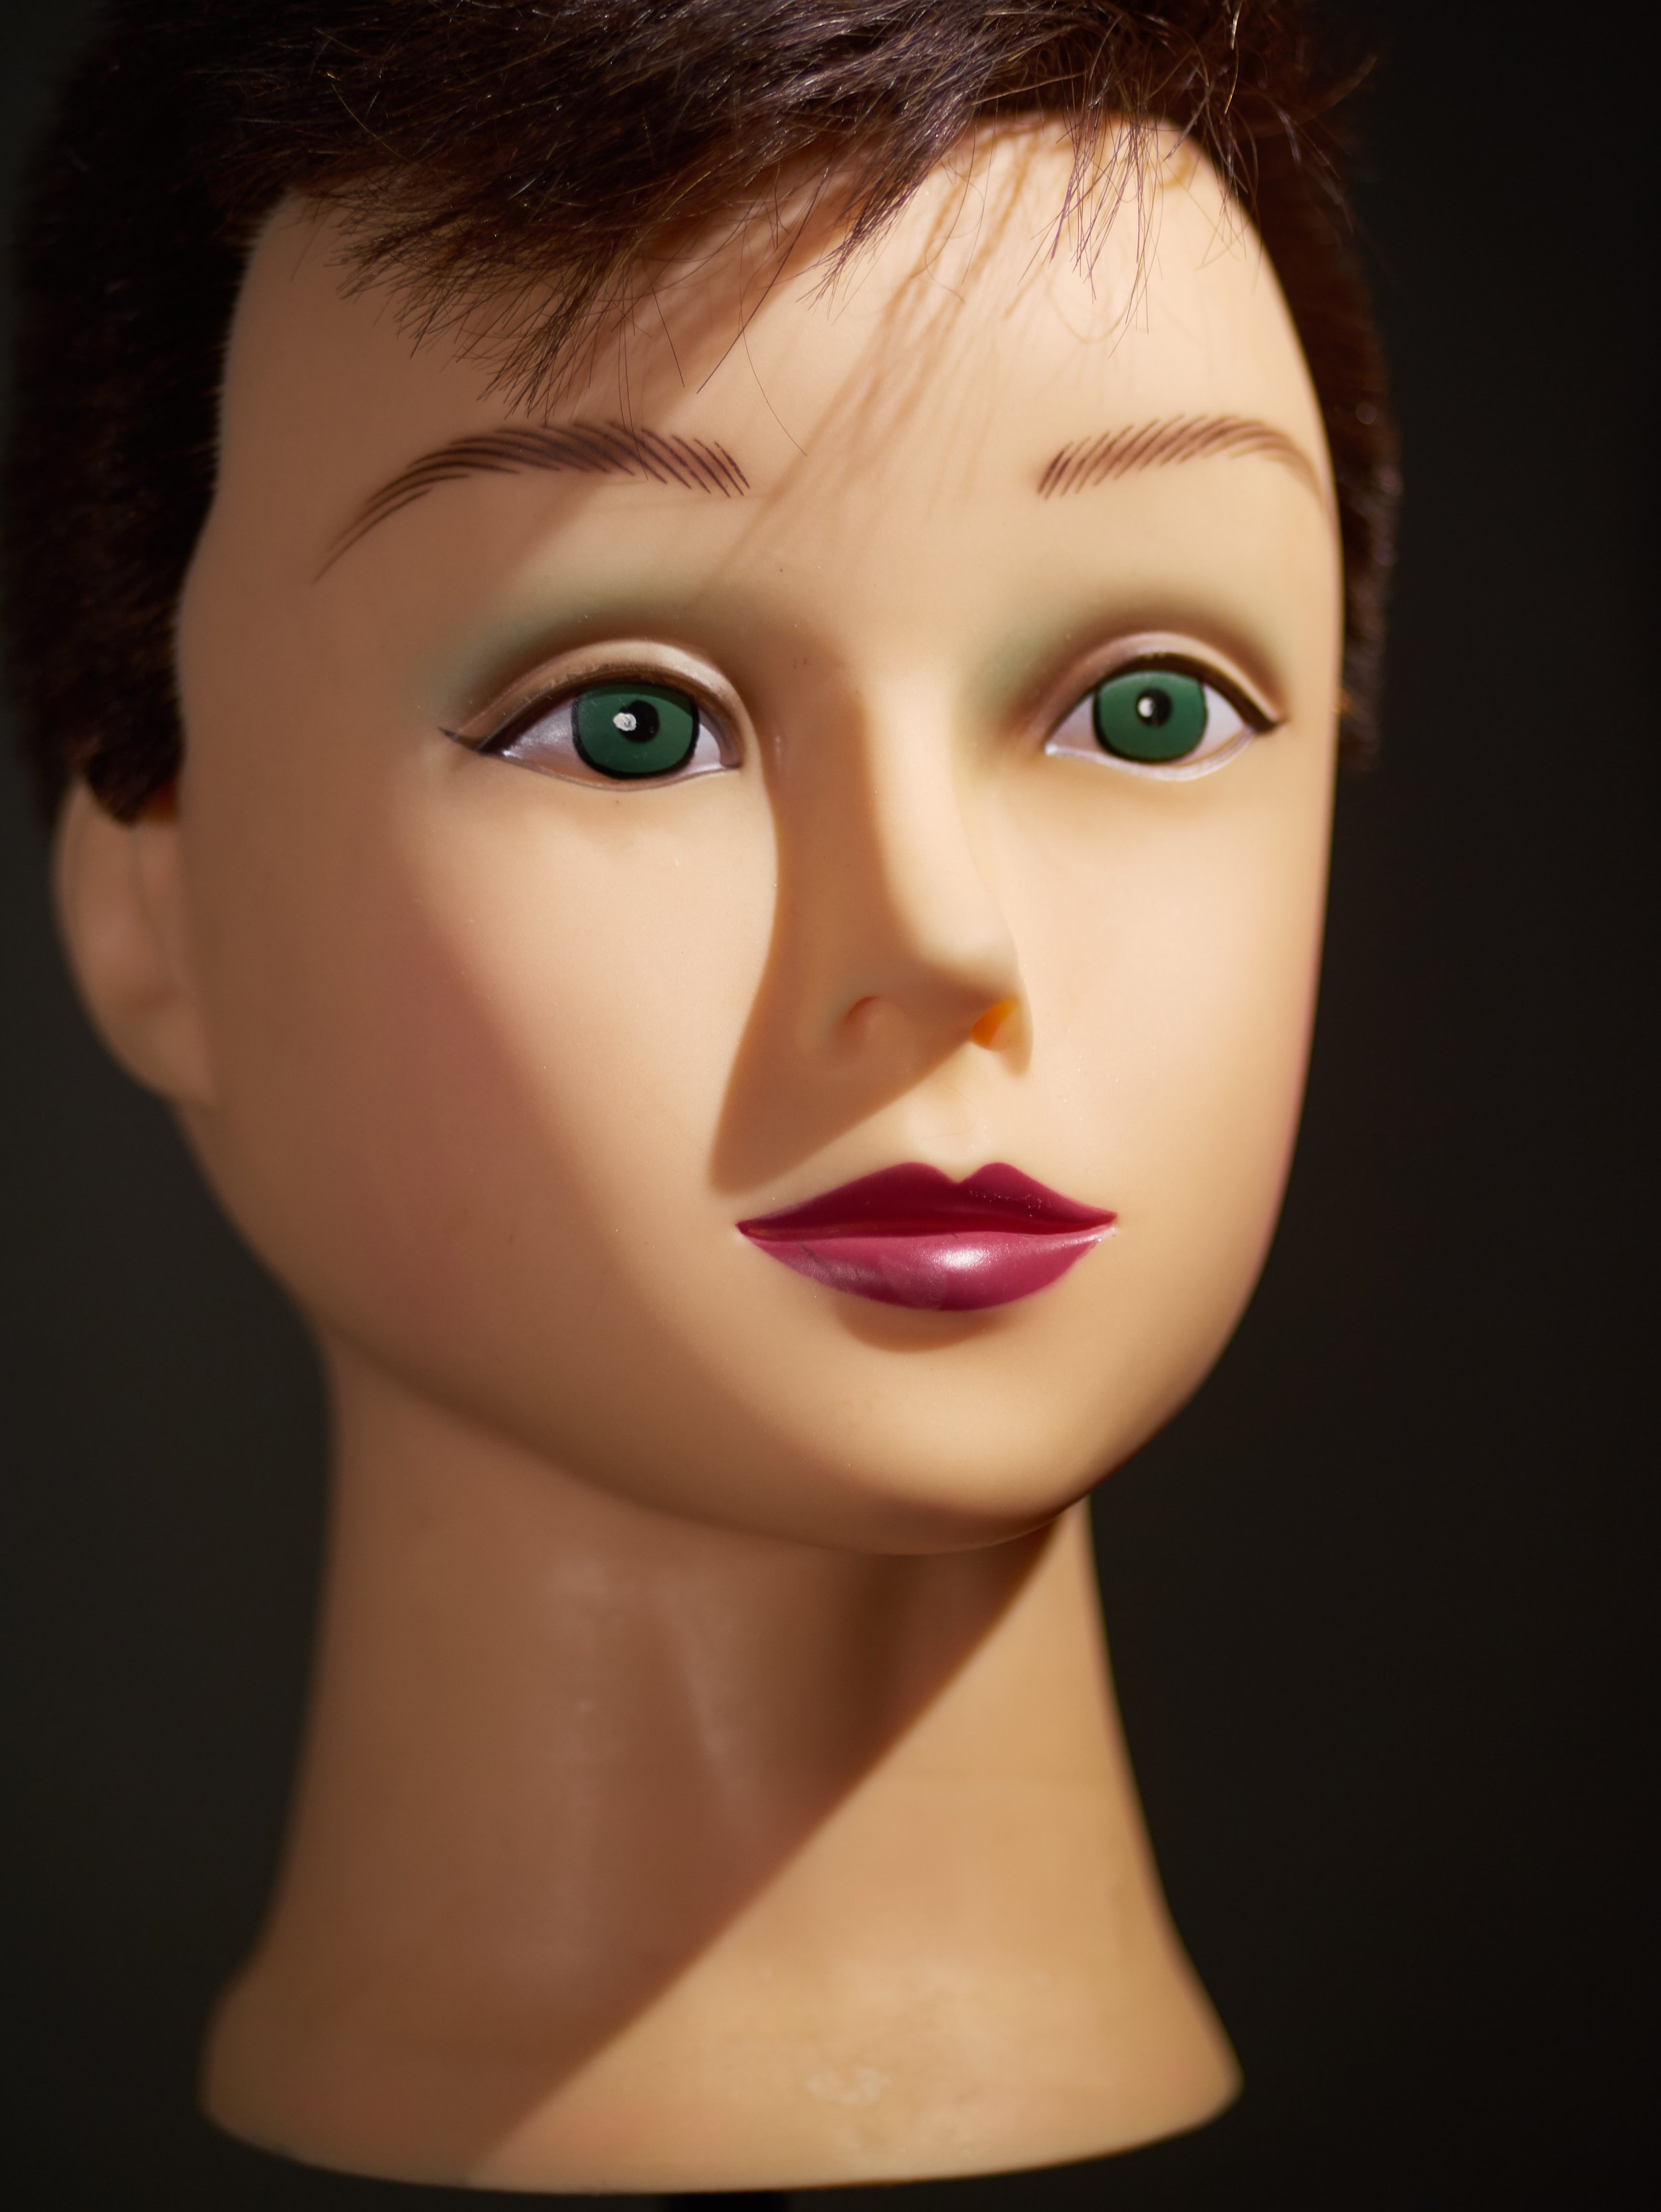 The second test was conducted with the same placement of the lights but instead of the Lume Cubes facing the dummy head directly the light was bounced off two Rogue Flash Benders. No Diffusion material was used.As you can see the light was much softer and way more pleasing in the image below. The settings were ISO 640, F/1.7 at 1/80 sec. Clearly there is about 3 stops of light loss when using the Flash Benders. However, the soft light is excellent for portraiture.
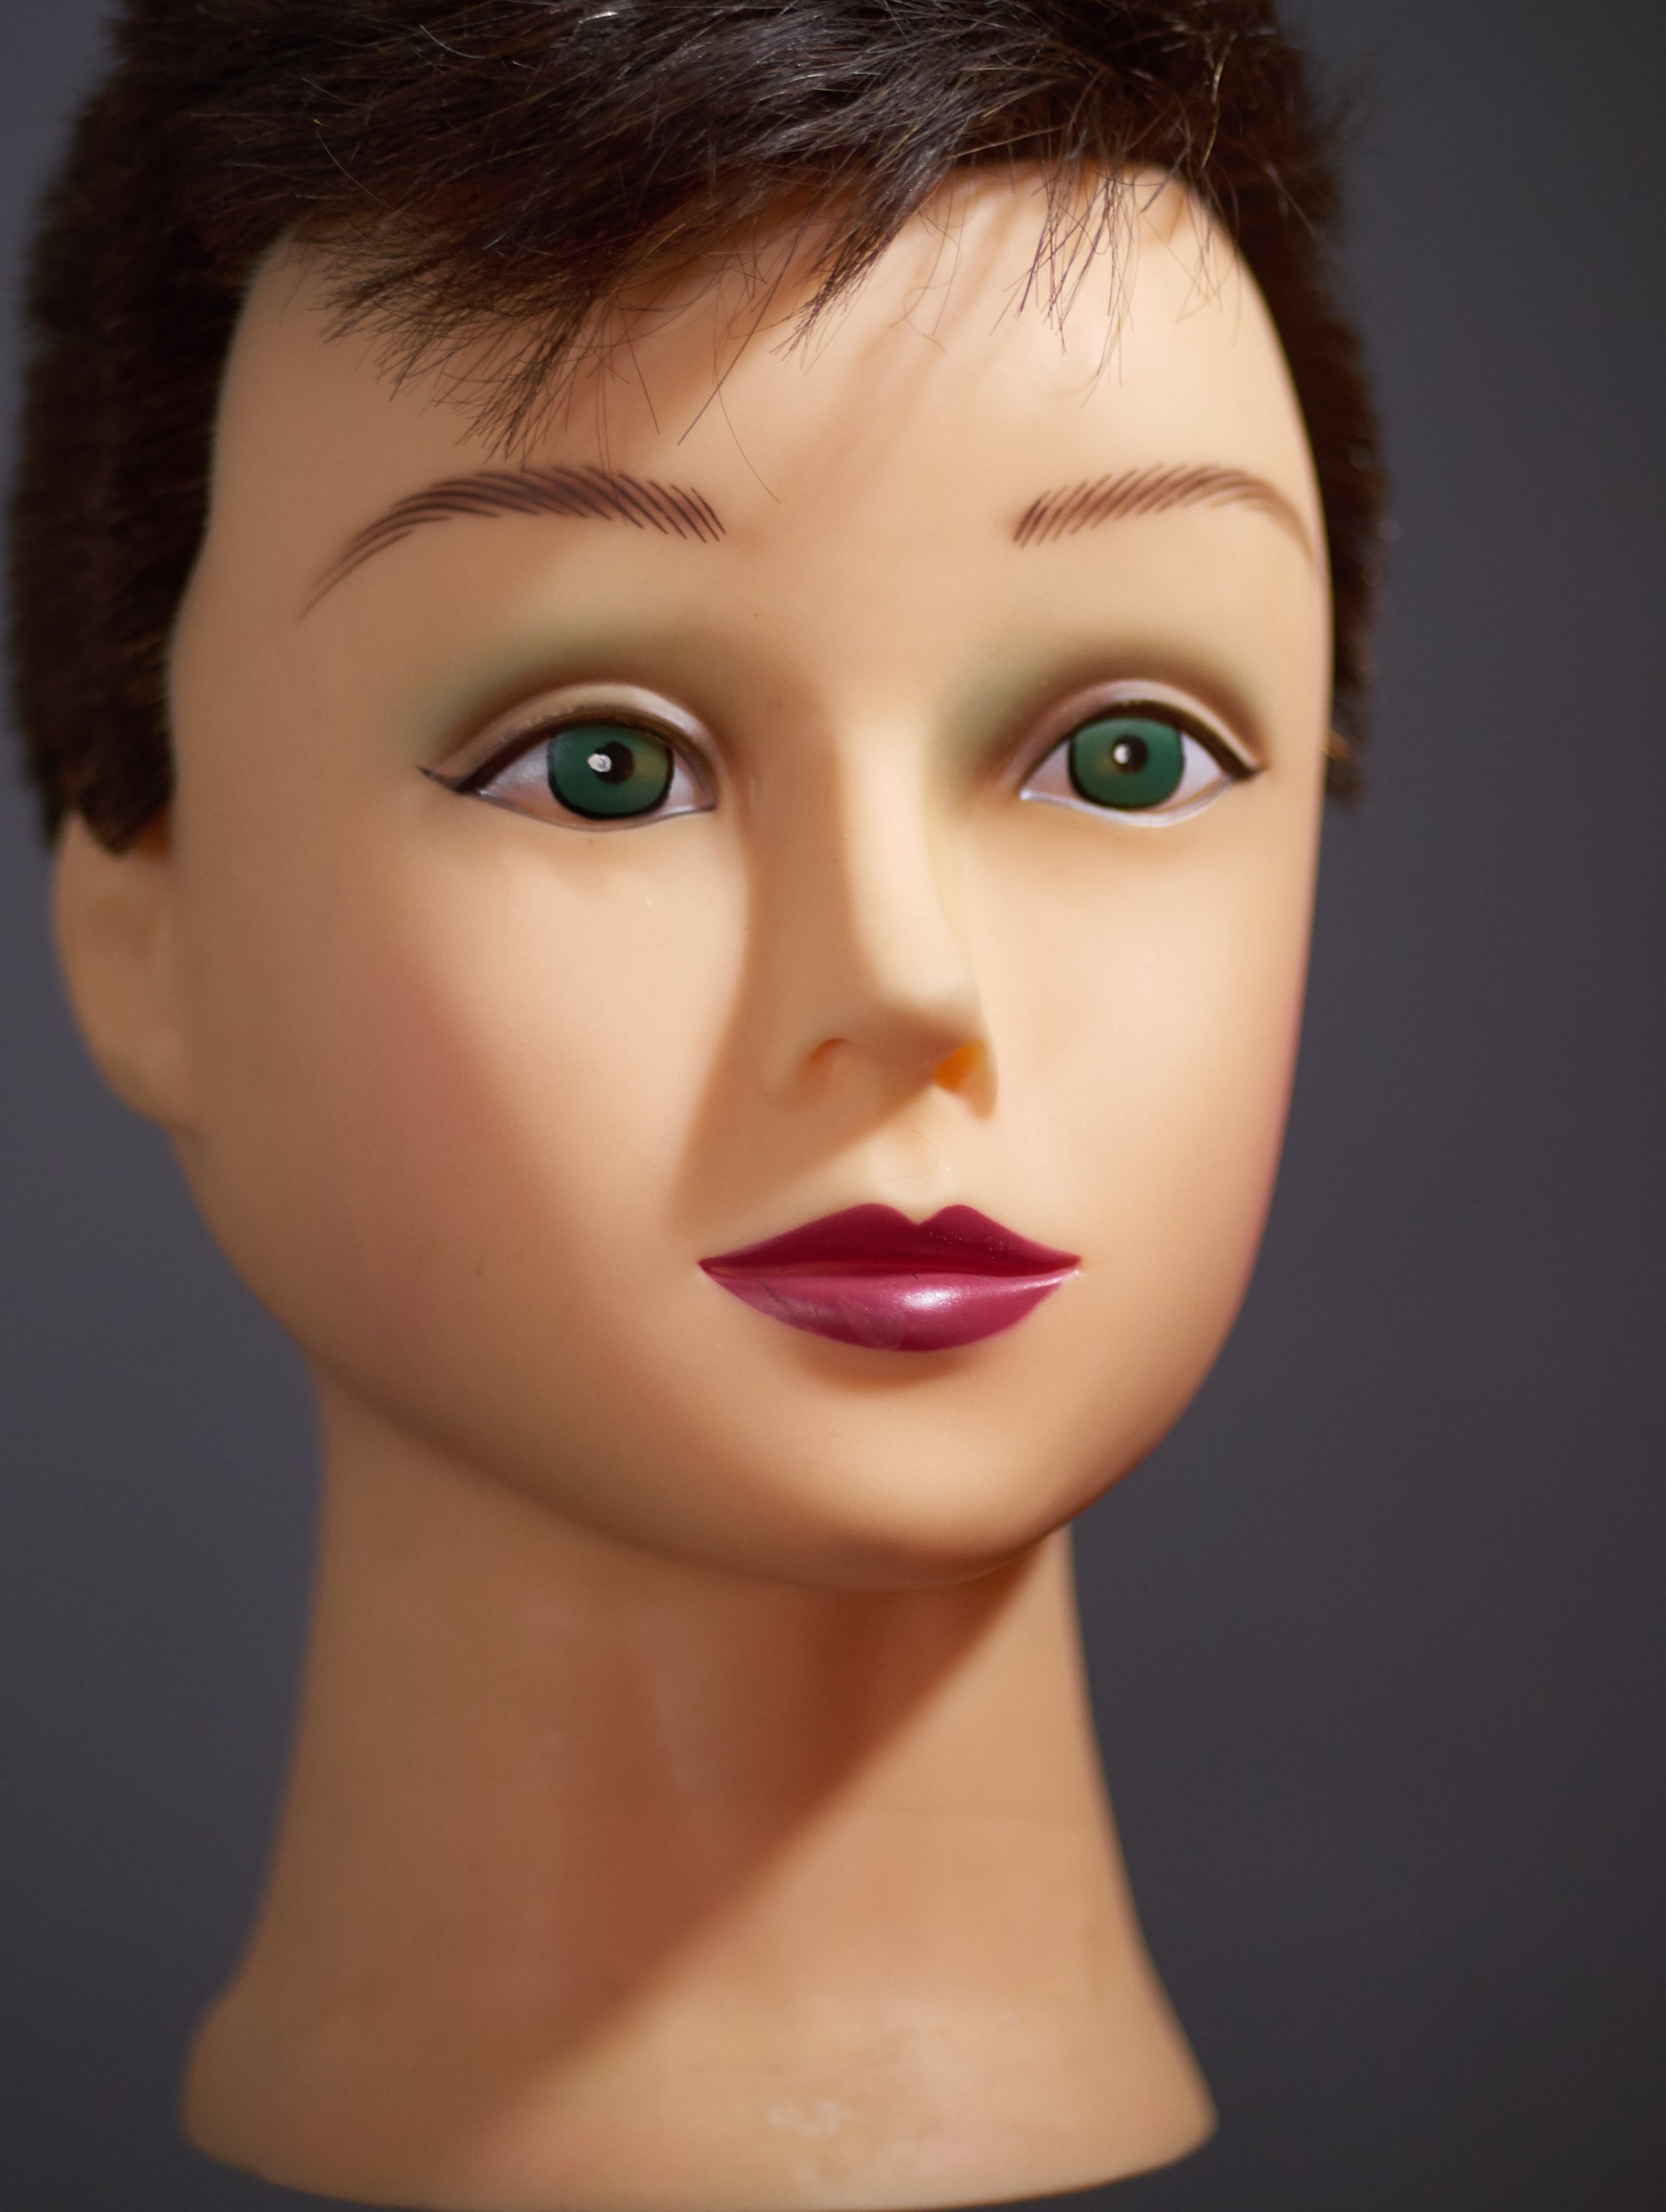 Lume Cube for Macro/Close-up PhotographyThe Lume Cube produces a really hard light as it is a very small light, but also a very powerful one. The Lume Cubes were about 1.5 inches from the subject. Exposure triad: F/4, 1/800 sec., ISO 640. The lens was a 30mm macro with an extension tube. Camera: Panasonic Lumix GX85.The following is the setup:
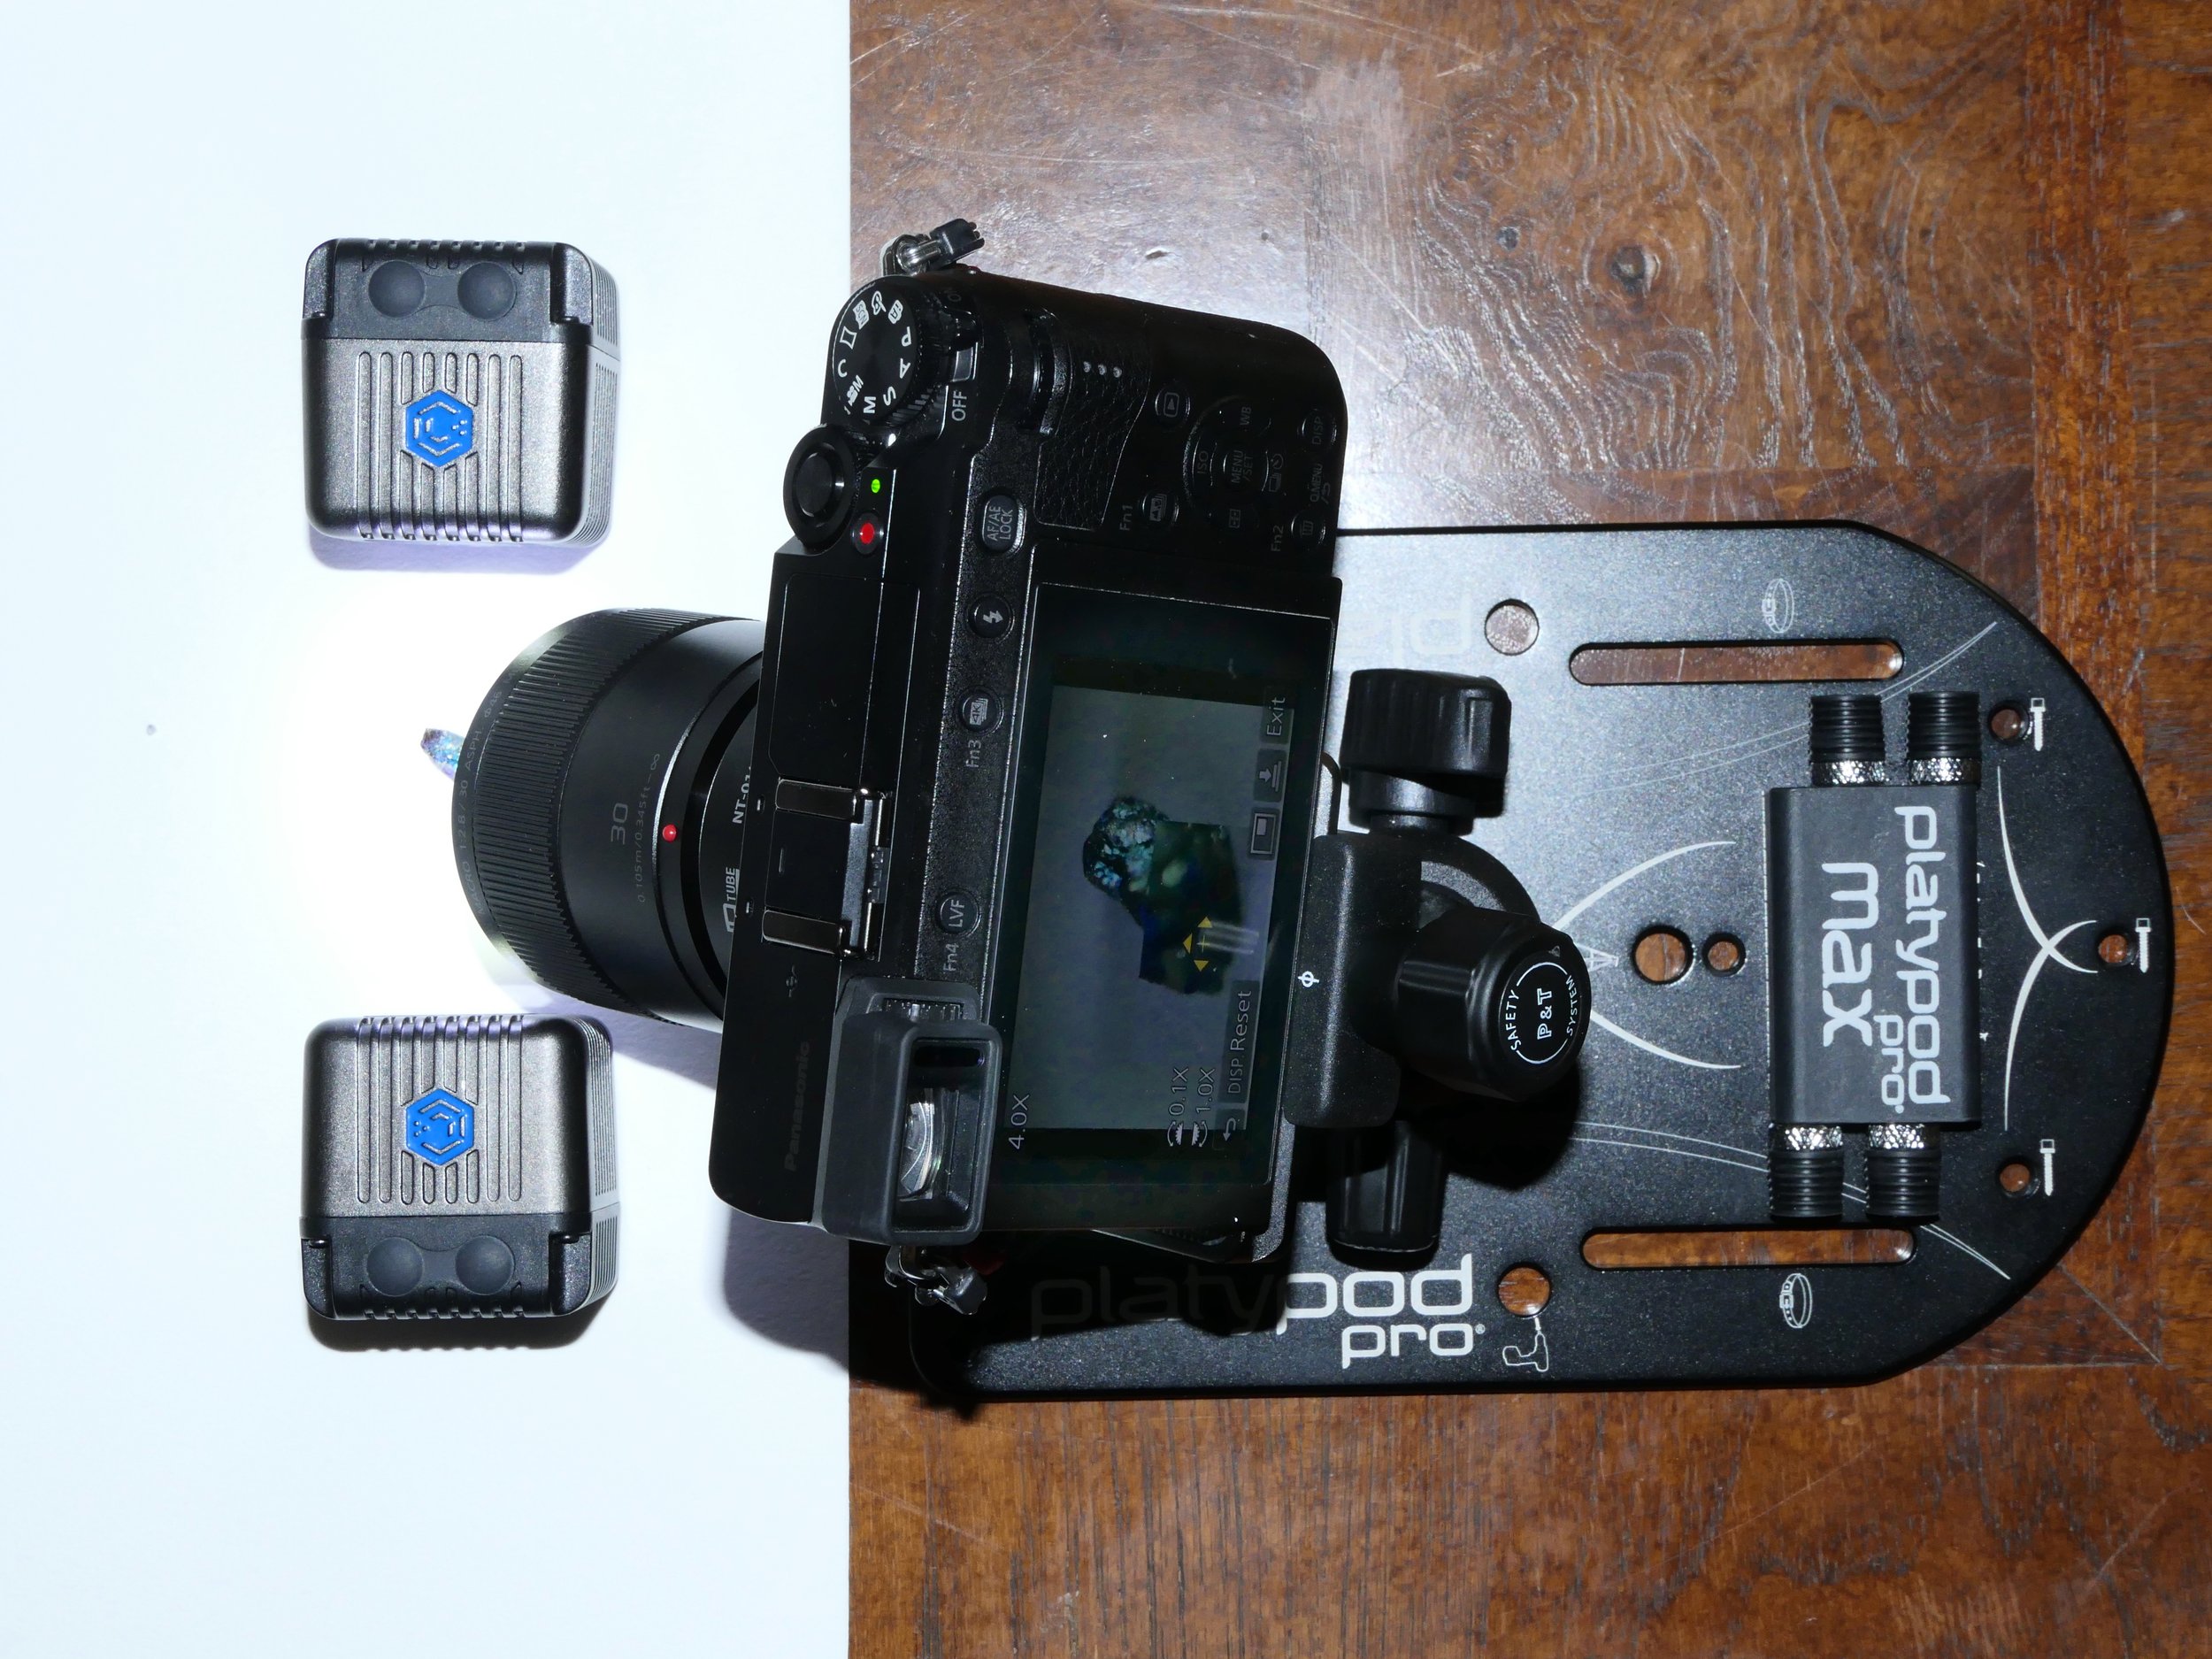 The image shown below is a 45 image stack using the GX85's focus bracketing feature.
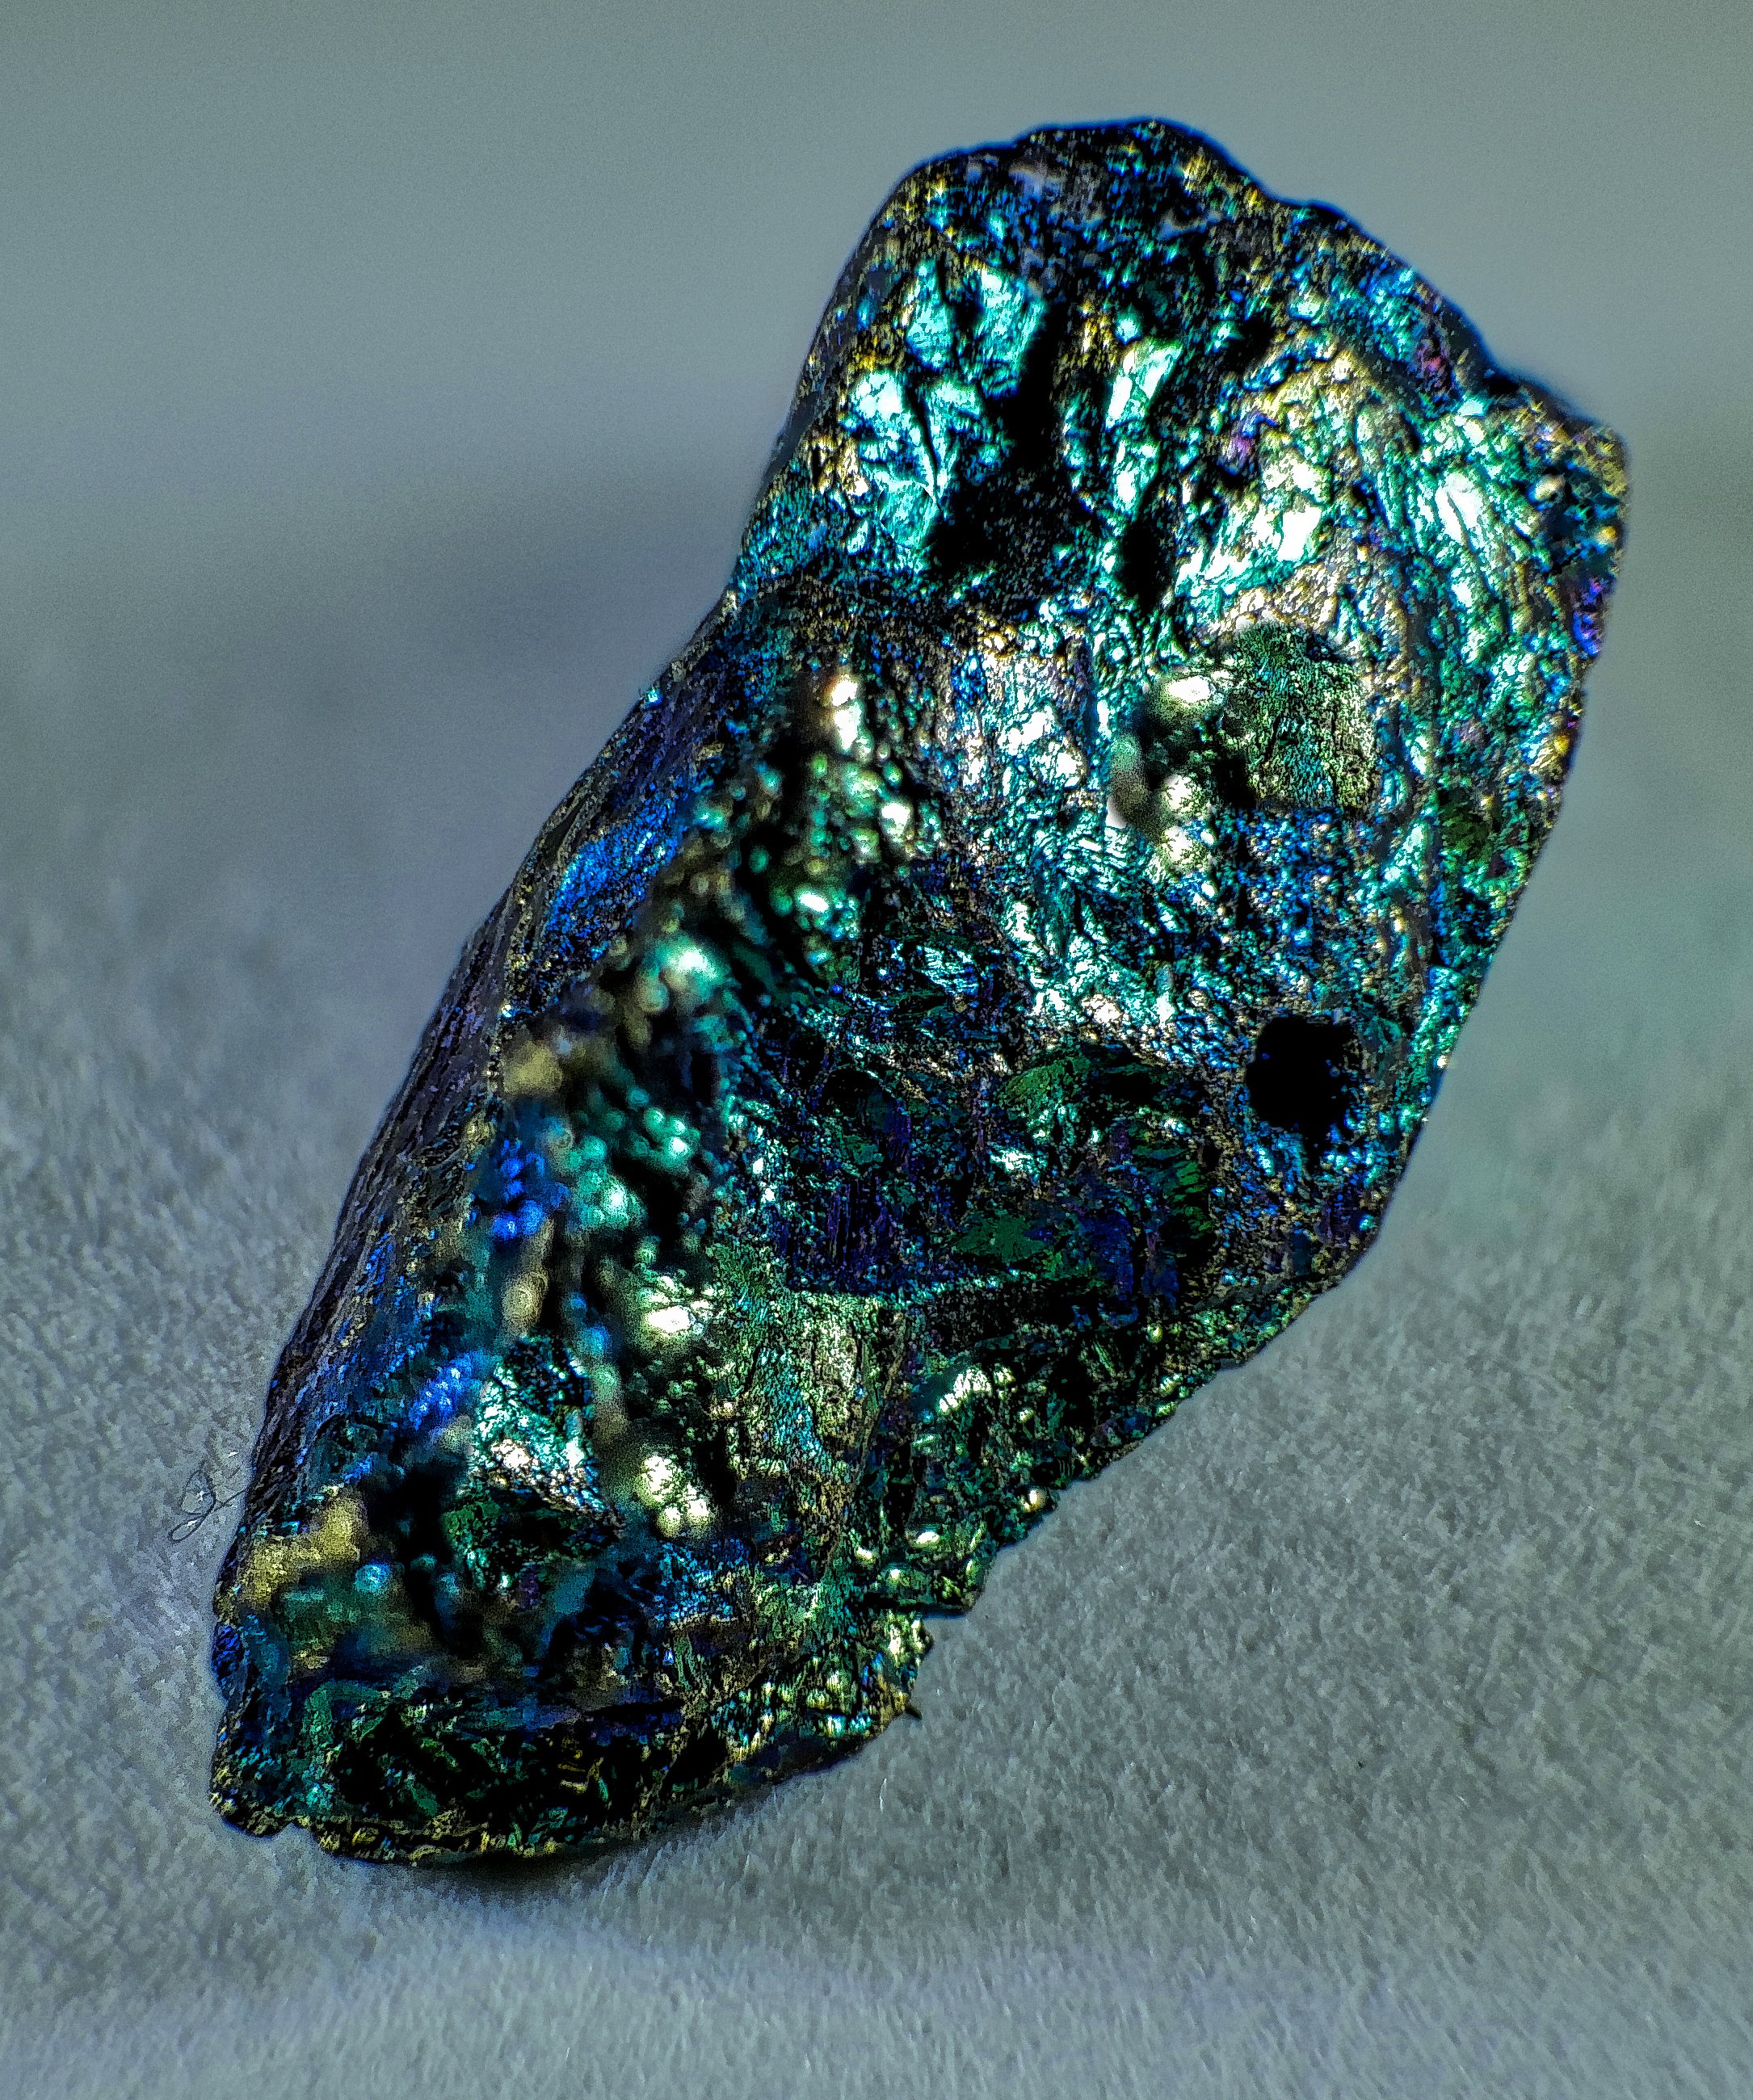 The portability of these little powerhouses has me convinced, and I tend to carry two in my bag at all times.CLICK HERE TO ORDER
Review of the Platypod Pro Max
 A while back I had done a review of the exceptionally versatile and compact Platypod Pro® Deluxe Kit. Now the makers have introduced a follow-up to the Platypod Pro called the Max.Much planning, engineering and fine machining go in to making the Platypod Pro® Max. The Max’s initial form is stamped out of a 5mm thick sheet of aircraft grade aluminum maintaining absolute flatness. Using Computer Aided Manufacturing (CAM), the plate is computer machine precision drilled for all holes and slots. Edges are round-routed and holes either threaded or chamfered to avoid any sharp edges. Key holes slots for attaching the spike screw box are drilled only partway through the plate with very low tolerances to allow easy but firm attachment. These last holes are invisible from underneath the plate.
 I have been informed by the manufacturer that the machining quality and workmanship on the Max is so meticulous that despite computer aided manufacturing the factory can only produce 1500 every 25 days!Like the original Platypod Pro the Platypod Pro Max is a sturdy flat mini tripod ideal for low-angle shots and situations where traditional tripods are cumbersome or impractical. It is however, significantly larger, has four spikes/reversible rubber feet rather than three, a belt loop, a single 3/8 inch 16 ball head mounting screw and a 1/4 inch 20 removable stud to mount accessories.
 Here is an image captured with the Max set up on top of the stone wall at Tunnel View - Yosemite NP.
 Unlike its smaller brother the Max supports ball heads of any size and is rated to support 300 pounds. A 3/8 inch 16 threaded screw hole allows you to mount the Max directly to your tripod as and when needed. Made of aircraft grade aluminum anodized black with beautiful self-explanatory laser etchings, the Max comes in a red microfiber drawstring pouch.
 If you already own a Platypod Pro the Max does not replace it, rather it compliments it where situations demand a larger base or when you need to physically move your low lying camera rig across the sand or grass when photographing wildlife.Specifications:
- Base - 6061 black anodized aircraft-grade aluminum. 5 mm thick. 5.25 x 7.75” (5-year warranty—Full replacement of parts for any defect in workmanship.)
- Fiberglass-reinforced nylon removable "bayonet style" storage box mounted onto plate to hold four 1/4-20 spikes, 2 inches long, with heavy-duty rubber feet and locking nuts. Small magnets keep spikes in place for storage.
- Five 1/4-20 threaded holes strategically placed to allow use of spike feet in configurations of one, two, three, or four at a time.
- Two 2-inch belt slots to secure to any cylindrical object or to tape onto floors for remote camera setups.
- 1/4-20 and 3/8-16 accessory threaded holes for attachment to tripods or quick-release devices under the unit.
- 3/8-16 TA2 titanium photographic bolt drilled and countersunk through the plate and welded in place for large tripod ball heads, such as the RRS-BH55, even with spike-feet in place.
- Two non-threaded holes for permanent or semi-permanent mounting to floors, walls, ceilings or panels.
- Weight: 13 ounces, including spikes and storage box.
At approximately 5 x 8 inches it is about the size of an iPad Mini and fits well in any camera case that has a slot or pouch designed to hold a laptop or an iPad. As an option you can use either slot or one of the non-threaded holes and a carabiner to hang the Max from your belt or a loop on your backpack. As compared to the original Platypod Pro, Max’s larger footprint means more stability. Like the Pro, Max is made of aircraft-grade aluminum with an embedded 3/8-inch titanium bolt. However, it does come with a few features, including a pair of slots that can secure Max via a bungee cord, zip-ties or even your belt to freestanding objects and structures. In the center are 1/4- and 3/8-inch holes to attach Max to quick-release devices, such as the Peak Design Capture Clip, or directly onto a tripod center column. A very convenient 1/4 - 1/4-inch male cross-nut allows attachment of flexible arms, speed-lights and numerous accessories. Here I used a Novoflex Flex Arm and a Lume Cube LED to light the crystal. The camera is a Panasonic GH4 with a 30mm Lumix macro lens. A second 1/4 - 1/4 and a second Flex Arm would be ideal for cross lighting a macro subject.The Max‘s larger base allows use of most any ball head. The RRS B55 is the largest ball head I own and I had no problem attaching it to the Max and all the knobs have adequate clearance. As I no longer use large DSLR’s all my tests were done with Sony and Panasonic mirrorless bodies. Using the Max with an A7RII and the 70 – 200 mm f/4.0 lens was a breeze. I also mounted a Panasonic GH4 with the new Leica 100-400 using a Wimberly SideKick for quick reaction time and maneuverability. When using the Sidekick it is imperative that you remove the holder for the spikes with a simple twist and place the cross-nut in one of the corner positions, out-of-the-way. This gives the sidekick the clearance for 360 degree rotation. The Max supported this rig very well.
 With the Platypod Pro you had to be careful mounting heavier gear. It was best to ensure the center of gravity was as close to the center of the Platypod Pro mounted ball-head. With the Max, this is a less of an issue. With a medium or large ball head the Max will comfortably support most DSLRs and mirrorless cameras fitted with normal to long telephoto lenses. A super telephoto lens properly mounted on a good ball head works well too. Here as in the image below I tested it using the RRS BH55 and the Wimberley Sidekick with a Canon 500 mm f/4.0 lens attached to a Sony A7R II using a Metabones IV adaptor.
 Similar to the Platypod the Max is ideal great for ground level photography and videography, a mount for action cameras and for creating panoramas. When creating panoramas use a pan/tilt ball head like the Unique as shown below or attach a leveling base (see following image) below the ball head as shown in an image above where the RSS BH55 is mounted on top of the Acratech 1170 leveling base. As the Max is made of a relatively thin aluminum plate it would be difficult to have a built-in level. A third-party bubble level can be adhered to the max or simply place on it to level the Max. When it is necessary to level the Max it is best to use three of the four spikes or rubber ends. Four legs are great for stability but not so for leveling. The Max is best used without spikes or feet when you want to have the flexibility of sliding it in any direction on flat surfaces, sand or grass. When friction is important then the spikes are the best option. In the reverse orientation the rubber caps not only provide friction preventing the base from sliding around but also prevent damage to furniture, painted surfaces, etc.
 For surfaces like asphalt, rocks and brick the spikes are your best choice for stability. To attach the base plate to a fence post, rail or tree limb, a pair of bungee cords, straps or your belt work great. All you need is to secure the cord around your object and hook the ends into the slots or holes in the base plate. Belts and straps can be passed through the slots on each side of the Max to secure it to any post, tree trunk or similar object.The Max with its little brother the Platypod Pro have a permanent home in my photography kit. I find I am using these support systems more than using my tripods.More on the Platypod products and their web siteAll company names, products and devices mentioned in this review are trademarks of the respective companies, registered in the U.S. and other countries.
ND Filters' Color Cast comparison - Vü 10 stop Sion, Lee 10 stop (Big Stopper) & Formatt Hitech 8 stop
The Lee Big Stopper was introduced in 2010 to compete with the Hitech 10 stop filter that was known to have flare and other issues. Subsequently Hitech reengineered their 10 stop filter and emulated some of Lee’s design features. In particular the the light blocking gasket. Soon Lee introduced the Little Stopper while Hitech developed a wider range of solid ND filters the Pro Stop line from 6 to 10 stops and in multiple sizes. Most recently I was introduced to the Vü system and hence this test as a comparison. I will do a full review of the Vü system in the near future.As I own the Lee Big sStopper and the Hitech 8 stop with the Hitech holder (I do prefer the Hitech to the Lee holder) I was keen to understand the differences in the way high f-stop ND filters impart a color cast when used. Hence this test. Please click on the images to see a larger version.The set up was fairly simple. Using a Sony A7R II and a Zeiss Batis 85mm f/1.8 lens set at f/2.0 and a base ISO of 50, shutter speed 1/125 sec. The light source was two Elinchrome studio strobes positioned to give a 1/3 stop exposure variation at the edges. The camera was focused on a white foam-core board with a X-Rite Color Checker Passport clamped to the upper right corner. Camera white balance set for flash rather than a custom white balance (5450 Kelvin) and an "as shot" tint of +9. I wanted to allow for any variation in the white of the foam-core board that is typically not 100% white be adjusted in post.The test exposure was made and the white balance adjusted in post using Lightroom - this is the image below. White balance adjustment yielded a temperature of 4750 Kelvin and a tint of -1: Next the strobes were adjusted to full power providing 8 additional stops of light. The ISO was adjusted to increase sensitivity by two stops while the aperture of the lens was kept at a constant f/2.0 for all the exposures. Each filter was tested for color cast only.
The Lee Big Stopper (10 stop ND)
The Lee Big Stopper (10 stop ND) was mounted and the image as shown below was captured. This is as a screen shot so as to show the RGB histogram. The info panel shows the reading from the center of the captured image. Values are R=219, G=229, B=243 In this next image the Info Panel shows RGB values from the lower third of the image. Values are R=187, G=203, B=222
 Next the image was white balanced in Lightroom WB to 8600 Kelvin and tint +43. Compensated for the color of the board and the lights the calculated readings are 7900 Kelvin and a +35 Tint adjustment.
 The Lee Big Stopper exhibits a heavy blue cast in both the center and the edges.
Formatt Hitech 8 stop ND filter
As I do not have a 10 stop Formatt Hitech filter, I chose to do the same test with the 8 stop that I own. As with the Lee filter before, here the info panel shows the reading from the center of the captured image. Values are R=234, G=238, B=236 In this next image the Info Panel shows RGB values from the lower third of the image. Values are R=209, G=220, B=212
 Next the image was white balanced in Lightroom WB to 5750 Kelvin and tint +52. Compensated for the color of the board and the lights the calculated readings are 5050 Kelvin and a +44 Tint adjustment.
 The Formatt HiTech 8 stop exhibits a heavy green cast at the edges but is more neutral in the center.
Vü Sion Q 10 stop Neutral Density Filter
The Vü Sion 10 stop ND filter mounted using The Vü professional filter holder (more abut this in a future post) and the same test was performed. As before the image captured is shown as a screen shot showing the RGB histogram. The info panel shows the reading from the center of the captured image. Values are R=235, G=235, B=239 In this next image the Info Panel shows RGB values from the lower third of the image. Values are R=211, G=214, B=219
 Next the image was white balanced in Lightroom WB to 5800 Kelvin and tint +13. Compensated for the color of the board and the lights the calculated readings are 5000 Kelvin and a +5 Tint adjustment.
 The Vü Sion 10 stop is very neutral in the center an has a negligible shift at the edges.In conclusion I am very impressed with the Vü Sion 10 stop and is near neutral rendering. My full review of this system is forthcoming.
TWiP Episode 453 – Hot New DSLRs!
Click here for the Youtube ChannelHere is the link to the TWiP page
Panasonic Leica DG Vario-Elmar 100 - 400mm F/4 - 6.3 lens
 Last week at the Space Coast Birding and Wildlife festival I had the opportunity to briefly try out a pre-production unit. The lens was one of the first pre-production units and a lot has changed since it's manufacture. The final units will be way better in image quality, performance and handling. With that said, I will say I was truly impressed with the way the lens performed.The Leica 100-400mm is an f/4-6.3 telephoto zoom lens that gives the equivalent of 200-800mm in 35mm equivalence.The lens has a lockable zoom pull feature, so you can pull the end of the zoom to set the zoom position, or when it is locked, you need to rotate the zoom ring to vary the focal length. The lens has Power Optical Image Stabilization, and high-speed 240fps AF drive, which makes it incredibly fast in focusing performance. It is also, splash and dust proof.A feature I found most useful was the lens collar and foot that also rotates all the lens function switches. This allows you to easily access these in any orientation, landscape or portrait.In thumbnail view, hover over the thumbnail to see the focal length and exposure details. To see a larger rendition of this slide show please click here

Review of the Hähnel Captur Module Pro, Captur Module - IR and the Captur Receiver
Hähnel Captur Module Pro remote trigger with sound, light, laser and IR triggering. Hähnel of Ireland has replaced the wonderful Giga T pro with Captur Module Pro. Capture is high-speed trigger system that will provide remote triggering, intervalometer functions, delay triggering, long exposure and will will also work as an ordinary flash trigger.Some of the more interesting features are sound, light, laser and infrared sensors for high-speed or wildlife photography. What is even better is that the system has an auxiliary port. This allows you to use any third part triggering devices to be connected to the Captur Module Pro that in turn will trigger your camera.The basic kit comes as a set of two devices. A hand held control unit and a IR transmitter. You will need an optional wireless unit to control your camera wirelessly. The controller is a 2.4GHz transmitter with a range of 320 feet. It will work with either shoe-mount flashes or studio lights as there is a hot-shoe and a sync port. There are models for Nikon, Canon, Sony and Olympus/Panasonic. Best of all the modules all use AA batteries.Features:
- Captures Time Lapse Photography, High Speed Photography, Motion & Wildlife Photography
- Four built-in sensors (light, sound, Laser & IR). The package indicates five built-in sensors however there are four sensors (three windows) and an auxiliary port that can accommodate an infinite variety of sensors and triggers.
- Auxiliary port allows to connect 3rd party sensors such as pressure plates, humidity & temperature sensors
- Fully programmable timed sequences including delay, interval timer, exposure count & exposure length setting
- Shutter release button with autofocus, single & continuous shooting & bulb mode
- Connect wirelessly to camera using the Captur Receiver (sold separately)
Construction:The Captur Module Pro and the IR Transmitter are encased in rubber shield that covers the unit with the exception of the display and control face. Each has a 1/4 20 thread that lets you mount the units on a tripod, light stand or clamp. The IR Transmitter mounts inverted to protect it from the elements. The Capture Receiver is not rubber encased. Module Pro: The face of the unit has the display window, three buttons - Lock, Trigger and Start/Stop. Blow these is the four way rocker and a center “set” button. The left side has the cameras cable release port and the auxiliary port. The top has the microphone, IR sensor and Light sensor. The right side has a micro USB port that can be used to power the device, and the on/off switch. Note the micro USB port is covered by the rubber enclosure. The underside of the unit has the 1/4 20 mount and the battery compartment also accessible by removing the upper enclosure.
 The Module IR has a high/low switch on the front face and the 1/4 20 mount. The IR bean is emitter from the top of the unit.he On/Off switch is located on the left side and the batter compartment is in the bottom also covered by the rubber enclosure.
 The Capture Receiver has a flash hot shoe on the face a test button and an indicator light that flashes green when the unit is ready and turns red when the unit is activated. The left side has the remote trigger cabe port while the right has the On/Off switch. The bottom of the unit has a combination hotshot mount and a 1/4 20 mount. Also on the bottom is the battery compartment. Note: this unit does not have a rubber enclosure.Using the units:The handheld remote controller can be connected to your camera with a remote cable or wireless is used with the wireless receiver unit. The controller will allow you to configure various shooting scenarios that require precise delays and also works as an intervalometer for time-lapse photography. Unlike the Giga T Pro, Captur Module Pro will work as a conventional flash trigger in addition to the remote triggering functionality when paired with a Captur unit.The control unit has settings for Hours, Minutes and Seconds (HH:MM:SS) and a mode delay of 00:01 through 10:00 seconds (duration in 1/100th second). A 4 way rocker for modes and a central push button for setting the parameters. Buttons for triggering, start/stop and lock. There are four configurable options:
- Delay - lets you set an interval between the time the trigger is fired and the shutter is activated.
- Long - allows you to set a long exposure duration - the camera must be set to bulb mode. It is also possible to do long exposures without programming. This is achieved by depressing the release button for 3 seconds and the bulb function will lock and you can release the button. Depress the button once more to end the bulb exposure (long exposure).
- Interval 1 - is configured to set the interval between shots and then N1 sets the number of shots to take.
- Interval 2 configures the time between interval (Interval 1) activation sand N2 configures the number of times the Interval 1 and N1 sequence is repeated.
Using the Captur Module pro is easy if you are familiar with the Gia T Pro system. There is an online manual that is reasonable week detailed for those who have not used a Giga system or are new to Remote triggers and intervalometers.Configuring for various modes:All modes have some common options: sensitivity, amount of delay before the unit will trigger the shutter, the duration of shutter open when the camera is in bulb mode and the number of allowed activations. To enable a mode all you need to do is to press the Start/Stop button to start the process. A ready LED turns green and when the mode is triggered the LED turns Red as a verification.To set the mode, use the rocker switch to get to the sensor mode you want. The modes are in the following order:Sound mode- adjust the sensitivity of the sensor as needed.Infrared (IR) mode, (you need to use the Module - IR). Set the Module - IR and the Module - Pro so they are aligned with the IR beam lens in line-of-sight with the receiver window of the Module Pro. When the IR beam is interrupted the unit will be triggered. The Module IR has High/Low setting. Use the low setting for a beam length of 4.5 feet or less and the High for lengths greater than 4.5 feet.Light Mode - here the sensor is activated when there is a change in light level - bright to dark, dark to bright. Ideal for fireworks, lightning, or indoors with any light being turned on or off.Laser - this mode requires a laser beam to be pointed at the receiver window and works the same way as the IR beam but with a much greater distance between transmitter and receiver.AUX - this mode requires you to connect any triggering device to the Captur Module Pro via a 1/8” Tip-shield plug.Pricing:The Captur Pro Module is $120, Two receiver modules are $45 each; A pair of flash triggers not reviewed are $100 and the Capture Timer Module also not reviewed is $60.Conclusion:In my opinion the Captur system is probably the most versatile triggering system I have used and as it uses AA batteries it will last through extremely long time-lapse sequences without having to worry about a premature shutdown. The construction is solid as is the performance. In all of the tests performed the unit did not miss-fire.
Peak Design - CLUTCH - an excellent hand strap
 This is the second in my three-part review of the Peak Design camera strap product line. Here I review the Clutch. This is a comfortable and beautifully constructed support strap. This is no ordinary hand strap, it is not only easy to attach but has a wonderful feel around the back of your hand.
 |
 |
The top end is attached to the strap loop of your camera via a looped band that is then attached to the strap using a spring-loaded trap-door style locking mechanism. The other end is connected via an Anchor Link attached to the supplied camera base plate or your Really Right Stuff compatible plate. I attached this to all three of my mirrorless cameras and my wife’s Canon 6D. I found it to be most comfortable when attached using the supplied plate or the RRS plate on my Panasonic GH4 and with the Canon 6D. On the Olympus OM-D E-M1 and the Sony A7R the RRS plate extends too far to the right that provides too much slack. This slack has the Anchor Link clasp interfering with your hand and is not comfortable at all. However if you use the supplied base plate this is no longer an issue.Once the Clutch is properly attached it is a breeze to tighten it for a perfect grip by pulling on the tab of the tightening band. To loosen, you simply lift on the end of the friction loop to release the tension.
 As with any hand strap there is a concern of the camera possibly slipping out of your hand and falling to its doom. If this is a concern, you can easily solve this by attaching a second Anchor Link to the base plate and use a to secure the camera to your wrist, using the “Cuff”.
Specifications (from the Peak Design product page)
- Weight: 45 g (123 g as packed)
- Strap length: adjustable from 18 cm (7 in) to 29 cm (11.4 in)
- Strap width: at the widest point, 51 mm (2 in)
- Strength rating: Vectran®-corded Anchors can withstand over 200 lbs (90 kg), making Clutch safe for use with the largest of professional cameras
Build quality
Of all the straps that I have used in the past and currently, I find the Peak Design Clutch to have been made exceptionally well as I have found with the other Peak Design straps. As with the Slide, every component is beautifully constructed, all the stitching is truly well executed. The adjusters, the loops and the tripod plate are all of the highest standards.I have been using the Clutch to my Panasonic Lumix GH4 for two weeks and am very pleased with the performance. . With the cuff as added security this is an excellent combination.
My final assessment
This is undoubtedly the most comfortable hand strap I have used. It is ideal for the lighter DSLR’s and any mirrorless bodies on the market. Of significance is the easy of tightening and loosening the strap.I would not hesitate to recommend the Clutch and give it 4 1/2 star rating out of a possible 5. The street price is about $40.To get any Peak Design product click on the logo below for a 10% discount.![]()
Peak Design - SLIDE - an awesome camera strap
 This is part one of a three-part review of three camera straps made by the kick starter company called Peak Design. I had heard about these from a number of sources including my friends at TWiP (This Week in Photography). Peak Design were kind enough to send me the Slide and the Clutch and I ended up getting the Cuff. After this bit of testing I should consider getting the leash too as you will see from my review.
 Let's start with the Slide which is the most versatile strap in this family of straps. The strap is made of materials similar to those found in automobile seat belts. The two ends of the strap terminate with a unique attachment system made off a spring loaded slide-in connector that connects to a Kevlar loop clip system. The strap is actually two belts fused together in the central area that would typically wrap around your neck or across your shoulder. The fused area has a slight padding with one side same as the belt while the other side has silicone striping to provide enough friction to prevent it from slipping off the shoulder. I find this double-sided arrangement very convenient. It is so easy to switch between the surfaces for those times you want to use the strap as a slide or have it in it's nonslip mode across your shoulder. To maintain uniformity there are two adjustment loops at either end. An anodized aluminum metal handle mechanism allows you to extend or retract the length of the strap but you must do on both ends to keep the padded area in the middle.The Slide strap kit comes with the strap, four Anchor Link connectors, one square Arca Swiss compatible camera plate, an allen wrench on a ring, a carrying pouch and a user manual. These are all nicely packaged in a well-designed box.
 I attached two Anchor Links to either end of my camera where you would typically attach your OEM camera strap. I attached a third Anchor Link to the loop connector of my existing Really Right Stuff extendable camera plate. With three connectors I am able to use the strap in various configurations. The most convenient is across the shoulder where I can easily bring the camera into shooting position with my hand on the grip and index finger on the shutter release with no obstruction. If I need to Carry the camera around my neck, I can easily detach the connector from the base plate and attach it to the free connector at the top. For the various ways you can sling slide I found carrying the camera on one shoulder to be the least secure and also not very comfortable.
 |
 |
 |
For hand holding the camera the I attach the Clutch (more on this in Part 2) by attaching it to the two Anchor Links attached to the side of the camera body top and bottom (RRS Plate).
Specifications (from the Peak Design product page)
- Weight: 171 g (281 g as packed)
- Strap length: adjustable from 99 cm (39 in) to 137 cm (54 in)
- Strap width: 45 mm (1.8 in)
- Strength rating: Vectran®-corded Anchors can withstand over 200 lbs (90 kg), making Slide safe for use with the largest of professional cameras
Build quality
Of all the straps that I have used in the past and currently, I find the Peak Design Slide to have been made exceptionally well. Every component is beautifully constructed, all the stitching is truly well executed. The adjusters, the loops and the tripod plate are all of the highest standards.I use the slide mounted to a Canon 6D and on my Sony A7R for about 10 days now and am very happy with the performance. I always like to remove my camera strap when I mount the camera on my tripod so as to prevent any shake as straps tend to act like mini sails in windy conditions. This requires constant disconnecting and connecting Anchor Links. So far, they have all performed extremely well and it appears these will not give or come loose for a long time..
My final assessment
I am very happy with the performance and comfort of this strap the Slide. It is really designed for any camera but my preference would be to use the Slide for heavier DSLRs and mirrorless camera bodies. A slimmer version but with the same wide shoulder padding would be ideal for the smaller minimalist mirrorless bodies. The Peak Design Leash comes close but does not have the comfort padding.I would not hesitate to recommend the Slide and give it 4 1/2 star rating out of a possible 5. The street price is about $60. Keep in mind that a small Arca Swiss camera plate will cost you a minimum of $20 - here one is included. This to me is a great bonus.To get any Peak Design product click on the logo below for a 10% discount.![]()
Testing Affinity from Serif
Have not had a lot time to test the 2nd Beta release of Affinity but gave it a good shot yesterday. Still a lot to learn, but on the whole, I like it a lot. Has some great features built in, the filters are great but not sure I like the fact that it creates an intermediate file. The following is an image processed entirely using Affinity (Sony Raw to a TIFF export).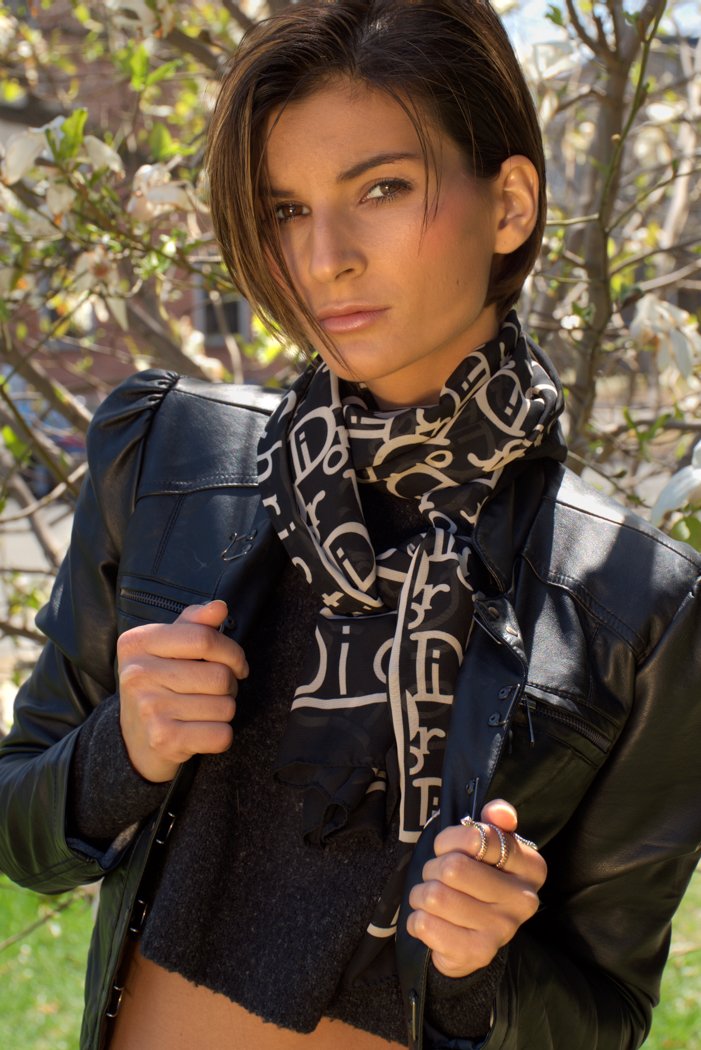
Tamron SP 150-600mm f/5-6.3 Di VC USD - Lens Review
 My review of the Tamron SP 150-600 mm lens has been published and is available on the Digital Photography School web site.Click here for the review.
Elinchrome D-LiTE-RX4 - Review
 Elinchrom’s new D-Lite-RX 2/4 200/400 ws strobes are excellent low sync speed semi portable studio worthy strobes. The ”it” designation is for Intelligent Triggering.
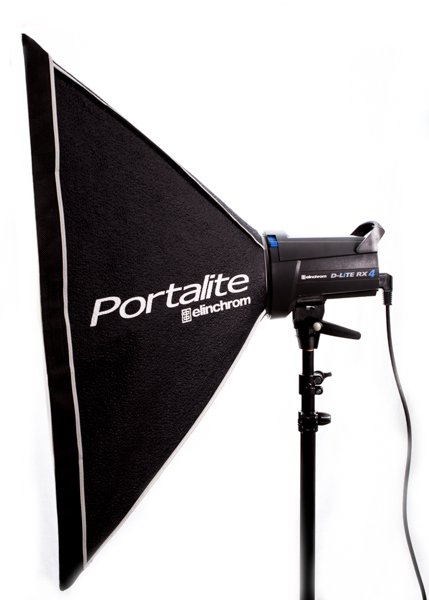
Each strobe head is made from a rugged impact resistant plastic that has a rubberized top handle with a holder for a spare fuse.with many new exciting features. The kit contains two strobes, power cables, two Portalite square soft boxes, with bayonet mounts. Included is one reflector.
Each head has a built-in Skyport” receiver and a four channel Skyport transmitter is included with the kit.The transmitter is an optional item for single units. All heads are fan cooled when needed. The kit includes a pair of Manfrotto light stands and all carrying cases.
The heads are available in 200 and 400 Watt versions. My units are 400 Watts. The control panel is well configured as shown in the image below.
Specifications:
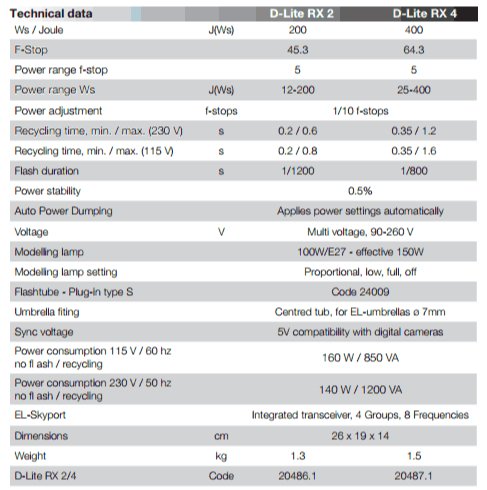
The power switch is illuminated when the head is powered on. A two position LED indicates the power setting, with two buttons to increase or decrease the power in 1/10 increments. Another button allows you to set the modeling light at full power, minimum power, proportional power or off. There is a strobe trigger button called the Eye-Cell and is programmable for Auto, Manual or Pre-Flash modes. This is very useful when using a hot-shoe flash to trigger the D-Lites. Finally there is a button to turn on or off the audible beep. The units have a decent recycling rate recharging in .35 to 1.6 seconds based on the power output setting. A great feature is "Auto Dumping". When you lower the power output the nut will automatically dump the excess charge and indicates it is ready with a beep.
Set-up

Assembling the Portalite soft boxes takes up most of the time. There is one addition I would like, a secondary diffusion panel inside the Portalite Softbox. The rest is easy. The units come preconfigured to work with the Skyport set on the Frequency Channel 1 and Group 1. Changing channels and groups is easy and accomplished pressing the power up and down buttons together, then toggling the function using the modeling lamp mode button and using the individual power up or down buttons to
select the following:
- Groups 1 through 4
- Channels 1 through 8
At any time you can do a Master Reset to factory defaults switching off the unit, holding the power up and down buttons and switching on the unit again.
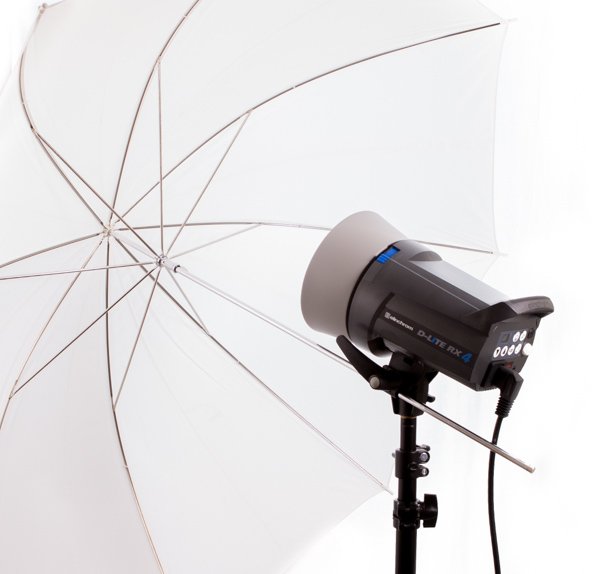 The unit has two umbrella mounts. one is a centered tube that will accept 7mm diameter umbrella shafts that are on the Elinchrome EL umbrellas. If you do not have EL umbrellas you can mount an off centered umbrella in the secondary mount near the tilt handle.
For most of the work I do in studio I find these to be an excellent choice. The units work flawlessly. I have two sets in my studio and for the past 8 months these have never missed a beat. The power output and color temperature are consistent and the supplied cases are ideal for transportation to allocation shoots.
I highly recommend these units to anyone looking for an excellent high quality starter system. My preference is for the 400W units.
These can be purchased for $949 for the 400WS heads and $849 for the 200WS heads. Individual heads are also available but the best price breaks are when you purchase a kit.
Rode Video Mic Pro - Compact Shotgun Microphone
I got a Rode Video Mic Pro - Compact Shotgun Microphone for Christmas as a gift and put it through its paces. First impressions after two days of use - it is an exceptional, well built, mono video microphone that has a fantastic super cardioid condenser. Rode microphones are designed and made in Australia. The Video Mic Pro is easy to mount on any DSLR hot-shoe and with its built in 3/8 inch socket can be mounted on booms and stands with ease.
Specifications as provided by Rode
| Frequency Range | 40Hz - 20kHz |
| Output Impedance | 200Ω |
| Maximum SPL | 134dB SPL (@ 1kHz, 1% THD into 1KΩ load) |
| Maximum Output Level | 6.9dBu (@ 1kHz, 1% THD into 1KΩ load) |
| Sensitivity | -38.0dB re 1 Volt/Pascal (12.60mV @ 94 dB SPL) +/- 2 dB @ 1kHz |
| Signal to Noise Ratio | 74dB |
| Equivalent Noise Level (A-weighted) | 20dB-A |
| Weight | 85.00gm |
| Dimensions | 95.00mmH x 43.00mmW x 150.00mmD |
I was a bit surprised with the short length of the cable that connects the mic to the 3.5 mm socket in camera. However, it is long enough for all DSLR’s when the mic is mounted on the hot shoe. Extension cables are a quick fix when you want the microphone connected to an external recorder or when mounted on a boom pole. The mono output is paralleled to both left and right channels. The unit is powered by a 9V battery housed in the microphone frame. I found the battery door to be a bit clumsy in its construction and the ease of opening and closing the compartment door is not easy. The battery life is stated at 70 hours, which is more than sufficient for any field work.
 The unit is mounted within a cradle with four shock/vibration control elastic bands. A second set of these bands is included in the packaging. There is sufficient clearance between the cradle and the mic so the likelihood of any bumps and interference during normal use.

The rear of the microphone has two three-position slider switches. The upper switch positions are power Off, Mic On (flat response) and Mic On HPF (High Pass Filter set at 80Hz). The second switch is a three-position attenuation control. -10dB, 0 and +20dB. Above these switches is a LED that flashes red on power on and then turns to green. When the battery is low the LED will turn to a solid red.The high Pass Filter is excellent at filtering room noise, environmental hum, and other low frequency ambient noise. Wind and pops are well handled by the foam encasing on the super cardioid. The microphone’s attenuation control functions exceptional well. In loud environments, street scenes with a lot of traffic noise the -10db and 0 db settings are ideal. However in low sound level situations the +20db has the right amount of boost with absolutely no deterioration of sound quality. The directional pattern is excellent and the mic eliminates side and read sounds very well. The +20db setting was not required when the microphone was connected to and external recorder. Using 0db set on the mic and attenuating the signal on the recorder yielded the best results.The microphone is well packaged comes with a quick start guide However the manual must be downloaded from the website. The warranty is 1 year that will be extended to a 10 year warranty once you register. You must register your product on the Rode web site at www/rodemic.com.In conclusion, this is an excellent light-weight professional shotgun mice that I have no hesitation recommending for any DSLR videographer.You can get this mic at The Camera Company - click here and at Hunts Photo - click here
Sony Releases two full frame mirror-less cameras
 Sony today announced the α7 and α7R interchangeable lens mirror-less systems. Though the lens selection is limited but Sony promises and extensive line by 2015. I do believe these are definitely cameras that will be strong competition for other mirror-less and prosumer range DSLR cameras. From the specifications these are ideal cameras for all types of photography with the exception of subjects that require a fast focusing system - wildlife and sports action photography. The cameras will be available in December and I am putting one on my wish list.
The Sony α7R has a 36.4 megapixel sensor and excludes a low pass filter for obtaining greater detail. The Sony α7 has a 24.3 megapixel sensor coupled with a reasonably fast hybrid auto focus system.
Click here for a link to the Sony press release.
Canon 70D announced - A DSLR with full function Video
Canon proudly introduces the EOS 70D – features:a revolutionary autofocus technology that unlocks the potential of Live View: Dual Pixel CMOS AF. This game-changing technology allows the EOS 70D to capture video in Live View with smooth and precise autofocus similar to that of a camcorder. Additionally, Dual Pixel CMOS AF provides fast and accurate autofocus during Live View still image capture, enabling you to fully benefit from the freedom of angle allowed by the Vari-angle Touch Screen 3.0-inch Clear View LCD monitor II.Built-in wireless technology and the EOS Remote app* further enhance shooting versatility, as well as enable easy sharing.Brilliant image quality is provided by the EOS 70D's 20.2 Megapixel CMOS (APS-C) sensor, a first for an EOS camera with an APS-C sized sensor.Continuous shooting up to 7.0 frames per second, as well as an extended ISO range of 100–12800 (H: 25600) that allows shooting in a wide variety of lighting conditions.19-point all cross-type AF system with a high precision dual cross f/2.8 center point, and advanced display options available on the Intelligent Viewfinder supply exceptional control.In-camera imaging features like HDR, HDR Backlight Control, Multiple Exposure, Handheld Night Scene, and Creative Filters.
The Genie Motion Control Device
Syrp, a New Zealand company, was very kind and shipped me one of their motion control devices, that I am featuring in my upcoming book. The time-lapse sequence above, was captured using the Genie in Time-Lapse mode with the Clouds preset modified for my way of capturing.I love the simplicity of this unit. It is easy and a charm to use.I also did a review of the Genie that you can read - click on this link GENIE Review.Please contact me if you need more information or would like to get your and on one.
The Impressive Feisol Carbon Fibre Ball-Head
I had done a review of the Feisol Carbon Fiber Tripod and the The FEISOL CB-50DC Carbon fiber Ball-Head a while back Click here for the review. This lightweight ball-head continues to impress me. It is a light yet very well constructed Arca Swiss compatible ball head designed for general purpose use.
 My unit is now mounted on my Dynamic Precession cart atop the 6 foot rail and performs really well. As most of these rails are belt and stepper motor driven it is best to keep the overall weight as low as possible. Here is where this head is perfect.
 The carbon fibre construction is impressive. The locking mechanism is based on dual calipers. One dual caliper is used to lock the ball while the other is used to lock the base plate. Each caliper is operated by a rotating knob. A third flatter knob is used to maintain tension on the ball preventing any accidental flopping of mounted equipment.Hunts Photo is conducting a one week "shiv verma | photography" special for all Feisol Products. Discounts and free shipping are available through April 14, 2013.
