
The GH5 continues to excel
With the exception of the last three years we typically go to Damariscotta Maine to photograph the Osprey fishing for alewives. The main reason for not going was the decline in activity. However we did spend this past weekend in a lovely B&B - The Mill Pond Inn in Nobleboro. It is a great place and has two of the finest hosts.My main purpose was to test out the GH5 for its tracking capability and the Dual IS 2 function. Both these images were shot with the GH5 and the Leica 100 - 400 lens, hand-held. Exposure was set to "Manual" and the ISO was set on Auto. The focus was set to 1 Area and reduced to its smallest size. All images processed using Capture One Pro, version 10I intentionally left the shutter speed slow so as to get a lot of motion in the wings and to have the water droplets streak. I panned this shot keeping the 1 Area on the bird's eye. As we waited for more action (that never happened) a Bald Eagle flew by in the distance and finally landed on a tree on the far bank. I knew that the bird was just to far to get a decent shot but I wanted to see what I could get irrespective. Once again this was hand held. I did increase the shutter speed to 1/1600 sec and the lens was out at 800 mm (FF equivalent).This next image is the un-cropped version.
 The next image is a crop at 1400 by 1050 pixels:
 #LumixLounge #wherelumixgoes #lumixusa #lumixGH5 #gh5 #birdphotography#birds #africa #wildlifephotography
Review of the Platypod Pro Max
 A while back I had done a review of the exceptionally versatile and compact Platypod Pro® Deluxe Kit. Now the makers have introduced a follow-up to the Platypod Pro called the Max.Much planning, engineering and fine machining go in to making the Platypod Pro® Max. The Max’s initial form is stamped out of a 5mm thick sheet of aircraft grade aluminum maintaining absolute flatness. Using Computer Aided Manufacturing (CAM), the plate is computer machine precision drilled for all holes and slots. Edges are round-routed and holes either threaded or chamfered to avoid any sharp edges. Key holes slots for attaching the spike screw box are drilled only partway through the plate with very low tolerances to allow easy but firm attachment. These last holes are invisible from underneath the plate.
 I have been informed by the manufacturer that the machining quality and workmanship on the Max is so meticulous that despite computer aided manufacturing the factory can only produce 1500 every 25 days!Like the original Platypod Pro the Platypod Pro Max is a sturdy flat mini tripod ideal for low-angle shots and situations where traditional tripods are cumbersome or impractical. It is however, significantly larger, has four spikes/reversible rubber feet rather than three, a belt loop, a single 3/8 inch 16 ball head mounting screw and a 1/4 inch 20 removable stud to mount accessories.
 Here is an image captured with the Max set up on top of the stone wall at Tunnel View - Yosemite NP.
 Unlike its smaller brother the Max supports ball heads of any size and is rated to support 300 pounds. A 3/8 inch 16 threaded screw hole allows you to mount the Max directly to your tripod as and when needed. Made of aircraft grade aluminum anodized black with beautiful self-explanatory laser etchings, the Max comes in a red microfiber drawstring pouch.
 If you already own a Platypod Pro the Max does not replace it, rather it compliments it where situations demand a larger base or when you need to physically move your low lying camera rig across the sand or grass when photographing wildlife.Specifications:
- Base - 6061 black anodized aircraft-grade aluminum. 5 mm thick. 5.25 x 7.75” (5-year warranty—Full replacement of parts for any defect in workmanship.)
- Fiberglass-reinforced nylon removable "bayonet style" storage box mounted onto plate to hold four 1/4-20 spikes, 2 inches long, with heavy-duty rubber feet and locking nuts. Small magnets keep spikes in place for storage.
- Five 1/4-20 threaded holes strategically placed to allow use of spike feet in configurations of one, two, three, or four at a time.
- Two 2-inch belt slots to secure to any cylindrical object or to tape onto floors for remote camera setups.
- 1/4-20 and 3/8-16 accessory threaded holes for attachment to tripods or quick-release devices under the unit.
- 3/8-16 TA2 titanium photographic bolt drilled and countersunk through the plate and welded in place for large tripod ball heads, such as the RRS-BH55, even with spike-feet in place.
- Two non-threaded holes for permanent or semi-permanent mounting to floors, walls, ceilings or panels.
- Weight: 13 ounces, including spikes and storage box.
At approximately 5 x 8 inches it is about the size of an iPad Mini and fits well in any camera case that has a slot or pouch designed to hold a laptop or an iPad. As an option you can use either slot or one of the non-threaded holes and a carabiner to hang the Max from your belt or a loop on your backpack. As compared to the original Platypod Pro, Max’s larger footprint means more stability. Like the Pro, Max is made of aircraft-grade aluminum with an embedded 3/8-inch titanium bolt. However, it does come with a few features, including a pair of slots that can secure Max via a bungee cord, zip-ties or even your belt to freestanding objects and structures. In the center are 1/4- and 3/8-inch holes to attach Max to quick-release devices, such as the Peak Design Capture Clip, or directly onto a tripod center column. A very convenient 1/4 - 1/4-inch male cross-nut allows attachment of flexible arms, speed-lights and numerous accessories. Here I used a Novoflex Flex Arm and a Lume Cube LED to light the crystal. The camera is a Panasonic GH4 with a 30mm Lumix macro lens. A second 1/4 - 1/4 and a second Flex Arm would be ideal for cross lighting a macro subject.The Max‘s larger base allows use of most any ball head. The RRS B55 is the largest ball head I own and I had no problem attaching it to the Max and all the knobs have adequate clearance. As I no longer use large DSLR’s all my tests were done with Sony and Panasonic mirrorless bodies. Using the Max with an A7RII and the 70 – 200 mm f/4.0 lens was a breeze. I also mounted a Panasonic GH4 with the new Leica 100-400 using a Wimberly SideKick for quick reaction time and maneuverability. When using the Sidekick it is imperative that you remove the holder for the spikes with a simple twist and place the cross-nut in one of the corner positions, out-of-the-way. This gives the sidekick the clearance for 360 degree rotation. The Max supported this rig very well.
 With the Platypod Pro you had to be careful mounting heavier gear. It was best to ensure the center of gravity was as close to the center of the Platypod Pro mounted ball-head. With the Max, this is a less of an issue. With a medium or large ball head the Max will comfortably support most DSLRs and mirrorless cameras fitted with normal to long telephoto lenses. A super telephoto lens properly mounted on a good ball head works well too. Here as in the image below I tested it using the RRS BH55 and the Wimberley Sidekick with a Canon 500 mm f/4.0 lens attached to a Sony A7R II using a Metabones IV adaptor.
 Similar to the Platypod the Max is ideal great for ground level photography and videography, a mount for action cameras and for creating panoramas. When creating panoramas use a pan/tilt ball head like the Unique as shown below or attach a leveling base (see following image) below the ball head as shown in an image above where the RSS BH55 is mounted on top of the Acratech 1170 leveling base. As the Max is made of a relatively thin aluminum plate it would be difficult to have a built-in level. A third-party bubble level can be adhered to the max or simply place on it to level the Max. When it is necessary to level the Max it is best to use three of the four spikes or rubber ends. Four legs are great for stability but not so for leveling. The Max is best used without spikes or feet when you want to have the flexibility of sliding it in any direction on flat surfaces, sand or grass. When friction is important then the spikes are the best option. In the reverse orientation the rubber caps not only provide friction preventing the base from sliding around but also prevent damage to furniture, painted surfaces, etc.
 For surfaces like asphalt, rocks and brick the spikes are your best choice for stability. To attach the base plate to a fence post, rail or tree limb, a pair of bungee cords, straps or your belt work great. All you need is to secure the cord around your object and hook the ends into the slots or holes in the base plate. Belts and straps can be passed through the slots on each side of the Max to secure it to any post, tree trunk or similar object.The Max with its little brother the Platypod Pro have a permanent home in my photography kit. I find I am using these support systems more than using my tripods.More on the Platypod products and their web siteAll company names, products and devices mentioned in this review are trademarks of the respective companies, registered in the U.S. and other countries.
Beaches of Martha's Vineyard
 Here are another three images from my Martha's Vineyard workshop last weekend. The image above and the next were captured on the beach at Aquinnah just below Gay Head Cliffs. The last image was captured on the last evening at Menemsha. Menemsha is famous for exceptional sunsets but this was a overcast and stormy evening with no hope of a sunset. Stormy yet so serene.

One Day Workshop Schedule
ALL ONE DAY WORKSHOPS ARE TEMPORARILY SUSPENDED
Workshop details are available from the Registration Page.
Macro and Close-up Photography
Flash Photography, High Speed flash, creative lighting
Portrait and Lighting Techniques
Digital Photography A-Z. This is a one day three part course that will teach you camera basics, post processing and printing.
The Digital Darkroom - a course that covers image capture, asset management, processing and enhancement, output to print and web media. A one day program for digital image making workflow
Timelapse Photography, post processing and video assembly
If you have any questions or would like more information please call 617-759-0010 or email sv@shivverma.com
Please use this REGISTRATION link to register for these workshops.
Cape Cod - after Lexi
After Friday's snow storm, Saturday's skies and a thin layer of high clouds were a good indication for photo opportunities. heading out to the Cape this next image was off Rt. 1 in Foxboro. (please click on the images for a larger rendition) There are many great opportunities for some exceptional color in Cape Cod. This next image is an outhouse at a farm. A favorite location we always visit during my "Light of Cape Cod" workshops that I will be posting in the next few days.
 Low tide coincidental with the sunset in the flats are another set of my favorite locations.
 With the way the low cloud bank was forming I did not expect much of a sunset. There were some interesting cloud formations and a lovely warm glow on the horizon.
 As photographers we know never to leave after the sun sets - you never know what the skies might do. Staying pays off:
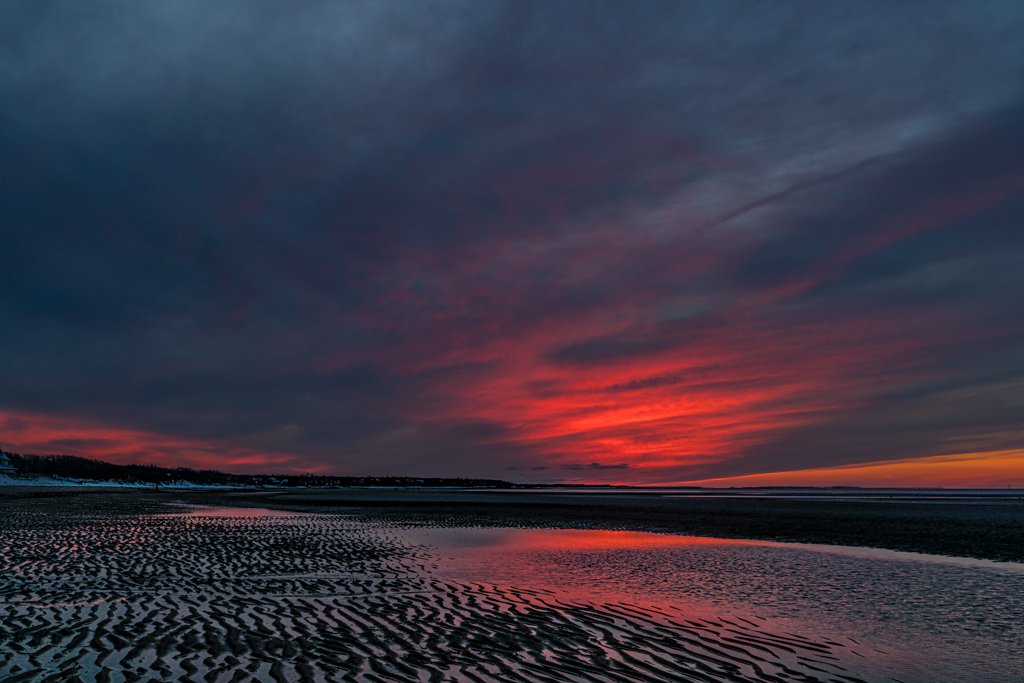
Ithaca, NY - A Waterfalls and Fall Foliage Workshop
 Just concluded an incredible workshop in the Finger Lakes region of NY State. October 8th through Columbus Day October 12th, 21 photographers and two spouses hiked through the gorges of some of the most beautiful parks in New York. The first night we attempted some Milky Way and light painting photography in the upper lot of Taughannouck Falls Sate Park. The following day, we had an early start to Buttermilk Falls. Buttermilk Falls is the largest of the 10 falls of Buttermilk Creek. Larger versions of these may be viewed by clicking on the image.
  Following Buttermilk Falls we drove to Ithaca Falls but access was restricted as there was construction on the access way to the river bed. Next option - into Robert Treman Park aka Enfield Glen. Though it rained all morning the water helped saturate the color and the clouds helped defuse the light.Here are some images from Enfield Glen:


 Later in the afternoon we went back to Ithaca Falls, a 150ft cascading fall at the end of Fall Creek before the creek empties into Cayuga Lake. Ithaca Falls is 175 wide and considered the region's most powerful.I had left my ND filter in the car so Nancy Marshal was kind enough to let me borrow her Big Stopper that I hand-held against the lens to get the following image:
Blurs and Abstracts
Many an image of birds in flight have been photographed while panning and using slow shutter speeds to create blurry images (aka "pleasing blurs"). I decided to try something similar but different. Rather than capturing a whole flock I concentrated on a few. Waited for a decent formation and captured the image. Enhanced in photoshop to augment the high key effect and treated with NiK Color Efex Pro for added impact.Your thoughts and comments are welcome?