
The Lumix G9 and Post Focus
 I have been asked this many times and no matter how much I explain it there is still some confusion. Basically, the Post Focus function in the supporting Lumix cameras rely on the high-resolution video capability in conjunction with focus racking to capture a sequence of images that can be selected by defining the plane of focus. So as an example, if you were to set up a yardstick and let the camera take a post-focus image - the camera would focus on the nearest point to the lens take an image and then gradually refocus a bit further out and take another image till it reached the end of the frame at the farthest point. There would be a series of images each one at a different point of focus. Note however that this sequence is captured using the video mode of the camera. Once the images are captured, the camera does internal processing that then allows you to tap on the screen to select the image that has the best focus at that selected point. You can then opt to save this selected image. Supporting this function is post-capture peaking to confirm focus and in addition, you can magnify the image for a selective selection.This feature is further augmented with a merge function. You can merge all the images captured into a single image that is tack sharp from the closest focus point to the farthest. However what is even more useful, particularly if you use large apertures for a shallow depth of field and you want to keep your background out of focus. You can select the range you want to merge and thereby leave the remainder of the scene out of focus.The following image that I used as the lead image was captured in post focus and merged in its entirety.
 For this next Post-focus demonstration I placed a postcard on the background and merged the entire set of images. As you can see the postcard is in focus as are the flowers.
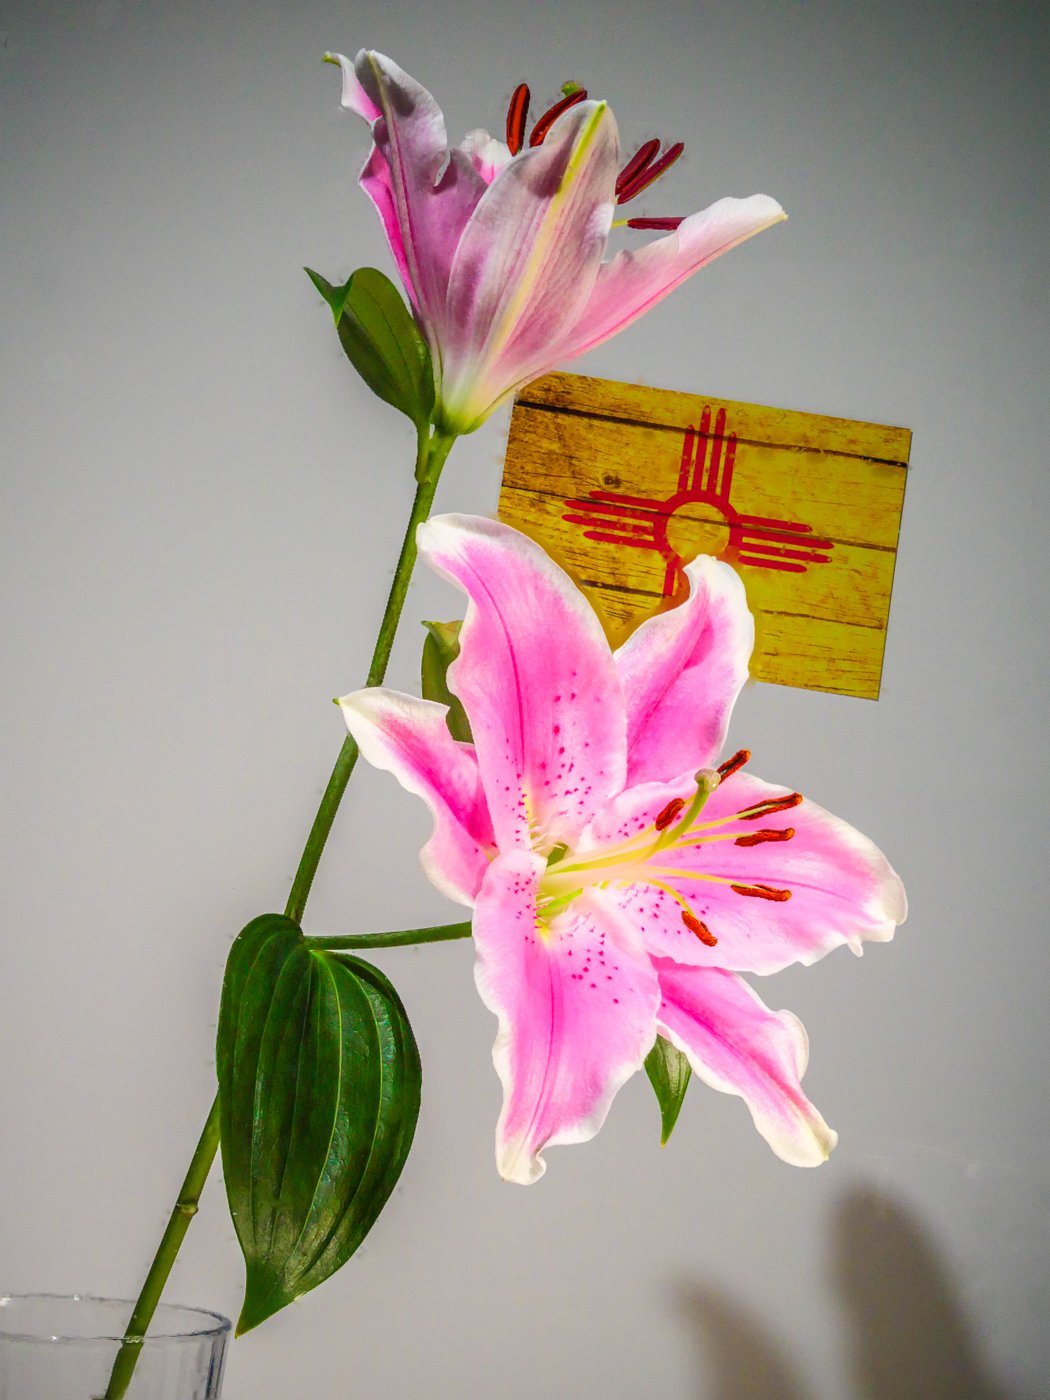 Next, I used the same Post-Focus set but this time iI selected just the range I wanted, just the flowers and executed the merge. The following is the resulting image with the postcard nicely blurred:
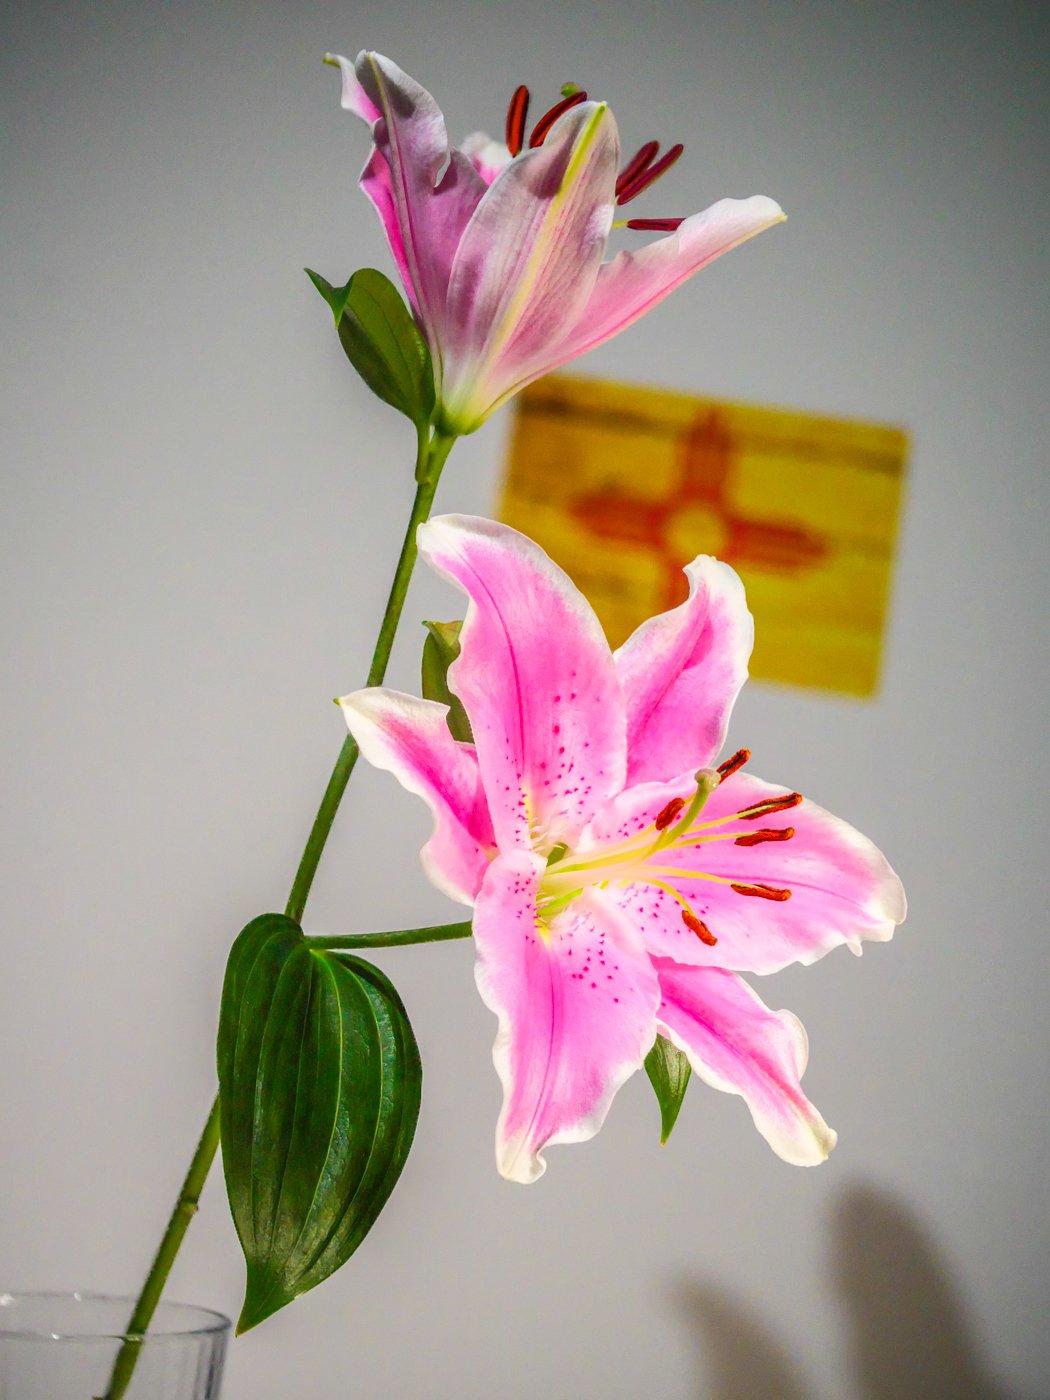 I hope this gives you a better understanding of the power of this feature and the many ways you can use it. Please note that when these images are captured using 6K Photo Mode, the resulting images are 18 MP and suitable for very large enlargements when processed with the appropriate software.
Fireworks
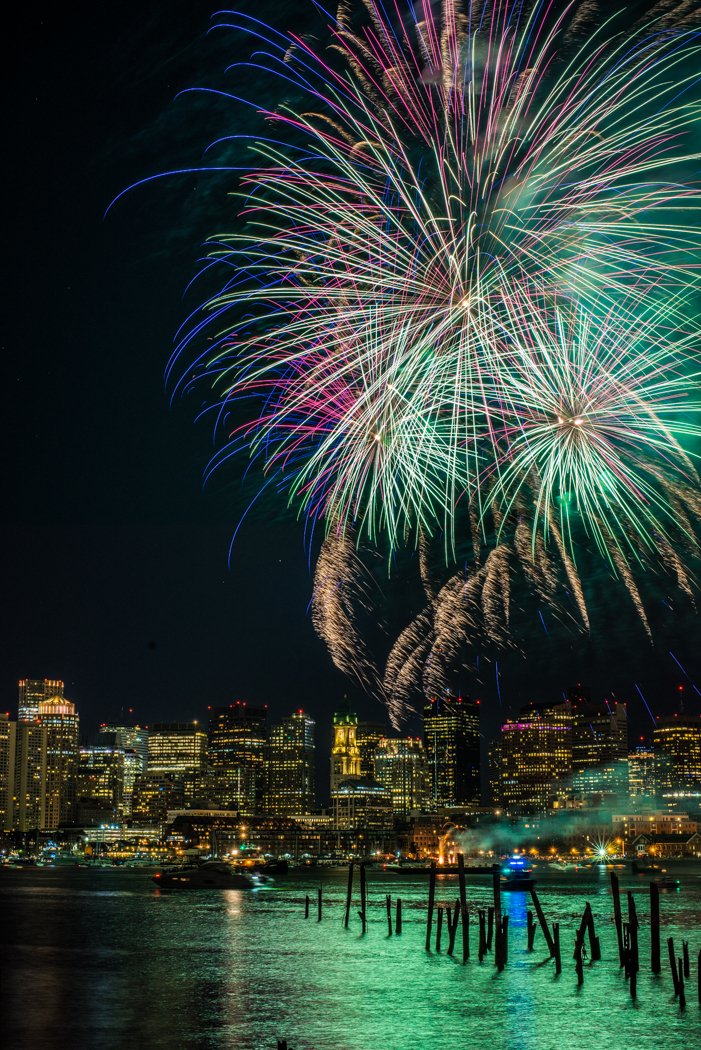 The 4th of July weekend is next. The weather forecast for the Greater Boston area looks good so why not try photographing fireworks. In addition to the annual Boston Pops concert and fireworks, the Boston Harbor Fest will also have a fireworks display on July 2, 2016. Here is an excerpt from the festival site: "Various sailors will decorate their boats and light up the Inner Harbor on Saturday, July 2nd. Live music on Long Wharf will lead up to an incredible fireworks display over Boston’s Inner Harbor."Here is a link to my tips page for photographing fireworks.
Cape Cod, Yellowstone and The Grand Tetons
 Just finalized the 2016 Fall Photo Tours and Workshops in Yellowstone and The Grand Tetons National Parks and Cape Cod.Yellowstone and The Grand Tetons - October 1 through October 8, 2016 - Details HereCape Cod - October 12 through October 16, 2016 - Details HereIn addition, the September 2016 Iceland photo tour and workshop is nearly full - two spots are available - Details Here
Light of Cape Cod - Photo Workshop
 A 4 day 3 night photo workshop that includes lodging and site feesMid Spring in Cape Cod is a multi faceted photo opportunity with truly spectacular scenics and some wildlife. The tourists have not crowded the roads and traffic is not a nightmare. This very special workshop is for all levels of photographers from beginner to advanced. The Cape provides some of the most incredible landscapes and seascapes and the light during spring is exceptional. We will explore and photograph the Cape's classic sea shore, sand dunes, light houses and some wildlife (including migratory birds). We will determine schedules and locations based on weather forecasts, tides and sunrise/sunset times. We may even explore the opportunity to do some night photography.(CLICK HERE FOR DETAILS)
TWiP Episode 453 – Hot New DSLRs!
Click here for the Youtube ChannelHere is the link to the TWiP page
Wild Flowers, Smoky Mountains and Cades Cove - Spring Workshop
 April 17 to 22, 2016 - Six Day 5 Night Photo WorkshopGreat Smoky Mountains National Park is a world-renowned preserve of wildflower diversity over 1,660 kinds of flowering plants are found in the park, more than in any other North American national park. In fact, the park is sometimes referred to as the “Wildflower National Park.” From the earliest hepaticas and spring-beauties in the late winter to the last asters in the late fall, blooming flowers can be found year-round in the park. Wildlife is fairly abundant in Cades Cove and we will have opportunities if lucky, to photograph bears. Landscapes, rivers, waterfalls and much more - a photographer's paradise.CLICK HERE FOR DETAILS
Hummingbird Moth Hemaris thysbe
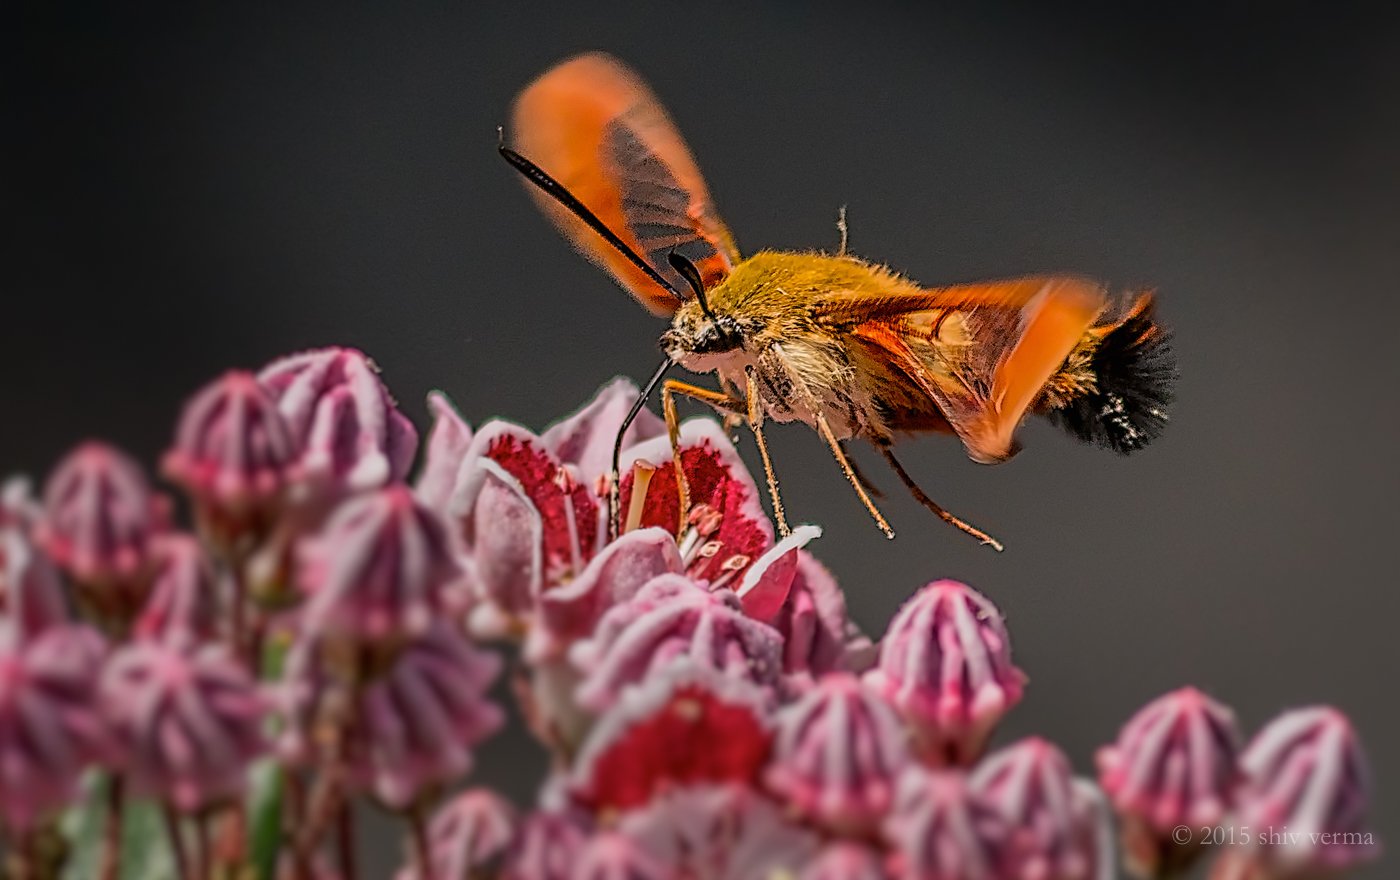 The Hummingbird Moth Hemaris thysbe, unlike most moths that are nocturnal or shade loving, is seen on bright sunny days. It is a fantastic hovering species that flies like a hummingbird and hence its name.They feed on nectar using a very long proboscis. Their wings flap at incredible speeds. This image was captured at 1/1600 sec and I was unable to freeze the wings.
70 South Gallery - Lighting Workshop
 The 70 South Gallery - Lighting and Model Photography workshop was a huge success. Thanks to some great organization by "Adventures in Photography" (NJ, NY and New England) and the 70 South Gallery, Morristown, NJ. The workshop was sold out and we were fortunate to have decent weather for some of the outdoor shoots. I would like to thank the participants, the models and the organizers for all the hard work and support that made this so awesome.Studio lights were Profoto and Arri, outdoor speed lights were Nissin and personal on and off camera flashes. Lastolite reflectors and the Phottix Luna but dish were also incorporated in the various sessions.
Martha's Vineyard - Memorial Day Weekend Workshop
 In case you’ve missed it, Adventures in Photography (AIP) has organized a 5 day/4 night workshop on Martha’s Vineyard over the Memorial Day Weekend where I will be instructing.This is rare opportunity for photographers and their non-photographer partners to share some quality time together.Photographers get to photograph the beauty and charm of this unique island community while their non-photographer partners explore the charming New England character of Martha’s Vineyard.Adventures in Photography (AIP) has reserved all of the Ashley Inn's 10 rooms from May 22nd until May 26th. We can accommodate 20 people based on double occupancy. The Ashley Inn is an upscale B&B and breakfast is included.We still have a few rooms available but expect that they will sell out.For a full description of this Adventure go CLICK HERE
Fog Photography - a new article in "Tips"
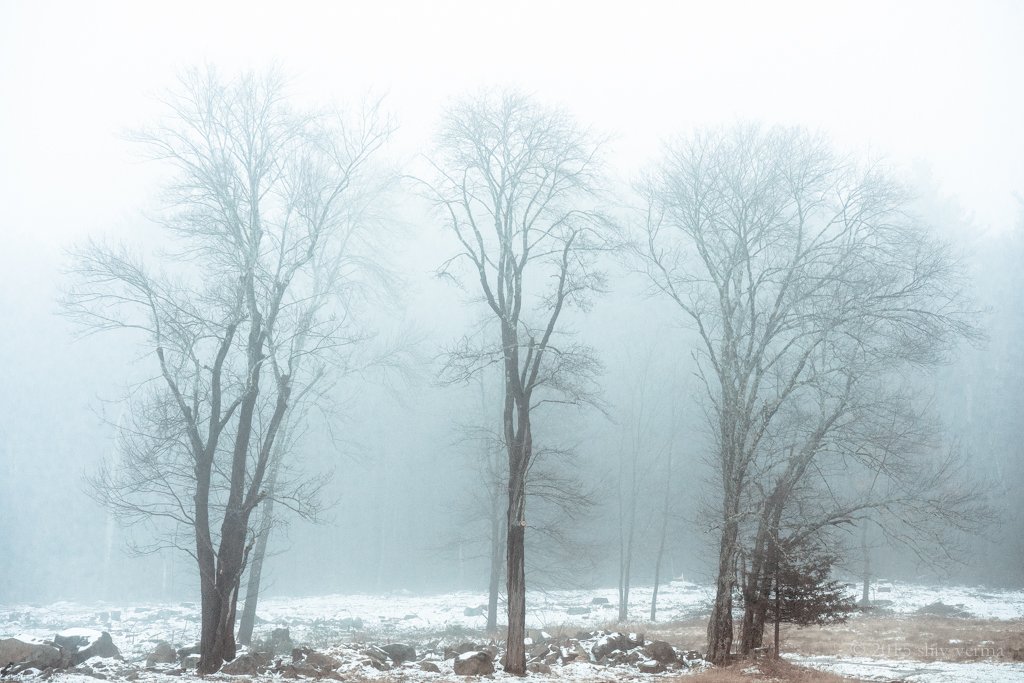 After the fog this weekend and some of the questions that have been asked, I have written an article on Fog Photography that you may find useful. The article is posted in the "Tips" section of my web. Click Here for the article.
2015 First Quarter - One Day Workshops
 Wishing you and your families a Very Happy & Prosperous New YearThe One Day Workshops for the first quarter of 2015 have been posted.They are listed on the One Day Workshop PageORYou may go directly to the Registration Page to get details and register.All one day workshops include a Pizza Lunch
What else is in my bag and more - Part 2
Here are some additional items I find useful. Some for the bag and others that are just good to have.
- Remote Shutter Release (wired or wireless) - A must have for tack sharp photography. There are 5 types available:
- A wired version that physically connects to your camera with a cable. Good for most photography when you are close to your camera.
- An Infrared trigger that is used to trigger the shutter using an IR beam (this requires you to be in “line of sight” to the front of your camera. These are usually OEM products but a few third-party devices are also available. I find these limiting.
- A wireless radio trigger. This is a two unit device - one is mounted and connected to the camera and the other is the hand-held controller. Hahnel and Phottix are the ones I use.
- An iOS or Android wired trigger. The smart phone is physically connected to the camera to trigger the shutter.
- The IOS or Android trigger. Here you use your smart phone and connect to the camera in WiFi mode to control and trigger the camera.
- Filter wrench (pair) - These come in two sizes and based on the lenses you have you may want to get both sets. Amazing how screw-on filters just don’t come off. The plastic wrenches allow you to apply pressure at the right places and lever the filter off so easily. Adorama branded wrenches are less than $5 a pair.
- LED Head Lamp - a must have when you are in the dark. Always carry one in your bag.
- Intervalometer - A must have device if you do any timelapse. long exposure, or multiple exposure photography. From basic wired devices to wireless units these are made most cameras including ones that have built-in intervalometers. Phottix, Hannel, Canon all make great units. Promote Systems makes a product called Promote Control, one of the finest devices not just an intervalometer but a whole lot more. The Promote Control will do focus stacking, automatic brackets of up to 45 images, with up to 9.0 EV step between shots for HDR. It can even automatically step into Bulb for night-time HDR! More expensive than the others but the Promote Control is my first choice.
Flash Photography:
- Flash Gels Filter gels are a great way to modify the color of your light but more important, they can balance the color temperature to match the ambient light. Roscoe and Rogue make excellent gels. My personal choice is the full set with the case and elastic band from Rogue. The Rogue set is around $30.
- Rogue Flashbender - These flash diffusers and reflectors are the best I have used. The come in multiple sizes and when used with the front diffuser, that act like a small soft-box. The cam be molded to direct light as needed or rolled up to form a snoot. These start at $20 for the Flashbender bounce card..
- Rogue Grid - If you need more control with the direction of the light from your flash the Rogue Grid is an excellent tool. The design features stacking honeycomb grids that produce 16, 25 and 45 degree grid spots. In addition you can get a set of bells that match the shape of the grid collar. The grid is under $50 and the gels will cost under $30
- Kupo Off-Camera Flash Alli Clamp - The clamp has a jaw that can clamp onto items up to 1.57" thick. Rubber nubs on the inside of the clamp prevent damage to paint or furniture. The clamp has a 5/8" receiver for light-stands or a 5/8" stud for super clamps with matching receivers. The Alli Clamp is topped with a metal locking shoe mounted to a rotating ball for your flash. I use it to mount my flashes, action cams, video lights and any other objects that need to held in place. Cost under $50. A lighter version called the Kupo Alli Clamp is for under $15.
Macro and Close-up
- Focusing rails and racks - These are ideal for precise positioning of a camera in X and Y directional axes. These come in single axis (front to back adjustment and 2 axis where a left right adjustment is also possible. Prices range for under $100 to $600 plus.
- Diopters or Close-up filters - This is one of the least expensive method of doing close-up photography. These filters attach to the front of your lens allowing you to focus closer hence magnifying your subject. They are available in single and dual elect construction. I recommend the dual element as you will have better optics. Prices range from $30 and up.
- Extension tubes - If you like macro these will allow your lenses to focus closer to the subject. As they have no optical elements in there is no image quality degradation. Kenko extension tubes are what I have and love. They come in a set of 12mm, 20mm and 36mm. For the newer mirrorless cameras the tubes are in sets of two at 10mm and 16mm
- McClamp The Clamp - This clamps to a tripod leg and can hold such items as gray cards and 12" reflectors, and small delicate subjects in place. It has a 26" flexible arm with a spring-loaded clamp to hold your subject in place. Wimberly also makes a similar device and have a new version called the Plamp II. Both products are about $45.
- Light Tent or Cube - A great light modifier for your product photography, food photography and macro work. These come in various sizes and cost $40 and up.
- Triflip (Trigrip) 6 in 1 or 8 in 1 reflector/diffuser - The TriGrip from Lastolite has a triangular shape with a built-in handle that allows easy hand holding or for attaching to a stand.The TriGrip is 30" at its widest point and collapses storage. I prefer this to the typical round diffuser reflector kits.
A few for those who dabble with video:
- LED Light Panels - these come in various sizes - remember to get one that is disable and has the intensity you need for your kind of video shooting.
- Variable ND filter - for those bright days when you need to slow your shutter down and keep your aperture wide.
- Shotgun microphone - DSLRs are great at capturing video. The audio on the other hand really is pathetic. The minute in-built microphones are really bad. So get a good starter microphone. A shotgun mounts on the hot-shoe and connects to the mic input port of the camera. My choices for a starter microphone is the Rhode Video Mic Pro with the Dead Cat for around $210
Please use the comment link on the top of this post to share with us some of your special items.If you do plan on getting any of these items please use my affiliate links on the right column of this blog post or use the Products and Discounts Page for additional links.
What else is in my bag - Part 1
Apart from cameras, lenses, filters we as photographers carry a number of gizmos to help our image capture. This is part 1 of my list of gizmos. These are all reasonably priced and many are less than $10. Most on-line photography stores carry these items and you should check them out.
- Gray Card – Get your exposure right. Available in cardboard and durable plastic these are one of the most valuable tools for your camera kit. The camera may be smart but it is easily fooled. It will under or over expose very bright or very dark scenes. You should use a gray card to set the exposure for much more accurate results. Some of the newer cards come as sets with a black and white card. This can also help you set your white balance. A step-up would be the X-Rite Color Checker Passport.
- High velocity blower - Never clean your lens without first blowing off any dust, grit or lint. The last thing you want is to scratch your lens as your clean it with a lens pen or lens cloth. A good blower costs under $10 - the one I like is the Visible Dust Manual Blower. Adorama and B&H have these.
- Lens Pen - This is another must have tool for your bag. There are many manufacturers and models available. The ones with a carbon bad need to be activated before each use. Others like the Allsop have replaceable tips. I keep an Allsop in each of my camera bags.
- Lens Cleaning Cloth - A good lens cloth is a must in your bag. Zeiss makes some of the finest and can be purchased from Walmart and B&H for $3 and up.
- 1 or 1.5 inch natural bristle soft painter's brush - An ideal too to get lager dust and sand particles off your equipment. Keep one in your bag - you will be happy you have it on those dusty trips.
- Small micro fiber or cotton hand towel - You never know when you will need it. These are great for wiping of moisture from your gear on those wet days. Grocery stores and Bed Bath & Beyond carry these.
- Spray bottle - You may not always get a dewy morning but you can create dew on flower petals and spider webs with a handy fine-mist spray bottle. Fine mist spray bottles can be found for under $2 at Amazon.
- Bubble level - A three axis bubble level for your hotshot mount will keep your horizons level. If you have an inbuilt electronic level in the camera then you can skip this tool.
- Elastic bands and small ziplock bags - You will find many uses for this combo. A lost lens cap can be a problem but not if you can put a ziplock bag around the front element and secure it with an elastic band. If your zoom lens tends to creep the elastic band can help keep it in place.
- Large garbage bag - During any outdoor shoot I always pack one or two large garbage bags in my bag or in the car. They are great when you need some rain protection, need to keep your equipment on the salty sand, need to lay down at ground level when shooting low to the ground. A black garbage bag acts as a great gobo when needed, translucent bags make great diffusers.
- Gaffer's tape - 1 inch width in black, a small roll is perfect to secure items when needed. This is a must have to tape down your lens at infinity when doing any astro photography. A small piece can be used to cover the eyepiece of the viewfinder, preventing stray light from spoiling the exposure. It is also a great all around repair tool.
- Parchment paper, issue paper, or rip (stock) cloth - A small piece about 4 inches square is good but larger pieces can be useful for other situations. You can tape this (using gaffer's tape to your flash to diffuse the light. If you keep a larger piece you can have someone hold it to diffuse bright sunlight while doing close-up or macro photography. Get parchment paper any kitchen or grocery store. rip stock can be purchased from a fabric store or on-line.
- White foam-core - This makes a great reflector, if you need a silver reflector keep some kitchen foil and fold it over the foam-core. You can use the foam-core as a gobo or even as a white background for small subjects. Staples, Office Max, Michael’s or A.C. Moore are ideal for this.
- LED Flashlight - a must have when you are in the dark. A great tool for light painting and when you need just that added light for filling in shadows or adding a highlight. My favorites are Coast and SureFire (SureFire lights are available from the SureFire website and Amazon). Others can be purchased at Home Depot, Amazon or Lowes carry great LED Lights
- Small notebook and a ballpoint pen - Journaling is key. Write down locations, notes, day and time of best light, etc. Draw sketches of what there is so you can come back for better images. If nothing else - you can use it to jot down names and contact info of fellow photographers you meet.
In the near future I will follow-up with additional items I find useful. Some for the bag and others that are good to have. In the mean time, why don't you use the comment link on the top of this post to share with us some of your special items.If you do plan on getting any of these items please use my affiliate links on the right column of this blog post or use the Products and Discounts Page for additional links.
2015 Photography Project - 12 Pre-visualized Photographs
 The Oxford dictionary indicates the term Pre-visualization as a Noun and Pre-visualize as a Verb as follows:Pre-visualization: The visualization of how something will look when created or finished.Pre-visualize: To visualize (how) a thing will look when created or finished; to imagine or predict (the result of a process or act).Ansel Adams was a pioneer of this technique. He pre-visualized the final print and based on this he determined what would be needed to achieve that result. This would become his game plan for what he captured and how he processed it in the darkroom.Ansel Adams definition of visualization was:The camera makes an image-record of the object before it. It records the subject in terms of the optical properties of the lens, and the chemical and physical properties of the negative and print. The control of that record lies in the selection by the photographer and in his understanding of the photographic processes at his command. The photographer visualizes his conception of the subject as presented in the final print. He achieves the expression of his visualization through his technique—aesthetic, intellectual, and mechanical.Pre-visualization should become a mandatory requirement to consistently make great photographs.When you do not pre-visualize, you are photographing without a plan for the end result. Authors have a story board or an outline of the book they wish to write, architects create blueprints before buildings are constructed, fashion designers sketch their designs before cloth is cut, so should you pre-visualize before you shoot. I do also believe this does not apply to all types of photography, in particular, sports, certain events, photojournalism and street photography to mention a few.Many photographers have challenged themselves to do 365 or 52 projects where they capture one image a day for a year or one image a week for 52 weeks. So here is a twist based on two of my mantras “pre-visualization” and “deliberate photography™”.The project is based on your pre-visualizing 12 images and then striving to capture them as you pre-visualized them.The way you go about doing this is through a process of journalling before the fact. It is more like creating a story board sketch. Each sketch is created to record your pre-visualized image and may also contain lens perspective and focal lengths, mood, lighting and some post processing notes.The 12 pre-visualized sketches can be individual images that have no connection to each other, they could be a part of a story or they could be based on a theme you choose.Keep these twelve sketches with you in your camera bag. More importantly flip through these pages every once in a while. When you come across a scene that is representative of what you have pre-visualized, be deliberate, take your time, wait for the moment and capture the image.Once you have post processed the image, compare it to your sketch - see how well you achieved what you had set out to capture.This is something different but a project that will teach you to be on the look out for the images you desire, think and plan your photographs and help you create photographic art.Leave me a comment if you would like me to set up a page to display your project.
Firmware Updates
What is "firmware"? Firmware is the program code that resides in an electronic or computer device's read-only memory (ROM). ROM can be written into using special software. Firmware is also referred to as "microcode". Typically, firmware is written into ROM when products are assembled in the production facility and is used to facilitate the running of the product defined by user programs.In most cases, when a product is first introduced the firmware is given a numeric designation, typically 1.0. As features are added and bugs or problems are resolved, new firmware is developed and the numeric designation is updated. This could be 1.1 or 1.01, etc. These are minor revisions or updates. A significant enhancement or update is usually designated with a whole number increment, 2.0, 3.0, etc. All firmware updates are designed to be incorporated into existing products via an update. Such updates can be downloaded from the manufacturer to your computer and subsequently into the ROM of your product.With many manufacturers, you will get an email notification when a new firmware update is released. However, this notice will only come if you have registered your product. You need to periodically check for these updates on the manufacturer's website (usually in the support section).It is unfortunate that many DSLR's and Mirrorless camera owners rarely update the firmware. Only when they encounter issues and ask for support they will be requested to do an update. The update will in most cases resolve the issue.It is good to periodically check the firmware version of your camera and verify that you have the latest. If you are not up-to-date, then download and install the latest version. Be very careful and follow installation instructions explicitly. There are no shortcuts and a mistake during a firmware update can render your camera useless. You will have to send the camera to the manufacturer for a complete reset and update.DSLR and Mirrorless cameras are not the only products that require firmware updates. Newer lenses, flashes, lens adaptors, hand held light meters, studio strobes, etc. contain ROM and firmware. If your photography product has a USB port (connection) then it probably has ROM and firmware so it is worth checking for updates.Why not start the new year ensuring all your gear is up-to-date. It is also good to check for updates once every three months. Why miss out on a new feature or bug fix.
Flash Sync Speed Limitation - a question from a subscriber
Question: "One thing I am curious about is the shutter with regards to off camera flash. Is there still a physical shutter that limits me to a max synch speed of around 1/200 of a second? Or have they moved to an electronic shutter that would allow much faster synch times?"
In order to appropriately respond to the question lets first understand how mirrorless camera sensors operate. Most mirorless cameras use CMOS sensors that contain light sensitive pixels arranged in rows. These sensors are always live as long as the camera is powered on and booted up. In the mirrorless world, the sensor information is being constantly fed to the LCD and/or the electronic viewfinder. When you press the shutter the following sequence takes place: a) the sensor is wiped clean electronically; b) next the sensor is turned on and receives light while the pixels record the information; c) now the computer in the camera reads the data collected by the sensor pixels to generate the image. This data is finally recorded to the memory card.We know that the sensor is sensitive to light and always receiving information. In order to capture a good image, the sensor should be restricted from receiving light while it is being wiped clean and then again when it is reading the data captured during exposure. As the sensor data is being read you do not want the pixel information changing with any new light that may fall on the pixels. So, for both these events, mirrorless cameras use electronic or mechanical shutters or a combination of the two.The electronic shutter works by first erasing all the pixel data on a row-by-row basis. Then new image information is gathered and the data is read by the computer on a row-by-row basis very similar to how a television picture is generated. All of this takes time, albeit just a fraction. The greater the number of pixels the more the rows of information and the slower the process. This limits the cameras from achieving high shutter speeds. For proper exposure these rows of pixels gather the same amount of light but do so a row at a time. The data is read at the same rate. The collective time determines the fastest achievable electronic shutter speed.We are aware that to expose properly for flash photography all the pixels must be “alive” and ready to receive data while the flash is on. If the row by row read process starts too early then you will get areas of dark under exposure. In order to properly expose for flash, the computer in the camera has to wait before it can start reading the data collected by the sensor. This wait time determines the highest sync speed for flash photography.As an adjunct to this, in order to achieve higher shutter speeds mirrorless cameras use mechanical second curtains. The curtain can rapidly close all light from entering the sensor while the computer reads the information. On the Sony A7 that has a 24 MP sensor, there are 4000 rows of pixels. The only way to attain shutter speeds of 1/8000 sec. is possible using a mechanical rear-curtain. On the 36 MP A7r however, there are 4912 rows of pixels. To attain speeds of 1/8000 sec. this camera needs both a front-curtain and a rear-curtain shutter. The MFT cameras like the Panasonic GH4 and the Olympus OM-D series have 16 MP sensors that have only 3456 rows and can achieve 1/8000 sec. electronic shutter speeds without the need for mechanical shutters..The Sony A7 has an optional mechanical front-curtain that must be deployed when using lenses of longer focal lengths at high shutter speeds.Unlike DSLR’s, the mechanical shutter on mirrorless cameras remains in an open state in both the powered off and powered on modes, allowing for live view data to be collected and displayed continuously.The highest flash sync speed is currently 1/320 sec on the Olympus OM-D E-M1 , 1/250 sec on the Panasonic GH4 and under 1/200 sec for most of the Sony cameras.Hope this explains why the current mirrorless technology is limited and high flash sync speeds are not feasible. If you have other photography related questions, please do not hesitate to ask and I will do my best to get you answers.
Diaphanous Flowers - Rose of Sharon
This is the fourth flower in this series. A Rose of Sharon from the yard. This one was lit from the side and the back with a low intensity cross fill. All lighting for these images have been cool LED lights, daylight balanced. Once again please click on the image for a larger view.
Time-Lapse Imagery - Published
 I am so thrilled. My book is finished and is available in the Apple Store. It is an interactive iBook/e-Book that can be viewed using iBooks on a Mac or on an iPad.I am working on an interactive PDF version for all non Mac and iPad users. This should be ready in a week or so.
![]()
BBF - Back Button Focusing
This week I saw a post on Facebook where a friend was talking about seriously starting to use Back Button Focusing. I know there are lots of opinions and articles on this topic but one more will not hurt. Please note, this has nothing to do with back focusing. Before we go to far into the BBF stuff let’s get familiar with camera focusing. Most modern DSLR Cameras have the ability to manually focus on your subject or automatically focus. Some lenses do limit you to manual focusing as they have no motors and electronics to drive the focusing elements.Automatic or Auto Focus has a few modes, One Shot, AI Focus and AI Servo in Canon speak and AF-S and AF-C in Nikon speak. There really should be some ISO standards for this kind of stuff.One Shot and AF-S basically means the camera will trigger the lens to auto focus on the subject, lock the focus for you to capture the image.AI- Servo and AF-C means the camera will trigger the lens to auto focus on the subject and then do its best to keep the focus on the subject while the subject is in motion.Canon has AI-Focus which is supposed to intelligently detect motion and trigger the appropriate auto focus mode, one shot of AI-Servo. This can be problematic so let’s leave it out of this article.No lets understand how we get this to work. By default your camera is set to focus and read the exposure when you half press the shutter button. Fully depressing the shutter button takes the picture. Not a bad way to do your photography.So what is the problem? If you have a static subject, and use center auto focusing point (it is the most sensitive AF sensor) you would half depress the shutter button. This action will initiate the auto-focus and then you will see or hear focus confirmation, now you can depress the shutter all the way and capture your image. Optionally, keeping the shutter button half depressed you can recompose and then press the shutter button all the way and take your image. This system works great for static subjects. Now you are trying to photograph moving subjects. You can’t half depress the shutter and lock focus and then take the shot because your subject will have moved and no longer in focus.You switch your camera to AI-Servo (canon) or AF-C (Nikon). You are capturing great action images and you notice a great subject that is static. You point your camera, focus and recompose – Oh! NO! you lost focus and more Oh! No! the opportunity is gone. What could you have done? You could have switched the camera back to One-Shot or AF-S or switched your lens to manual focus after getting focus and then pressing the shutter to grab the shot. This would definitely be too late.To overcome this issue you need to separate the focus initiation from your shutter release. Now you need to assign focusing to some other button. Typically this is one of the buttons on the back of your camera and hence the term Back Button Focusing or BBF.Using your custom functions or menu functions set your shutter to meter only, assign the AF-On button to initiate focus. Now you will use your thumb to depress the AF-On button to initiate focus and then use the shutter button to capture the image. There are two steps but well worth it.One of the greatest benefits is when you want to lock focus, you simply release the AF-On button. The lens will not refocus till you depress the AF-On button again. So for any action photography you can be ready for any motion and yet be in a position to lock focus when you need to.A huge benefit, you can leave your camera in AI-Servo or AF-C mode and never have to switch to One Shot or AI-S mode. When you use BBF, as long as the AF-on button is depressed the focusing system will remain active in follow focus mode tracking your subject (AI-Servo or AF-C), release the button and focus stays locked. So for stationary subjects, all you need to do is to tap the AF-ON button and focus system will focus and lock. Remember to release the AF-On or the camera will continue to try and refocus.Now once you set BBF you need to be aware that this will take some getting used to. Your fingers and brain need a major reset. You will miss a few good shots but once you are used to this system you will wonder why you have been wasting so may good opportunities.Warning for Nikon users: The back button focusing button AF-ON will not trigger the lens vibration reduction “VR”. The shutter button must be half depressed to trigger VR.
Metering Modes and How Your Camera Meter Works
My latest article has been published in Digital Photography School. Non DPS subscribers may read it using the link below. There are lots of excellent articles and product reviews available in DPS and they are all free.Click Here for the article