
A US Navy DC3 Cargo Wreck
 On Sólheimasandur a black sand beach in Iceland lies the remains of a Douglas Super DC-3 cargo plane that crashed here in 1973. The cargo aircraft was abandoned and is now a tourist attraction. Though not easy to get to, it is a great photo opportunity. It tail section, wings and engines are all gone and its interior stripped.The wreck is most photographed from the side you first see it when approaching the beach but on this evening on August 14, last year the dramatic clouds made an exceptional backdrop for the opposite side of the plane.I am so looking forward to going back this September for another great workshop.
Review of the Platypod Pro Max
 A while back I had done a review of the exceptionally versatile and compact Platypod Pro® Deluxe Kit. Now the makers have introduced a follow-up to the Platypod Pro called the Max.Much planning, engineering and fine machining go in to making the Platypod Pro® Max. The Max’s initial form is stamped out of a 5mm thick sheet of aircraft grade aluminum maintaining absolute flatness. Using Computer Aided Manufacturing (CAM), the plate is computer machine precision drilled for all holes and slots. Edges are round-routed and holes either threaded or chamfered to avoid any sharp edges. Key holes slots for attaching the spike screw box are drilled only partway through the plate with very low tolerances to allow easy but firm attachment. These last holes are invisible from underneath the plate.
 I have been informed by the manufacturer that the machining quality and workmanship on the Max is so meticulous that despite computer aided manufacturing the factory can only produce 1500 every 25 days!Like the original Platypod Pro the Platypod Pro Max is a sturdy flat mini tripod ideal for low-angle shots and situations where traditional tripods are cumbersome or impractical. It is however, significantly larger, has four spikes/reversible rubber feet rather than three, a belt loop, a single 3/8 inch 16 ball head mounting screw and a 1/4 inch 20 removable stud to mount accessories.
 Here is an image captured with the Max set up on top of the stone wall at Tunnel View - Yosemite NP.
 Unlike its smaller brother the Max supports ball heads of any size and is rated to support 300 pounds. A 3/8 inch 16 threaded screw hole allows you to mount the Max directly to your tripod as and when needed. Made of aircraft grade aluminum anodized black with beautiful self-explanatory laser etchings, the Max comes in a red microfiber drawstring pouch.
 If you already own a Platypod Pro the Max does not replace it, rather it compliments it where situations demand a larger base or when you need to physically move your low lying camera rig across the sand or grass when photographing wildlife.Specifications:
- Base - 6061 black anodized aircraft-grade aluminum. 5 mm thick. 5.25 x 7.75” (5-year warranty—Full replacement of parts for any defect in workmanship.)
- Fiberglass-reinforced nylon removable "bayonet style" storage box mounted onto plate to hold four 1/4-20 spikes, 2 inches long, with heavy-duty rubber feet and locking nuts. Small magnets keep spikes in place for storage.
- Five 1/4-20 threaded holes strategically placed to allow use of spike feet in configurations of one, two, three, or four at a time.
- Two 2-inch belt slots to secure to any cylindrical object or to tape onto floors for remote camera setups.
- 1/4-20 and 3/8-16 accessory threaded holes for attachment to tripods or quick-release devices under the unit.
- 3/8-16 TA2 titanium photographic bolt drilled and countersunk through the plate and welded in place for large tripod ball heads, such as the RRS-BH55, even with spike-feet in place.
- Two non-threaded holes for permanent or semi-permanent mounting to floors, walls, ceilings or panels.
- Weight: 13 ounces, including spikes and storage box.
At approximately 5 x 8 inches it is about the size of an iPad Mini and fits well in any camera case that has a slot or pouch designed to hold a laptop or an iPad. As an option you can use either slot or one of the non-threaded holes and a carabiner to hang the Max from your belt or a loop on your backpack. As compared to the original Platypod Pro, Max’s larger footprint means more stability. Like the Pro, Max is made of aircraft-grade aluminum with an embedded 3/8-inch titanium bolt. However, it does come with a few features, including a pair of slots that can secure Max via a bungee cord, zip-ties or even your belt to freestanding objects and structures. In the center are 1/4- and 3/8-inch holes to attach Max to quick-release devices, such as the Peak Design Capture Clip, or directly onto a tripod center column. A very convenient 1/4 - 1/4-inch male cross-nut allows attachment of flexible arms, speed-lights and numerous accessories. Here I used a Novoflex Flex Arm and a Lume Cube LED to light the crystal. The camera is a Panasonic GH4 with a 30mm Lumix macro lens. A second 1/4 - 1/4 and a second Flex Arm would be ideal for cross lighting a macro subject.The Max‘s larger base allows use of most any ball head. The RRS B55 is the largest ball head I own and I had no problem attaching it to the Max and all the knobs have adequate clearance. As I no longer use large DSLR’s all my tests were done with Sony and Panasonic mirrorless bodies. Using the Max with an A7RII and the 70 – 200 mm f/4.0 lens was a breeze. I also mounted a Panasonic GH4 with the new Leica 100-400 using a Wimberly SideKick for quick reaction time and maneuverability. When using the Sidekick it is imperative that you remove the holder for the spikes with a simple twist and place the cross-nut in one of the corner positions, out-of-the-way. This gives the sidekick the clearance for 360 degree rotation. The Max supported this rig very well.
 With the Platypod Pro you had to be careful mounting heavier gear. It was best to ensure the center of gravity was as close to the center of the Platypod Pro mounted ball-head. With the Max, this is a less of an issue. With a medium or large ball head the Max will comfortably support most DSLRs and mirrorless cameras fitted with normal to long telephoto lenses. A super telephoto lens properly mounted on a good ball head works well too. Here as in the image below I tested it using the RRS BH55 and the Wimberley Sidekick with a Canon 500 mm f/4.0 lens attached to a Sony A7R II using a Metabones IV adaptor.
 Similar to the Platypod the Max is ideal great for ground level photography and videography, a mount for action cameras and for creating panoramas. When creating panoramas use a pan/tilt ball head like the Unique as shown below or attach a leveling base (see following image) below the ball head as shown in an image above where the RSS BH55 is mounted on top of the Acratech 1170 leveling base. As the Max is made of a relatively thin aluminum plate it would be difficult to have a built-in level. A third-party bubble level can be adhered to the max or simply place on it to level the Max. When it is necessary to level the Max it is best to use three of the four spikes or rubber ends. Four legs are great for stability but not so for leveling. The Max is best used without spikes or feet when you want to have the flexibility of sliding it in any direction on flat surfaces, sand or grass. When friction is important then the spikes are the best option. In the reverse orientation the rubber caps not only provide friction preventing the base from sliding around but also prevent damage to furniture, painted surfaces, etc.
 For surfaces like asphalt, rocks and brick the spikes are your best choice for stability. To attach the base plate to a fence post, rail or tree limb, a pair of bungee cords, straps or your belt work great. All you need is to secure the cord around your object and hook the ends into the slots or holes in the base plate. Belts and straps can be passed through the slots on each side of the Max to secure it to any post, tree trunk or similar object.The Max with its little brother the Platypod Pro have a permanent home in my photography kit. I find I am using these support systems more than using my tripods.More on the Platypod products and their web siteAll company names, products and devices mentioned in this review are trademarks of the respective companies, registered in the U.S. and other countries.
View from the Merced
 Although May is a great time of the year for exceptional waterfalls it is not the best time for sunsets. The angle of the light at sunset just does not hit Half Dome rights from the iconic locations such as Glacier Point and Washburn Point. Similarly Tunnel view sunsets are weak compared to later in the year. This is one of two evenings where the light on El Capitan made it worth photographing. (Photographed May 2016 during my Yosemite & Monolake workshop.)
Lucy Vincent Beach - Martha's Vineyard
 Concluded a great photo workshop in Martha's Vineyard yesterday. A great group of photographers, and some great locations on the island. Inclement weather did not prevent us from photographing the opportunities that were presented. This image is one of my favorites where the last rays of the sun just kissed the rock on the shore at Lucy Vincent Beach. We stayed on to do some light painting and astro photography before winding up for the night. (More images to follow)
Zeiss Batis 2.8/18 Lens for Sony E-Mount Announced
 The ZEISS Batis 2.8/18 expands the Batis range of lenses with a super wide-angle lens. For the Sony α system with E-mount the new lens, which features a diagonal angular field of 99 degrees, is currently the shortest full-frame fixed focal length with autofocus. The new ZEISS Batis 2.8/18 with innovative OLED display to show focus distance and depth of field is also impressive thanks to its high image quality across the entire image field. The lens will be available from May 2016.
ND Filters' Color Cast comparison - Vü 10 stop Sion, Lee 10 stop (Big Stopper) & Formatt Hitech 8 stop
The Lee Big Stopper was introduced in 2010 to compete with the Hitech 10 stop filter that was known to have flare and other issues. Subsequently Hitech reengineered their 10 stop filter and emulated some of Lee’s design features. In particular the the light blocking gasket. Soon Lee introduced the Little Stopper while Hitech developed a wider range of solid ND filters the Pro Stop line from 6 to 10 stops and in multiple sizes. Most recently I was introduced to the Vü system and hence this test as a comparison. I will do a full review of the Vü system in the near future.As I own the Lee Big sStopper and the Hitech 8 stop with the Hitech holder (I do prefer the Hitech to the Lee holder) I was keen to understand the differences in the way high f-stop ND filters impart a color cast when used. Hence this test. Please click on the images to see a larger version.The set up was fairly simple. Using a Sony A7R II and a Zeiss Batis 85mm f/1.8 lens set at f/2.0 and a base ISO of 50, shutter speed 1/125 sec. The light source was two Elinchrome studio strobes positioned to give a 1/3 stop exposure variation at the edges. The camera was focused on a white foam-core board with a X-Rite Color Checker Passport clamped to the upper right corner. Camera white balance set for flash rather than a custom white balance (5450 Kelvin) and an "as shot" tint of +9. I wanted to allow for any variation in the white of the foam-core board that is typically not 100% white be adjusted in post.The test exposure was made and the white balance adjusted in post using Lightroom - this is the image below. White balance adjustment yielded a temperature of 4750 Kelvin and a tint of -1: Next the strobes were adjusted to full power providing 8 additional stops of light. The ISO was adjusted to increase sensitivity by two stops while the aperture of the lens was kept at a constant f/2.0 for all the exposures. Each filter was tested for color cast only.
The Lee Big Stopper (10 stop ND)
The Lee Big Stopper (10 stop ND) was mounted and the image as shown below was captured. This is as a screen shot so as to show the RGB histogram. The info panel shows the reading from the center of the captured image. Values are R=219, G=229, B=243 In this next image the Info Panel shows RGB values from the lower third of the image. Values are R=187, G=203, B=222
 Next the image was white balanced in Lightroom WB to 8600 Kelvin and tint +43. Compensated for the color of the board and the lights the calculated readings are 7900 Kelvin and a +35 Tint adjustment.
 The Lee Big Stopper exhibits a heavy blue cast in both the center and the edges.
Formatt Hitech 8 stop ND filter
As I do not have a 10 stop Formatt Hitech filter, I chose to do the same test with the 8 stop that I own. As with the Lee filter before, here the info panel shows the reading from the center of the captured image. Values are R=234, G=238, B=236 In this next image the Info Panel shows RGB values from the lower third of the image. Values are R=209, G=220, B=212
 Next the image was white balanced in Lightroom WB to 5750 Kelvin and tint +52. Compensated for the color of the board and the lights the calculated readings are 5050 Kelvin and a +44 Tint adjustment.
 The Formatt HiTech 8 stop exhibits a heavy green cast at the edges but is more neutral in the center.
Vü Sion Q 10 stop Neutral Density Filter
The Vü Sion 10 stop ND filter mounted using The Vü professional filter holder (more abut this in a future post) and the same test was performed. As before the image captured is shown as a screen shot showing the RGB histogram. The info panel shows the reading from the center of the captured image. Values are R=235, G=235, B=239 In this next image the Info Panel shows RGB values from the lower third of the image. Values are R=211, G=214, B=219
 Next the image was white balanced in Lightroom WB to 5800 Kelvin and tint +13. Compensated for the color of the board and the lights the calculated readings are 5000 Kelvin and a +5 Tint adjustment.
 The Vü Sion 10 stop is very neutral in the center an has a negligible shift at the edges.In conclusion I am very impressed with the Vü Sion 10 stop and is near neutral rendering. My full review of this system is forthcoming.
Battle of the Barges - Boston Sept 5, 2015
 After a very long time the Battle of the Barges returned to Boston. Piers Park would have been the ideal location but the crowds were overwhelming. Alternate East Boston location provided good views of the North End Barge.Please click on the image for a larger version.


Iceland August 2015 - Day 4 and a Resolution Test
Today was a travel day to the highlands with a few stops en route.Here are a few images and an experiment seeking detail.


 This image above was taken as an 8 image pano and stitched in Photoshop. The resulting image is 23,881 pixels by 7680 pixels. This equates to an image 100 by 32 inches (approx) at 240 dpi. There is a farm in the distance that I have applied a red stroke to in the image below (this has been reduced to 500 by 1600 pixels. Please do click on the image below for a larger rendition. Equipment: Zeiss Planar 50mm f/1.4 at f8, Sony A7R ISO 200, 1.6 sec using a 6 stop HiTech ND filter.
 I cut and pasted this stroked area onto a new image layer in Photo shop. The crop is about 1936 by 479 pixels. The crop section is below - please click on this for the full scale view.
 The new mirrorless sensors are amazing.
Iceland August 2015 - Day 3
 This the last full day in the peninsula (rain and wind aside) was spent exploring the far west and the northern coastline.


Iceland - August 2015 Day 1
It was unfortunate that we had very poor internet service this trip to Iceland hence no posts. This was a small group photo tour to the Snaefelsness Peninsula and the Highlands. The trip was 11 days with 10 of them rainy and very windy - this is Iceland after all. We arrived at a decent hour in Keflavik and on to the car rental. The morning was spent organizing cell phone SIM cards, drinks and snacks. We had breakfast at a quaint little breakfast pleace in Reykjavik. Walked about town and then drove on to a fishing village Hellnar and checked in to the hotel.A brief trip along the Southern coast before dinner and bed. Note that this and most if the images in subsequent posts lack great skies.

Peony

"Dusk on the FlowerOf the white peonyThat embraces the moon."Gyodai - Haiku from the Edo period (1603 - 1868)
This image was inspired by Chinese/Japanese art where paintings of peonies proliferate. In this culture, it is not only the symbol of wealth and status but can also be a metaphor for female beauty. In Western culture the flower was named after the Greek God Paeon. The root of the white peony like many other plants is used for medicinal purposes.
As a photographer the beauty of this flower captivates and inspires me.
Since there is no direct translation of my name into Chinese, I had to create my own "chop" - an an S and a V.
Peak Design - SLIDE - an awesome camera strap
 This is part one of a three-part review of three camera straps made by the kick starter company called Peak Design. I had heard about these from a number of sources including my friends at TWiP (This Week in Photography). Peak Design were kind enough to send me the Slide and the Clutch and I ended up getting the Cuff. After this bit of testing I should consider getting the leash too as you will see from my review.
 Let's start with the Slide which is the most versatile strap in this family of straps. The strap is made of materials similar to those found in automobile seat belts. The two ends of the strap terminate with a unique attachment system made off a spring loaded slide-in connector that connects to a Kevlar loop clip system. The strap is actually two belts fused together in the central area that would typically wrap around your neck or across your shoulder. The fused area has a slight padding with one side same as the belt while the other side has silicone striping to provide enough friction to prevent it from slipping off the shoulder. I find this double-sided arrangement very convenient. It is so easy to switch between the surfaces for those times you want to use the strap as a slide or have it in it's nonslip mode across your shoulder. To maintain uniformity there are two adjustment loops at either end. An anodized aluminum metal handle mechanism allows you to extend or retract the length of the strap but you must do on both ends to keep the padded area in the middle.The Slide strap kit comes with the strap, four Anchor Link connectors, one square Arca Swiss compatible camera plate, an allen wrench on a ring, a carrying pouch and a user manual. These are all nicely packaged in a well-designed box.
 I attached two Anchor Links to either end of my camera where you would typically attach your OEM camera strap. I attached a third Anchor Link to the loop connector of my existing Really Right Stuff extendable camera plate. With three connectors I am able to use the strap in various configurations. The most convenient is across the shoulder where I can easily bring the camera into shooting position with my hand on the grip and index finger on the shutter release with no obstruction. If I need to Carry the camera around my neck, I can easily detach the connector from the base plate and attach it to the free connector at the top. For the various ways you can sling slide I found carrying the camera on one shoulder to be the least secure and also not very comfortable.
 |
 |
 |
For hand holding the camera the I attach the Clutch (more on this in Part 2) by attaching it to the two Anchor Links attached to the side of the camera body top and bottom (RRS Plate).
Specifications (from the Peak Design product page)
- Weight: 171 g (281 g as packed)
- Strap length: adjustable from 99 cm (39 in) to 137 cm (54 in)
- Strap width: 45 mm (1.8 in)
- Strength rating: Vectran®-corded Anchors can withstand over 200 lbs (90 kg), making Slide safe for use with the largest of professional cameras
Build quality
Of all the straps that I have used in the past and currently, I find the Peak Design Slide to have been made exceptionally well. Every component is beautifully constructed, all the stitching is truly well executed. The adjusters, the loops and the tripod plate are all of the highest standards.I use the slide mounted to a Canon 6D and on my Sony A7R for about 10 days now and am very happy with the performance. I always like to remove my camera strap when I mount the camera on my tripod so as to prevent any shake as straps tend to act like mini sails in windy conditions. This requires constant disconnecting and connecting Anchor Links. So far, they have all performed extremely well and it appears these will not give or come loose for a long time..
My final assessment
I am very happy with the performance and comfort of this strap the Slide. It is really designed for any camera but my preference would be to use the Slide for heavier DSLRs and mirrorless camera bodies. A slimmer version but with the same wide shoulder padding would be ideal for the smaller minimalist mirrorless bodies. The Peak Design Leash comes close but does not have the comfort padding.I would not hesitate to recommend the Slide and give it 4 1/2 star rating out of a possible 5. The street price is about $60. Keep in mind that a small Arca Swiss camera plate will cost you a minimum of $20 - here one is included. This to me is a great bonus.To get any Peak Design product click on the logo below for a 10% discount.![]()
Testing Affinity from Serif
Have not had a lot time to test the 2nd Beta release of Affinity but gave it a good shot yesterday. Still a lot to learn, but on the whole, I like it a lot. Has some great features built in, the filters are great but not sure I like the fact that it creates an intermediate file. The following is an image processed entirely using Affinity (Sony Raw to a TIFF export).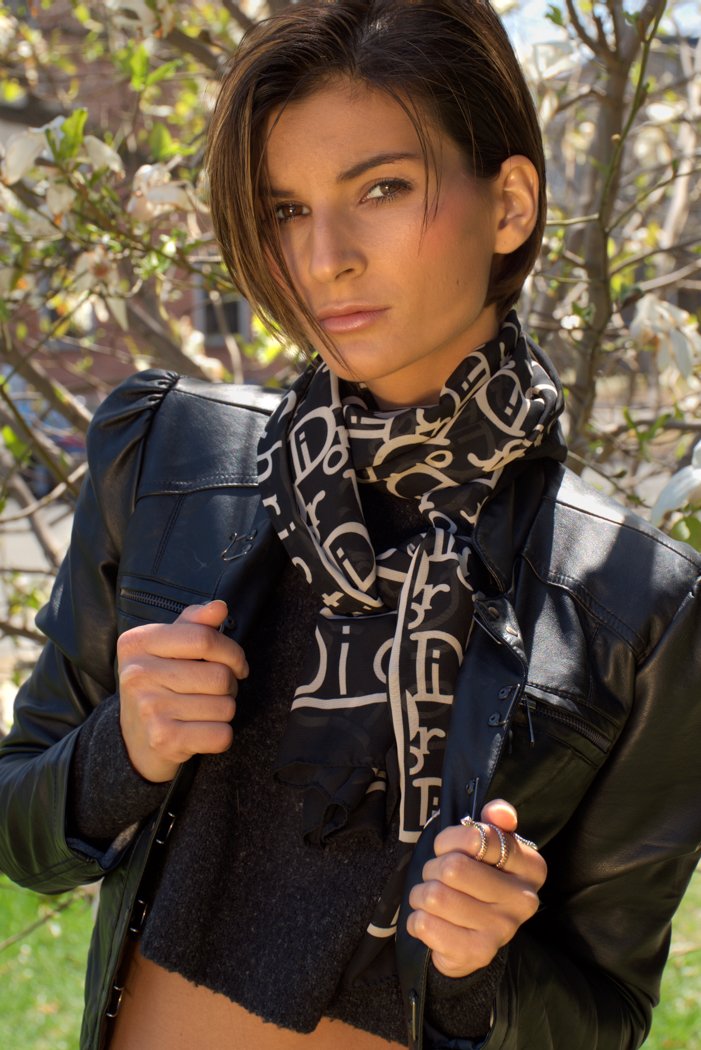
ZEISS announces 2 Full-Frame Autofocus Lenses for Sony A7 Cameras
 ZEISS Batis 2/25 and ZEISS Batis 1.8/85 – Designed for Sony A7 camera series
The ZEISS Batis 2/25 and ZEISS Batis 1.8/85 are the first full-frame autofocus lenses for Sony's E-mount cameras to be exclusively developed and distributed by ZEISS. This new family of lenses is particularly suited for the use with Sony's alpha range of mirrorless full-frame system cameras. The two new lenses will be shipping in July 2015.The new ZEISS Batis 2/25 and 1.8/85 lenses are the first full-frame autofocus lenses with an OLED display for the mirrorless Sony α series and therefore the pioneers of a new era. As professional tools, they enable outstanding image performance, impressive contrast and maximum resolution down to the very last detail.The innovative OLED display shows the distance of the focal plane from the camera system and the depth of field, ideally supporting creative image composition. Of significance is the fact that you will be able to see the readout in low light conditions. The display is powered through the camera. The OLED display is an absolute highlight – an innovation that is currently unparalleled in camera lenses.The Batis 2/25 is a Sonnar lens while the 1.8/85 is a Distagon lens
 Available this summer - The ZEISS Batis 2/25 and 1.8/85 lenses will be available for purchase in April and start shipping in July 2015. The recommended retail prices are $1,299 for the ZEISS Batis 2/25 and $1,199 for the ZEISS Batis 1.8/85.Click here for more information
No Aurora but the Milky Way
March 28, 2015 - Alaska Geo. Inst. forecasts a Kp index of 5 for the Aurora. Kp 5 means - if the Aurora occurs you should be able to see it low on the horizon in Massachusetts. Sounds awesome so we decide against going for the CamNats (Massachusetts Camera Naturalists) and head to Maine. Acadia is always a great spot so we head to the loop road. WRONG most of the roads are closed. A nice cop gives us direction on how to get to Sand Beach - so it is about midnight and we find our way to the parking lot. Poor visibility forces us out of there and heading further towards Otter Cliffs. The road is closed at the turnoff to Otter Cliff road. We pull over into a small clearing at one of the entrances to a parking lot and wait for the Aurora - nothing. Well the Milky Way rises over the cliffs so we wait. 3:15 and the Milky Way shows its full arc. It is cold, the wind does not help. I mounted the Rokinon 14mm on the Sony A7R to get this image. The foreground trees were light painted during the exposure.Please click on the image for a larger presentation. A subsequent 7 image pano yielded the arc but the 14mm lend distortion is apparent.
Wine and Cheese
As the cold and snow continues, photographing indoors is always a good choice. This is another image created using light painting. Equipment: Sony A7R, Zeiss Touit 32mm f/1.8, Maglight (non LED) flashlight, Surefire LED flashlight. Exposure triad f/16, 30 sec, ISO 400. 5 image composite.Please click on the image for a larger rendition.
Light Painting - Still Life
 With all the snow and not many places to go, a little light painting seemed to be the thing to do yesterday. This also gave me the opportunity to test out the Zeiss Touit 32mm f/1.8 lens. Mounted on the Sony A7R in crop sensor mode the lens performed flawlessly. There was a fair amount of ambient light at 4:30 in the afternoon so I stopped down the lens to f/16 at ISO 50 that allowed an 8 second exposure. Individual portions were light painted and three images combined to create this final composite.Please click on the image for a larger rendition.
Flash Sync Speed Limitation - a question from a subscriber
Question: "One thing I am curious about is the shutter with regards to off camera flash. Is there still a physical shutter that limits me to a max synch speed of around 1/200 of a second? Or have they moved to an electronic shutter that would allow much faster synch times?"
In order to appropriately respond to the question lets first understand how mirrorless camera sensors operate. Most mirorless cameras use CMOS sensors that contain light sensitive pixels arranged in rows. These sensors are always live as long as the camera is powered on and booted up. In the mirrorless world, the sensor information is being constantly fed to the LCD and/or the electronic viewfinder. When you press the shutter the following sequence takes place: a) the sensor is wiped clean electronically; b) next the sensor is turned on and receives light while the pixels record the information; c) now the computer in the camera reads the data collected by the sensor pixels to generate the image. This data is finally recorded to the memory card.We know that the sensor is sensitive to light and always receiving information. In order to capture a good image, the sensor should be restricted from receiving light while it is being wiped clean and then again when it is reading the data captured during exposure. As the sensor data is being read you do not want the pixel information changing with any new light that may fall on the pixels. So, for both these events, mirrorless cameras use electronic or mechanical shutters or a combination of the two.The electronic shutter works by first erasing all the pixel data on a row-by-row basis. Then new image information is gathered and the data is read by the computer on a row-by-row basis very similar to how a television picture is generated. All of this takes time, albeit just a fraction. The greater the number of pixels the more the rows of information and the slower the process. This limits the cameras from achieving high shutter speeds. For proper exposure these rows of pixels gather the same amount of light but do so a row at a time. The data is read at the same rate. The collective time determines the fastest achievable electronic shutter speed.We are aware that to expose properly for flash photography all the pixels must be “alive” and ready to receive data while the flash is on. If the row by row read process starts too early then you will get areas of dark under exposure. In order to properly expose for flash, the computer in the camera has to wait before it can start reading the data collected by the sensor. This wait time determines the highest sync speed for flash photography.As an adjunct to this, in order to achieve higher shutter speeds mirrorless cameras use mechanical second curtains. The curtain can rapidly close all light from entering the sensor while the computer reads the information. On the Sony A7 that has a 24 MP sensor, there are 4000 rows of pixels. The only way to attain shutter speeds of 1/8000 sec. is possible using a mechanical rear-curtain. On the 36 MP A7r however, there are 4912 rows of pixels. To attain speeds of 1/8000 sec. this camera needs both a front-curtain and a rear-curtain shutter. The MFT cameras like the Panasonic GH4 and the Olympus OM-D series have 16 MP sensors that have only 3456 rows and can achieve 1/8000 sec. electronic shutter speeds without the need for mechanical shutters..The Sony A7 has an optional mechanical front-curtain that must be deployed when using lenses of longer focal lengths at high shutter speeds.Unlike DSLR’s, the mechanical shutter on mirrorless cameras remains in an open state in both the powered off and powered on modes, allowing for live view data to be collected and displayed continuously.The highest flash sync speed is currently 1/320 sec on the Olympus OM-D E-M1 , 1/250 sec on the Panasonic GH4 and under 1/200 sec for most of the Sony cameras.Hope this explains why the current mirrorless technology is limited and high flash sync speeds are not feasible. If you have other photography related questions, please do not hesitate to ask and I will do my best to get you answers.
Shopping for a Mirrorless Camera?
 Here is a question that I have been asked many times. Why did you switch to the “mirror-less” camera system? My answer is quite simple, its all about not compromising the image quality and reducing camera size and weight. As these cameras do not have flip-up mirrors the distance from the lens to the sensor is greatly reduced resulting in lenses that have a smaller form factor and are also lighter. As a result, I can carry all my gear in a much smaller bag or carry-on and not have to worry about checked luggage during my travels.The next set of questions typically revolve around the quality of images; the focusing speed; noise because of the smaller sensor; battery performance; etc.Let’s address some of these concerns.Before the advent of mirrorless cameras, DSLR’s were based on the same design as film cameras. The film was replaced with an electronic light capturing device called the sensor. Computers, memory cards and batteries were added to complete the image capture process. All else however, remained the same. A mechanical mirror that is used to reflect light up and through a pentaprism into an optical viewfinder remained as the standard. Each time you press the shutter the mirror flips up and the sensor is exposed to light and captures the image. With the advancement of technology and innovation this flip-up mirror and mirror box is no longer required. The sensor has a clear view of the image as projected through the lens and the electronics used to capture the image are used to display the image onto the LCD screen. Optionally the image is displayed in the electronic view finder (EVF) that is like a miniature LCD screen. No more flip-up mirrors. Now DSLR's have incorporated some of this technology in what is termed as “Live View Mode” but unfortunately, some manufacturers have not taken this concept to the next level.Mirrorless cameras can be categorized the same way as DSLR’s where you have APS-C sized sensors, Full Frame sensors, etc. The mirrorless world for comparison purposes, has three sensor sizes that have gained acceptance as replacements for DSLR’s. The smallest are the Micro Four Thirds (MFT) cameras made by Panasonic and Olympus, APS-C sensor cameras made by Fuji, Samsung, Sony and others and the Full Frame cameras made by Sony. The sensor size of these cameras have the same crop factor considerations as do DSLR’s. The APS-C crop factor remains at 1.5 and the MFT sensor has a crop factor of 2. Based on the crop factor, higher depth of field is achieved with the smaller crop factor and results in less bokeh. Based on your style of photography and the subject matter, the range of full frame to a MFT sensor size body gives you all the choices you had with DSLR’s.As to focusing performance, DSLRs have some advantages. The dedicated phase-detect AF systems are very good at tracking subjects that are moving toward or away from the camera. In addition they also have an advantage focusing in low light situations. Conversely mirrorless cameras are excellent at lateral tracking. As the sensor in the mirrorless camera is always live it is capable of analyzing the subject and and tracking it as it moves across the frame. With the introduction of Panasonic's "Depth From Defocus" technology depth tracking has been greatly improved.
 What about quality? On the high end the Sony A7R has a 36.4 MP full frame sensor. The Nikon D810 utilizes a 36.4 MP sensor made by Sony. Image quality is exceptional. The elimination of the Anti-aliasing filter allows the camera to capture exceptional detail and clarity. The APS-C form factor has been popular with a majority of the prosumer range of DSLR’s on the market and has been the choice of many pro photographers too. The MFT cameras and that sensor size is new in comparison but the images from the MFT cameras are at par with the APS-C format cameras.ISO Sensitivity. If there is any doubt, all one needs to look at is the sensitivity of the Sony A7S with a max ISO of 409600. The camera can practically see in the dark. It is important to remember that ISO sensitivity has no bearing on the type of camera, DSLR or Mirrorless. The size of the sensor and the size of the pixels make the difference in light gathering capability and noise generation during image capture.Let’s look at some of the pros and cons for mirrorless cameras.PROs
- The ability to view the image in the viewfinder and the LCD screen in realtime.
- The ability to view all or select any of the camera settings live.
- The ability to view any changes to camera settings without having to take your eye away from the viewfinder.
- Focus peaking and zebra stripes. Focus peaking allows you to see the areas within your image that are in focus. This can be displayed using selectable colors. Zebra stripes show you in realtime areas that are going to be exposed with loss of detail in the highlights.
- The ability to use most DSLR and Film camera lenses with adaptors. You do not have to get rid of all your great glass. You may not have the ability to maintain electronic communication with the lens but they will work perfectly well in manual mode. With focus peaking, the process of obtaining good focus is simplified.
- The ability to shoot high resolution video and harvest the ideal frame. (Currently this is available on the Panasonic GH4)
- Electronic shutter - low to no sound when capturing images. A feature so important for nature, wildlife and street photography.
- No mirror, hence no mirror slap and vibration during image capture.
CON’s
- Battery life - with the exception of the Panasonic GH4 most other cameras have a very low battery life. These cameras are constantly drawing power feeding the LCD, electronic viewfinder or both. Due to the size of the mirrorless bodies, the batteries have been downsized too and hence have lower capacity.
- Long focal length lenses. With the exception of Olympus and Panasonic we have yet to see lenses with focal lengths greater than 200mm
- Electronic viewfinder and LCD refresh performance is limiting particularly in low light scenarios.
- Focusing speed of mirrorless cameras had been an issue but most manufacturers have addressed this with firmware and focusing system enhancements.
So which camera do you get? It all depends on your style and budget. I can say that having used mirrorless systems for about a year now my choices are:
- For general purpose, nature/wildlife and people photography - the Panasonic Lumix GH4 is superb with the Olympus OM-D E-M1 a close second.
- For detail and landscape photography - the Sony A7R is my choice. The A7 II, though I have not tested it appears to be a more forgiving camera and adds in camera image stabilization.
- For low-light photography - the Sony A7S is hard to beat.
- For video - the Panasonic Lumix GH4 is a hands down winner. The Sony A7S is very good but does not shoot 4K video to the camera.
I own or have used the following: Panasonic GH4, Olympus OM-D E-M1, Fuji XT1, Sony A7R and Sony A7. My comments on the Sony A7S and the A7 II are based or reviews and video samples captured by photographers’ whose opinion I value. The greatest lens selection is available from Panasonic and Olympus while Sony is still limited to 7 full frame E mount lenses. Panasonic and Leica have jointly produced some exceptional lenses as have Sony and Zeiss with their collaboration.By no means is this post meant to be a full review but a quick personal impression. Please do look at various reviews available on the internet for a more thorough analysis. However, I hope this helps you make your holiday shopping a little less confusing. Camera Labs is one of my preferred sites for honest in-depth reviews.CLICK on the chart to enlarge CLICK HERE FOR THE SAME CHART AS A PDF DOCUMENT
Processing with Capture One
For the past few weeks I have been processing my raw files using Capture One Pro rather than Adobe Camera Raw. I am finding the RAW processing engine in Capture One to be exceptional. Mark you, I have not upgraded to Version 8 and am still using Version 7.2.3In brief I love the way the the software handles skin-tones. The amount of detail it can draw out of dull highlights and shadows is great. The HDR sliders make it possible to bring out natural looking HDR tonal ranges from a single RAW file - exceptional.Now I just need to get more familiar with all the features and then upgrade to Version 8.Here is an example of an image processed using Capture One Pro. The image was captured in Iceland during my workshop this past September. Please do click on the image to see a larger version.