
Beaches of Martha's Vineyard
 Here are another three images from my Martha's Vineyard workshop last weekend. The image above and the next were captured on the beach at Aquinnah just below Gay Head Cliffs. The last image was captured on the last evening at Menemsha. Menemsha is famous for exceptional sunsets but this was a overcast and stormy evening with no hope of a sunset. Stormy yet so serene.

ND Filters' Color Cast comparison - Vü 10 stop Sion, Lee 10 stop (Big Stopper) & Formatt Hitech 8 stop
The Lee Big Stopper was introduced in 2010 to compete with the Hitech 10 stop filter that was known to have flare and other issues. Subsequently Hitech reengineered their 10 stop filter and emulated some of Lee’s design features. In particular the the light blocking gasket. Soon Lee introduced the Little Stopper while Hitech developed a wider range of solid ND filters the Pro Stop line from 6 to 10 stops and in multiple sizes. Most recently I was introduced to the Vü system and hence this test as a comparison. I will do a full review of the Vü system in the near future.As I own the Lee Big sStopper and the Hitech 8 stop with the Hitech holder (I do prefer the Hitech to the Lee holder) I was keen to understand the differences in the way high f-stop ND filters impart a color cast when used. Hence this test. Please click on the images to see a larger version.The set up was fairly simple. Using a Sony A7R II and a Zeiss Batis 85mm f/1.8 lens set at f/2.0 and a base ISO of 50, shutter speed 1/125 sec. The light source was two Elinchrome studio strobes positioned to give a 1/3 stop exposure variation at the edges. The camera was focused on a white foam-core board with a X-Rite Color Checker Passport clamped to the upper right corner. Camera white balance set for flash rather than a custom white balance (5450 Kelvin) and an "as shot" tint of +9. I wanted to allow for any variation in the white of the foam-core board that is typically not 100% white be adjusted in post.The test exposure was made and the white balance adjusted in post using Lightroom - this is the image below. White balance adjustment yielded a temperature of 4750 Kelvin and a tint of -1: Next the strobes were adjusted to full power providing 8 additional stops of light. The ISO was adjusted to increase sensitivity by two stops while the aperture of the lens was kept at a constant f/2.0 for all the exposures. Each filter was tested for color cast only.
The Lee Big Stopper (10 stop ND)
The Lee Big Stopper (10 stop ND) was mounted and the image as shown below was captured. This is as a screen shot so as to show the RGB histogram. The info panel shows the reading from the center of the captured image. Values are R=219, G=229, B=243 In this next image the Info Panel shows RGB values from the lower third of the image. Values are R=187, G=203, B=222
 Next the image was white balanced in Lightroom WB to 8600 Kelvin and tint +43. Compensated for the color of the board and the lights the calculated readings are 7900 Kelvin and a +35 Tint adjustment.
 The Lee Big Stopper exhibits a heavy blue cast in both the center and the edges.
Formatt Hitech 8 stop ND filter
As I do not have a 10 stop Formatt Hitech filter, I chose to do the same test with the 8 stop that I own. As with the Lee filter before, here the info panel shows the reading from the center of the captured image. Values are R=234, G=238, B=236 In this next image the Info Panel shows RGB values from the lower third of the image. Values are R=209, G=220, B=212
 Next the image was white balanced in Lightroom WB to 5750 Kelvin and tint +52. Compensated for the color of the board and the lights the calculated readings are 5050 Kelvin and a +44 Tint adjustment.
 The Formatt HiTech 8 stop exhibits a heavy green cast at the edges but is more neutral in the center.
Vü Sion Q 10 stop Neutral Density Filter
The Vü Sion 10 stop ND filter mounted using The Vü professional filter holder (more abut this in a future post) and the same test was performed. As before the image captured is shown as a screen shot showing the RGB histogram. The info panel shows the reading from the center of the captured image. Values are R=235, G=235, B=239 In this next image the Info Panel shows RGB values from the lower third of the image. Values are R=211, G=214, B=219
 Next the image was white balanced in Lightroom WB to 5800 Kelvin and tint +13. Compensated for the color of the board and the lights the calculated readings are 5000 Kelvin and a +5 Tint adjustment.
 The Vü Sion 10 stop is very neutral in the center an has a negligible shift at the edges.In conclusion I am very impressed with the Vü Sion 10 stop and is near neutral rendering. My full review of this system is forthcoming.
Review of the Hähnel Captur Module Pro, Captur Module - IR and the Captur Receiver
Hähnel Captur Module Pro remote trigger with sound, light, laser and IR triggering. Hähnel of Ireland has replaced the wonderful Giga T pro with Captur Module Pro. Capture is high-speed trigger system that will provide remote triggering, intervalometer functions, delay triggering, long exposure and will will also work as an ordinary flash trigger.Some of the more interesting features are sound, light, laser and infrared sensors for high-speed or wildlife photography. What is even better is that the system has an auxiliary port. This allows you to use any third part triggering devices to be connected to the Captur Module Pro that in turn will trigger your camera.The basic kit comes as a set of two devices. A hand held control unit and a IR transmitter. You will need an optional wireless unit to control your camera wirelessly. The controller is a 2.4GHz transmitter with a range of 320 feet. It will work with either shoe-mount flashes or studio lights as there is a hot-shoe and a sync port. There are models for Nikon, Canon, Sony and Olympus/Panasonic. Best of all the modules all use AA batteries.Features:
- Captures Time Lapse Photography, High Speed Photography, Motion & Wildlife Photography
- Four built-in sensors (light, sound, Laser & IR). The package indicates five built-in sensors however there are four sensors (three windows) and an auxiliary port that can accommodate an infinite variety of sensors and triggers.
- Auxiliary port allows to connect 3rd party sensors such as pressure plates, humidity & temperature sensors
- Fully programmable timed sequences including delay, interval timer, exposure count & exposure length setting
- Shutter release button with autofocus, single & continuous shooting & bulb mode
- Connect wirelessly to camera using the Captur Receiver (sold separately)
Construction:The Captur Module Pro and the IR Transmitter are encased in rubber shield that covers the unit with the exception of the display and control face. Each has a 1/4 20 thread that lets you mount the units on a tripod, light stand or clamp. The IR Transmitter mounts inverted to protect it from the elements. The Capture Receiver is not rubber encased. Module Pro: The face of the unit has the display window, three buttons - Lock, Trigger and Start/Stop. Blow these is the four way rocker and a center “set” button. The left side has the cameras cable release port and the auxiliary port. The top has the microphone, IR sensor and Light sensor. The right side has a micro USB port that can be used to power the device, and the on/off switch. Note the micro USB port is covered by the rubber enclosure. The underside of the unit has the 1/4 20 mount and the battery compartment also accessible by removing the upper enclosure.
 The Module IR has a high/low switch on the front face and the 1/4 20 mount. The IR bean is emitter from the top of the unit.he On/Off switch is located on the left side and the batter compartment is in the bottom also covered by the rubber enclosure.
 The Capture Receiver has a flash hot shoe on the face a test button and an indicator light that flashes green when the unit is ready and turns red when the unit is activated. The left side has the remote trigger cabe port while the right has the On/Off switch. The bottom of the unit has a combination hotshot mount and a 1/4 20 mount. Also on the bottom is the battery compartment. Note: this unit does not have a rubber enclosure.Using the units:The handheld remote controller can be connected to your camera with a remote cable or wireless is used with the wireless receiver unit. The controller will allow you to configure various shooting scenarios that require precise delays and also works as an intervalometer for time-lapse photography. Unlike the Giga T Pro, Captur Module Pro will work as a conventional flash trigger in addition to the remote triggering functionality when paired with a Captur unit.The control unit has settings for Hours, Minutes and Seconds (HH:MM:SS) and a mode delay of 00:01 through 10:00 seconds (duration in 1/100th second). A 4 way rocker for modes and a central push button for setting the parameters. Buttons for triggering, start/stop and lock. There are four configurable options:
- Delay - lets you set an interval between the time the trigger is fired and the shutter is activated.
- Long - allows you to set a long exposure duration - the camera must be set to bulb mode. It is also possible to do long exposures without programming. This is achieved by depressing the release button for 3 seconds and the bulb function will lock and you can release the button. Depress the button once more to end the bulb exposure (long exposure).
- Interval 1 - is configured to set the interval between shots and then N1 sets the number of shots to take.
- Interval 2 configures the time between interval (Interval 1) activation sand N2 configures the number of times the Interval 1 and N1 sequence is repeated.
Using the Captur Module pro is easy if you are familiar with the Gia T Pro system. There is an online manual that is reasonable week detailed for those who have not used a Giga system or are new to Remote triggers and intervalometers.Configuring for various modes:All modes have some common options: sensitivity, amount of delay before the unit will trigger the shutter, the duration of shutter open when the camera is in bulb mode and the number of allowed activations. To enable a mode all you need to do is to press the Start/Stop button to start the process. A ready LED turns green and when the mode is triggered the LED turns Red as a verification.To set the mode, use the rocker switch to get to the sensor mode you want. The modes are in the following order:Sound mode- adjust the sensitivity of the sensor as needed.Infrared (IR) mode, (you need to use the Module - IR). Set the Module - IR and the Module - Pro so they are aligned with the IR beam lens in line-of-sight with the receiver window of the Module Pro. When the IR beam is interrupted the unit will be triggered. The Module IR has High/Low setting. Use the low setting for a beam length of 4.5 feet or less and the High for lengths greater than 4.5 feet.Light Mode - here the sensor is activated when there is a change in light level - bright to dark, dark to bright. Ideal for fireworks, lightning, or indoors with any light being turned on or off.Laser - this mode requires a laser beam to be pointed at the receiver window and works the same way as the IR beam but with a much greater distance between transmitter and receiver.AUX - this mode requires you to connect any triggering device to the Captur Module Pro via a 1/8” Tip-shield plug.Pricing:The Captur Pro Module is $120, Two receiver modules are $45 each; A pair of flash triggers not reviewed are $100 and the Capture Timer Module also not reviewed is $60.Conclusion:In my opinion the Captur system is probably the most versatile triggering system I have used and as it uses AA batteries it will last through extremely long time-lapse sequences without having to worry about a premature shutdown. The construction is solid as is the performance. In all of the tests performed the unit did not miss-fire.
Battle of the Barges - Boston Sept 5, 2015
 After a very long time the Battle of the Barges returned to Boston. Piers Park would have been the ideal location but the crowds were overwhelming. Alternate East Boston location provided good views of the North End Barge.Please click on the image for a larger version.


Hummingbird Moth Hemaris thysbe
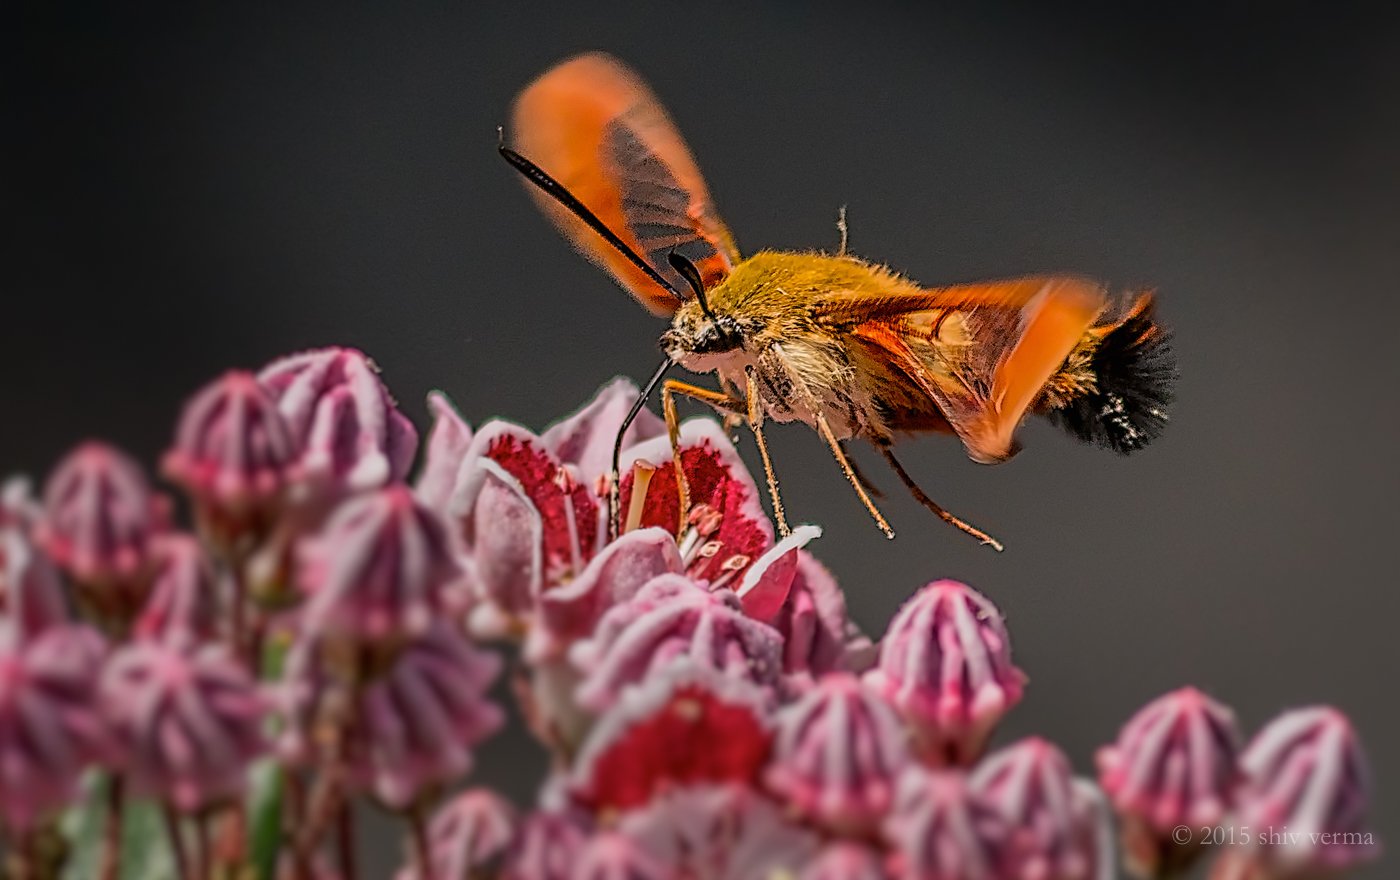 The Hummingbird Moth Hemaris thysbe, unlike most moths that are nocturnal or shade loving, is seen on bright sunny days. It is a fantastic hovering species that flies like a hummingbird and hence its name.They feed on nectar using a very long proboscis. Their wings flap at incredible speeds. This image was captured at 1/1600 sec and I was unable to freeze the wings.
2014 Fall Wanderings - 2
The Finger Lakes region in New York State is truly a landscape photographer's paradise. We spent an afternoon exploring Enfield Glen, an exceptional gorge in Robert H. Treman State Park. The gorge has multiple waterfalls (some just great cascades) - and the 115 foot Lucifer Falls. This image is of one of the three tiered waterfalls in the gorge. Each tier has its own set of cascades. Please click on the image to see detail.
Star-trails in the Southern Hemisphere
Finding Polaris or the North Star is easy in the Northern Hemisphere. In the Southern Hemisphere, finding Sigma Octantis is very difficult. The star lies in the constellation of Octans and has a magnitude of 5.5 making it barely visible even on a clear night. One can use the Southern Cross to make an attempt at locating its position but it will never be really accurate. I did my best and set up my cameras to do a time-lapse. This was the night Germany played Brazil in the World Cup.My tripod and camera must have aroused the curiosity of the night security guard at Eagle Island Camp. He kindly moved my rig to a more secure position on the tiles of the swimming pool. This was after 395 images had been captured with about 105 to go. Sequence disrupted but in my opinion the stack is interesting. Sigma Octantis is in the top left corner of the frame - INVISIBLE.Stars in Africa are incredibly bright as indicated by the EXIF data. These images were captured using the Panasonic Lumix GH4 and the 12 to 35 mm Lumix Vario lens. Exposure triad: f/2.8, 13 sec, ISO 200 - no noise reduction required.In hindsight, I should have added an ND filter and increased the exposure to 25 seconds or closed down the aperture to f/4. This would have extended the individual trails.Your comments would be appreciated.
Gullfoss - Iceland

I can never get tired of looking at images from Iceland. This is an extract of Gullfoss (Golden Waterfall), one of the most popular waterfalls in Iceland and a key stop on the the Golden Circle. It is a multi tiered waterfall on the river Hvítá. The first is a wide but shallow three step fall and then it drops in two tall stages. The first is about 36 feet and the second about 70 feet. This image is a small extract of the final drop. Canon 5D Mk II, 70-200 f2.8 at 200 mm, f/10, 0.8 seconds, ISO 250.
BBF - Back Button Focusing
This week I saw a post on Facebook where a friend was talking about seriously starting to use Back Button Focusing. I know there are lots of opinions and articles on this topic but one more will not hurt. Please note, this has nothing to do with back focusing. Before we go to far into the BBF stuff let’s get familiar with camera focusing. Most modern DSLR Cameras have the ability to manually focus on your subject or automatically focus. Some lenses do limit you to manual focusing as they have no motors and electronics to drive the focusing elements.Automatic or Auto Focus has a few modes, One Shot, AI Focus and AI Servo in Canon speak and AF-S and AF-C in Nikon speak. There really should be some ISO standards for this kind of stuff.One Shot and AF-S basically means the camera will trigger the lens to auto focus on the subject, lock the focus for you to capture the image.AI- Servo and AF-C means the camera will trigger the lens to auto focus on the subject and then do its best to keep the focus on the subject while the subject is in motion.Canon has AI-Focus which is supposed to intelligently detect motion and trigger the appropriate auto focus mode, one shot of AI-Servo. This can be problematic so let’s leave it out of this article.No lets understand how we get this to work. By default your camera is set to focus and read the exposure when you half press the shutter button. Fully depressing the shutter button takes the picture. Not a bad way to do your photography.So what is the problem? If you have a static subject, and use center auto focusing point (it is the most sensitive AF sensor) you would half depress the shutter button. This action will initiate the auto-focus and then you will see or hear focus confirmation, now you can depress the shutter all the way and capture your image. Optionally, keeping the shutter button half depressed you can recompose and then press the shutter button all the way and take your image. This system works great for static subjects. Now you are trying to photograph moving subjects. You can’t half depress the shutter and lock focus and then take the shot because your subject will have moved and no longer in focus.You switch your camera to AI-Servo (canon) or AF-C (Nikon). You are capturing great action images and you notice a great subject that is static. You point your camera, focus and recompose – Oh! NO! you lost focus and more Oh! No! the opportunity is gone. What could you have done? You could have switched the camera back to One-Shot or AF-S or switched your lens to manual focus after getting focus and then pressing the shutter to grab the shot. This would definitely be too late.To overcome this issue you need to separate the focus initiation from your shutter release. Now you need to assign focusing to some other button. Typically this is one of the buttons on the back of your camera and hence the term Back Button Focusing or BBF.Using your custom functions or menu functions set your shutter to meter only, assign the AF-On button to initiate focus. Now you will use your thumb to depress the AF-On button to initiate focus and then use the shutter button to capture the image. There are two steps but well worth it.One of the greatest benefits is when you want to lock focus, you simply release the AF-On button. The lens will not refocus till you depress the AF-On button again. So for any action photography you can be ready for any motion and yet be in a position to lock focus when you need to.A huge benefit, you can leave your camera in AI-Servo or AF-C mode and never have to switch to One Shot or AI-S mode. When you use BBF, as long as the AF-on button is depressed the focusing system will remain active in follow focus mode tracking your subject (AI-Servo or AF-C), release the button and focus stays locked. So for stationary subjects, all you need to do is to tap the AF-ON button and focus system will focus and lock. Remember to release the AF-On or the camera will continue to try and refocus.Now once you set BBF you need to be aware that this will take some getting used to. Your fingers and brain need a major reset. You will miss a few good shots but once you are used to this system you will wonder why you have been wasting so may good opportunities.Warning for Nikon users: The back button focusing button AF-ON will not trigger the lens vibration reduction “VR”. The shutter button must be half depressed to trigger VR.
2014 - 1st Quarter One-Day Workshops
Here is the schedule for the first Quarter of 2014. Please use this REGISTRATION link for details about each workshop and to register.REMEMBER ALL ONE-DAY WORKSHOPS INCLUDE A PIZZA LUNCHJanuary 11 - Product Photography and Lighting TechniquesJanuary 12 – Food Photography and Lighting TechniquesJanuary 18 – Lighting for PortraitureJanuary 19 – Timelapse Photography, post processing and video assemblyJanuary 25 - Macro CloseupJanuary 26 – The Digital Darkroom – a course that covers capture to process and enhancement to output to print and web media. A one day program for digital image making workflowFebruary 1 – Flower Photography, Textures, Blending and moreFebruary 2 – Lightroom 5February 8 – HDR – done right using Photoshop, Photomatics, NiK HDR Efex 2, EnfuseFebruary 9 - Macro CloseupFebruary 22 – Timelapse Photography, post processing and video assemblyFebruary 23 - Photography Basics 1 day Class March 1 – Flash PhotographyMarch 2 – Lightroom 5If you have any questions or would like more information please call 617-759-0010 or email sv @ shivverma.com (please remove the spaces)
African Skies 2 - A Timelapse Video
Gunther Wegner the developer of LRTimelapse software has just released African Skies 2. This excellent time-lapse video showcases the beauty of the African landscapes and animals in film and time lapse sequences, that have never been seen before.The production took more than half a year - and has been compiled from 4 terabytes of raw-data. All editing (time lapse and even video) was done, using the new LRTimelapse 3.2 and Lightroom 5.2. !The video sequence can be seen on Vimeo but is available at a nominal cost as a HD video and a 4K video. The sale proceeds will be used to fund and support the African wildlife and environmental protection organizations. This funding was done from proceeds from the video too and I commend Gunther for his efforts. we decided to sell the film as download in much higher quality in Full HD and even 4K. With the revenue we again want to support local animal and environmental protection organizations.Click here to be directed to the LRTimelapse Web and then use the African Skies Tab to purchase it if you would like to support the cause.Please share this post with your family and friends. Gunther has created an excellent video and I hope this can be viewed by all. Please click on HD and open it in full screen view.[video type="vimeo" id="78610518" width="400" height="200"] Click here to be directed to the LRTimelapse Web and then use the African Skies Tab to view the video and purchase it if you would like to support the cause.
Canon 70D announced - A DSLR with full function Video
Canon proudly introduces the EOS 70D – features:a revolutionary autofocus technology that unlocks the potential of Live View: Dual Pixel CMOS AF. This game-changing technology allows the EOS 70D to capture video in Live View with smooth and precise autofocus similar to that of a camcorder. Additionally, Dual Pixel CMOS AF provides fast and accurate autofocus during Live View still image capture, enabling you to fully benefit from the freedom of angle allowed by the Vari-angle Touch Screen 3.0-inch Clear View LCD monitor II.Built-in wireless technology and the EOS Remote app* further enhance shooting versatility, as well as enable easy sharing.Brilliant image quality is provided by the EOS 70D's 20.2 Megapixel CMOS (APS-C) sensor, a first for an EOS camera with an APS-C sized sensor.Continuous shooting up to 7.0 frames per second, as well as an extended ISO range of 100–12800 (H: 25600) that allows shooting in a wide variety of lighting conditions.19-point all cross-type AF system with a high precision dual cross f/2.8 center point, and advanced display options available on the Intelligent Viewfinder supply exceptional control.In-camera imaging features like HDR, HDR Backlight Control, Multiple Exposure, Handheld Night Scene, and Creative Filters.
The Genie Motion Control Device
Syrp, a New Zealand company, was very kind and shipped me one of their motion control devices, that I am featuring in my upcoming book. The time-lapse sequence above, was captured using the Genie in Time-Lapse mode with the Clouds preset modified for my way of capturing.I love the simplicity of this unit. It is easy and a charm to use.I also did a review of the Genie that you can read - click on this link GENIE Review.Please contact me if you need more information or would like to get your and on one.
Blurs and Abstracts
Many an image of birds in flight have been photographed while panning and using slow shutter speeds to create blurry images (aka "pleasing blurs"). I decided to try something similar but different. Rather than capturing a whole flock I concentrated on a few. Waited for a decent formation and captured the image. Enhanced in photoshop to augment the high key effect and treated with NiK Color Efex Pro for added impact.Your thoughts and comments are welcome?