
Diaphanous Lily 2
 This is the second image in the series. The process is the same as Diaphanous Lily with the exception of lighting. Here I used two lights instead of the single light in the first image. Please click on the image for a larger view.
Elinchrome D-LiTE-RX4 - Review
 Elinchrom’s new D-Lite-RX 2/4 200/400 ws strobes are excellent low sync speed semi portable studio worthy strobes. The ”it” designation is for Intelligent Triggering.
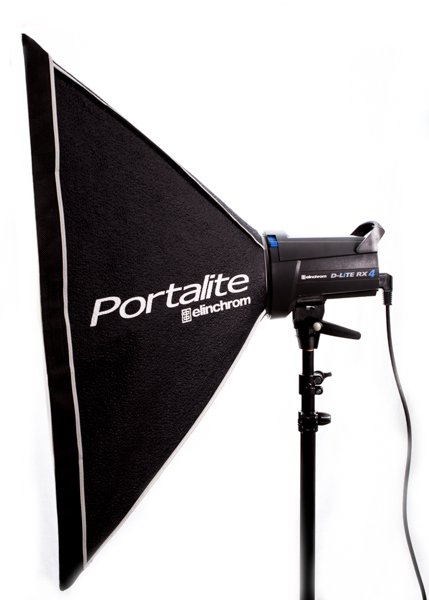
Each strobe head is made from a rugged impact resistant plastic that has a rubberized top handle with a holder for a spare fuse.with many new exciting features. The kit contains two strobes, power cables, two Portalite square soft boxes, with bayonet mounts. Included is one reflector.
Each head has a built-in Skyport” receiver and a four channel Skyport transmitter is included with the kit.The transmitter is an optional item for single units. All heads are fan cooled when needed. The kit includes a pair of Manfrotto light stands and all carrying cases.
The heads are available in 200 and 400 Watt versions. My units are 400 Watts. The control panel is well configured as shown in the image below.
Specifications:
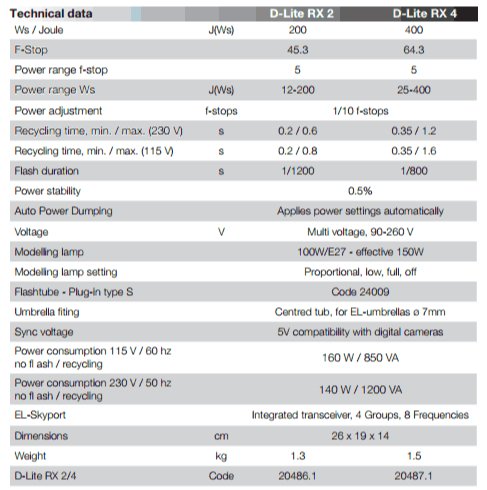
The power switch is illuminated when the head is powered on. A two position LED indicates the power setting, with two buttons to increase or decrease the power in 1/10 increments. Another button allows you to set the modeling light at full power, minimum power, proportional power or off. There is a strobe trigger button called the Eye-Cell and is programmable for Auto, Manual or Pre-Flash modes. This is very useful when using a hot-shoe flash to trigger the D-Lites. Finally there is a button to turn on or off the audible beep. The units have a decent recycling rate recharging in .35 to 1.6 seconds based on the power output setting. A great feature is "Auto Dumping". When you lower the power output the nut will automatically dump the excess charge and indicates it is ready with a beep.
Set-up

Assembling the Portalite soft boxes takes up most of the time. There is one addition I would like, a secondary diffusion panel inside the Portalite Softbox. The rest is easy. The units come preconfigured to work with the Skyport set on the Frequency Channel 1 and Group 1. Changing channels and groups is easy and accomplished pressing the power up and down buttons together, then toggling the function using the modeling lamp mode button and using the individual power up or down buttons to
select the following:
- Groups 1 through 4
- Channels 1 through 8
At any time you can do a Master Reset to factory defaults switching off the unit, holding the power up and down buttons and switching on the unit again.
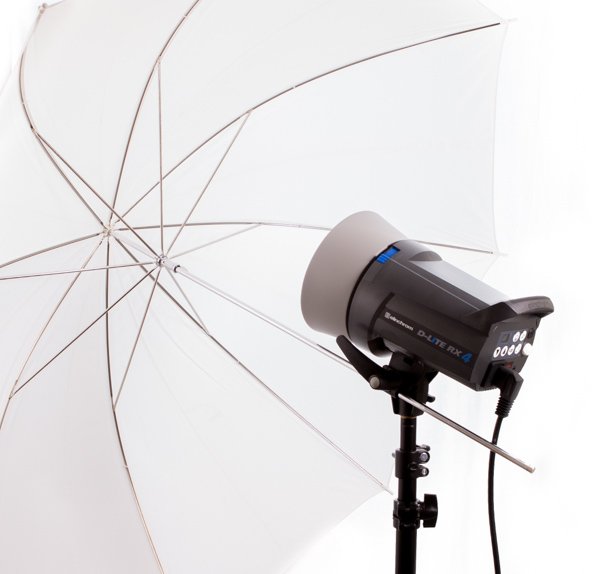 The unit has two umbrella mounts. one is a centered tube that will accept 7mm diameter umbrella shafts that are on the Elinchrome EL umbrellas. If you do not have EL umbrellas you can mount an off centered umbrella in the secondary mount near the tilt handle.
For most of the work I do in studio I find these to be an excellent choice. The units work flawlessly. I have two sets in my studio and for the past 8 months these have never missed a beat. The power output and color temperature are consistent and the supplied cases are ideal for transportation to allocation shoots.
I highly recommend these units to anyone looking for an excellent high quality starter system. My preference is for the 400W units.
These can be purchased for $949 for the 400WS heads and $849 for the 200WS heads. Individual heads are also available but the best price breaks are when you purchase a kit.
Winter Storm Nika Forces Indoor Photography
 We have about 10 inches of snow, but with the rain the snow is is getting packed down and getting heavier by the minute. It's just not conducive for any outdoor winter photography so decided to play with some water drops. Using a TriggerTrap V1 hooked up to a Nissen 866 flash head, Rogue gels, a dropper and a pan of water. Flash set at 1/64 power backlighting the water drop through an acrylic panel. Camera at ISO 100, aperture f/10 in Bulb mode.
Metering Modes and How Your Camera Meter Works
My latest article has been published in Digital Photography School. Non DPS subscribers may read it using the link below. There are lots of excellent articles and product reviews available in DPS and they are all free.Click Here for the article
Balancing Color for Flash and Ambient Light Using Gels
So glad to see another one of my articles published in Digital Photography SchoolClick Here read the article
2014 - 1st Quarter One-Day Workshops
Here is the schedule for the first Quarter of 2014. Please use this REGISTRATION link for details about each workshop and to register.REMEMBER ALL ONE-DAY WORKSHOPS INCLUDE A PIZZA LUNCHJanuary 11 - Product Photography and Lighting TechniquesJanuary 12 – Food Photography and Lighting TechniquesJanuary 18 – Lighting for PortraitureJanuary 19 – Timelapse Photography, post processing and video assemblyJanuary 25 - Macro CloseupJanuary 26 – The Digital Darkroom – a course that covers capture to process and enhancement to output to print and web media. A one day program for digital image making workflowFebruary 1 – Flower Photography, Textures, Blending and moreFebruary 2 – Lightroom 5February 8 – HDR – done right using Photoshop, Photomatics, NiK HDR Efex 2, EnfuseFebruary 9 - Macro CloseupFebruary 22 – Timelapse Photography, post processing and video assemblyFebruary 23 - Photography Basics 1 day Class March 1 – Flash PhotographyMarch 2 – Lightroom 5If you have any questions or would like more information please call 617-759-0010 or email sv @ shivverma.com (please remove the spaces)
2013 Remaining Workshops
There are a few spots available for the following:December 7, 2013 - Photography Basics 1 day Class December 8, 2013 - Time-Lapse WorkshopDecember 21, 2013 - Lighting WorkshopDecember 22, 2013 - Macro CloseupClick here for more info.Also checkout Iceland 2 and the India Tigers and More Workshops and Photo Tours. Click here.
Topaz labs - Thanksgiving Sale

I want to let you know about a huge promotion Topaz Labs is running for Black Friday/Cyber Monday. For the first time ever the Topaz Complete Photography Collection, which includes all the products will be on sale for $199.99, which is almost 50% off the normal price of $379.99. The sale will run from November 28th through December 2nd 2013.CLICK ON THE LINK BELOW AND -- USE THE PROMO CODE: blackfriday2013
Click to license Topaz Products
One Day Workshop Schedule for December 2013
Here is the schedule for the remainder of 2013. Please use this REGISTRATION link to register and pay for these workshops. Please also fill out and mail or bring with you the Workshop Registration and Waiver Form This is an electronic form, you may print it and then fill it out or fill it out directly and then print the required copies.Click on the links for detailed PDF documents.December 7, 2013 - Photography Basics a one day class December 8, 2013 - Time-Lapse WorkshopDecember 21, 2013 - Lighting WorkshopDecember 22, 2013 - Macro and Closeup PhotographyIf you have any questions or would like more information please call 617-759-0010 or email sv@shivverma.com
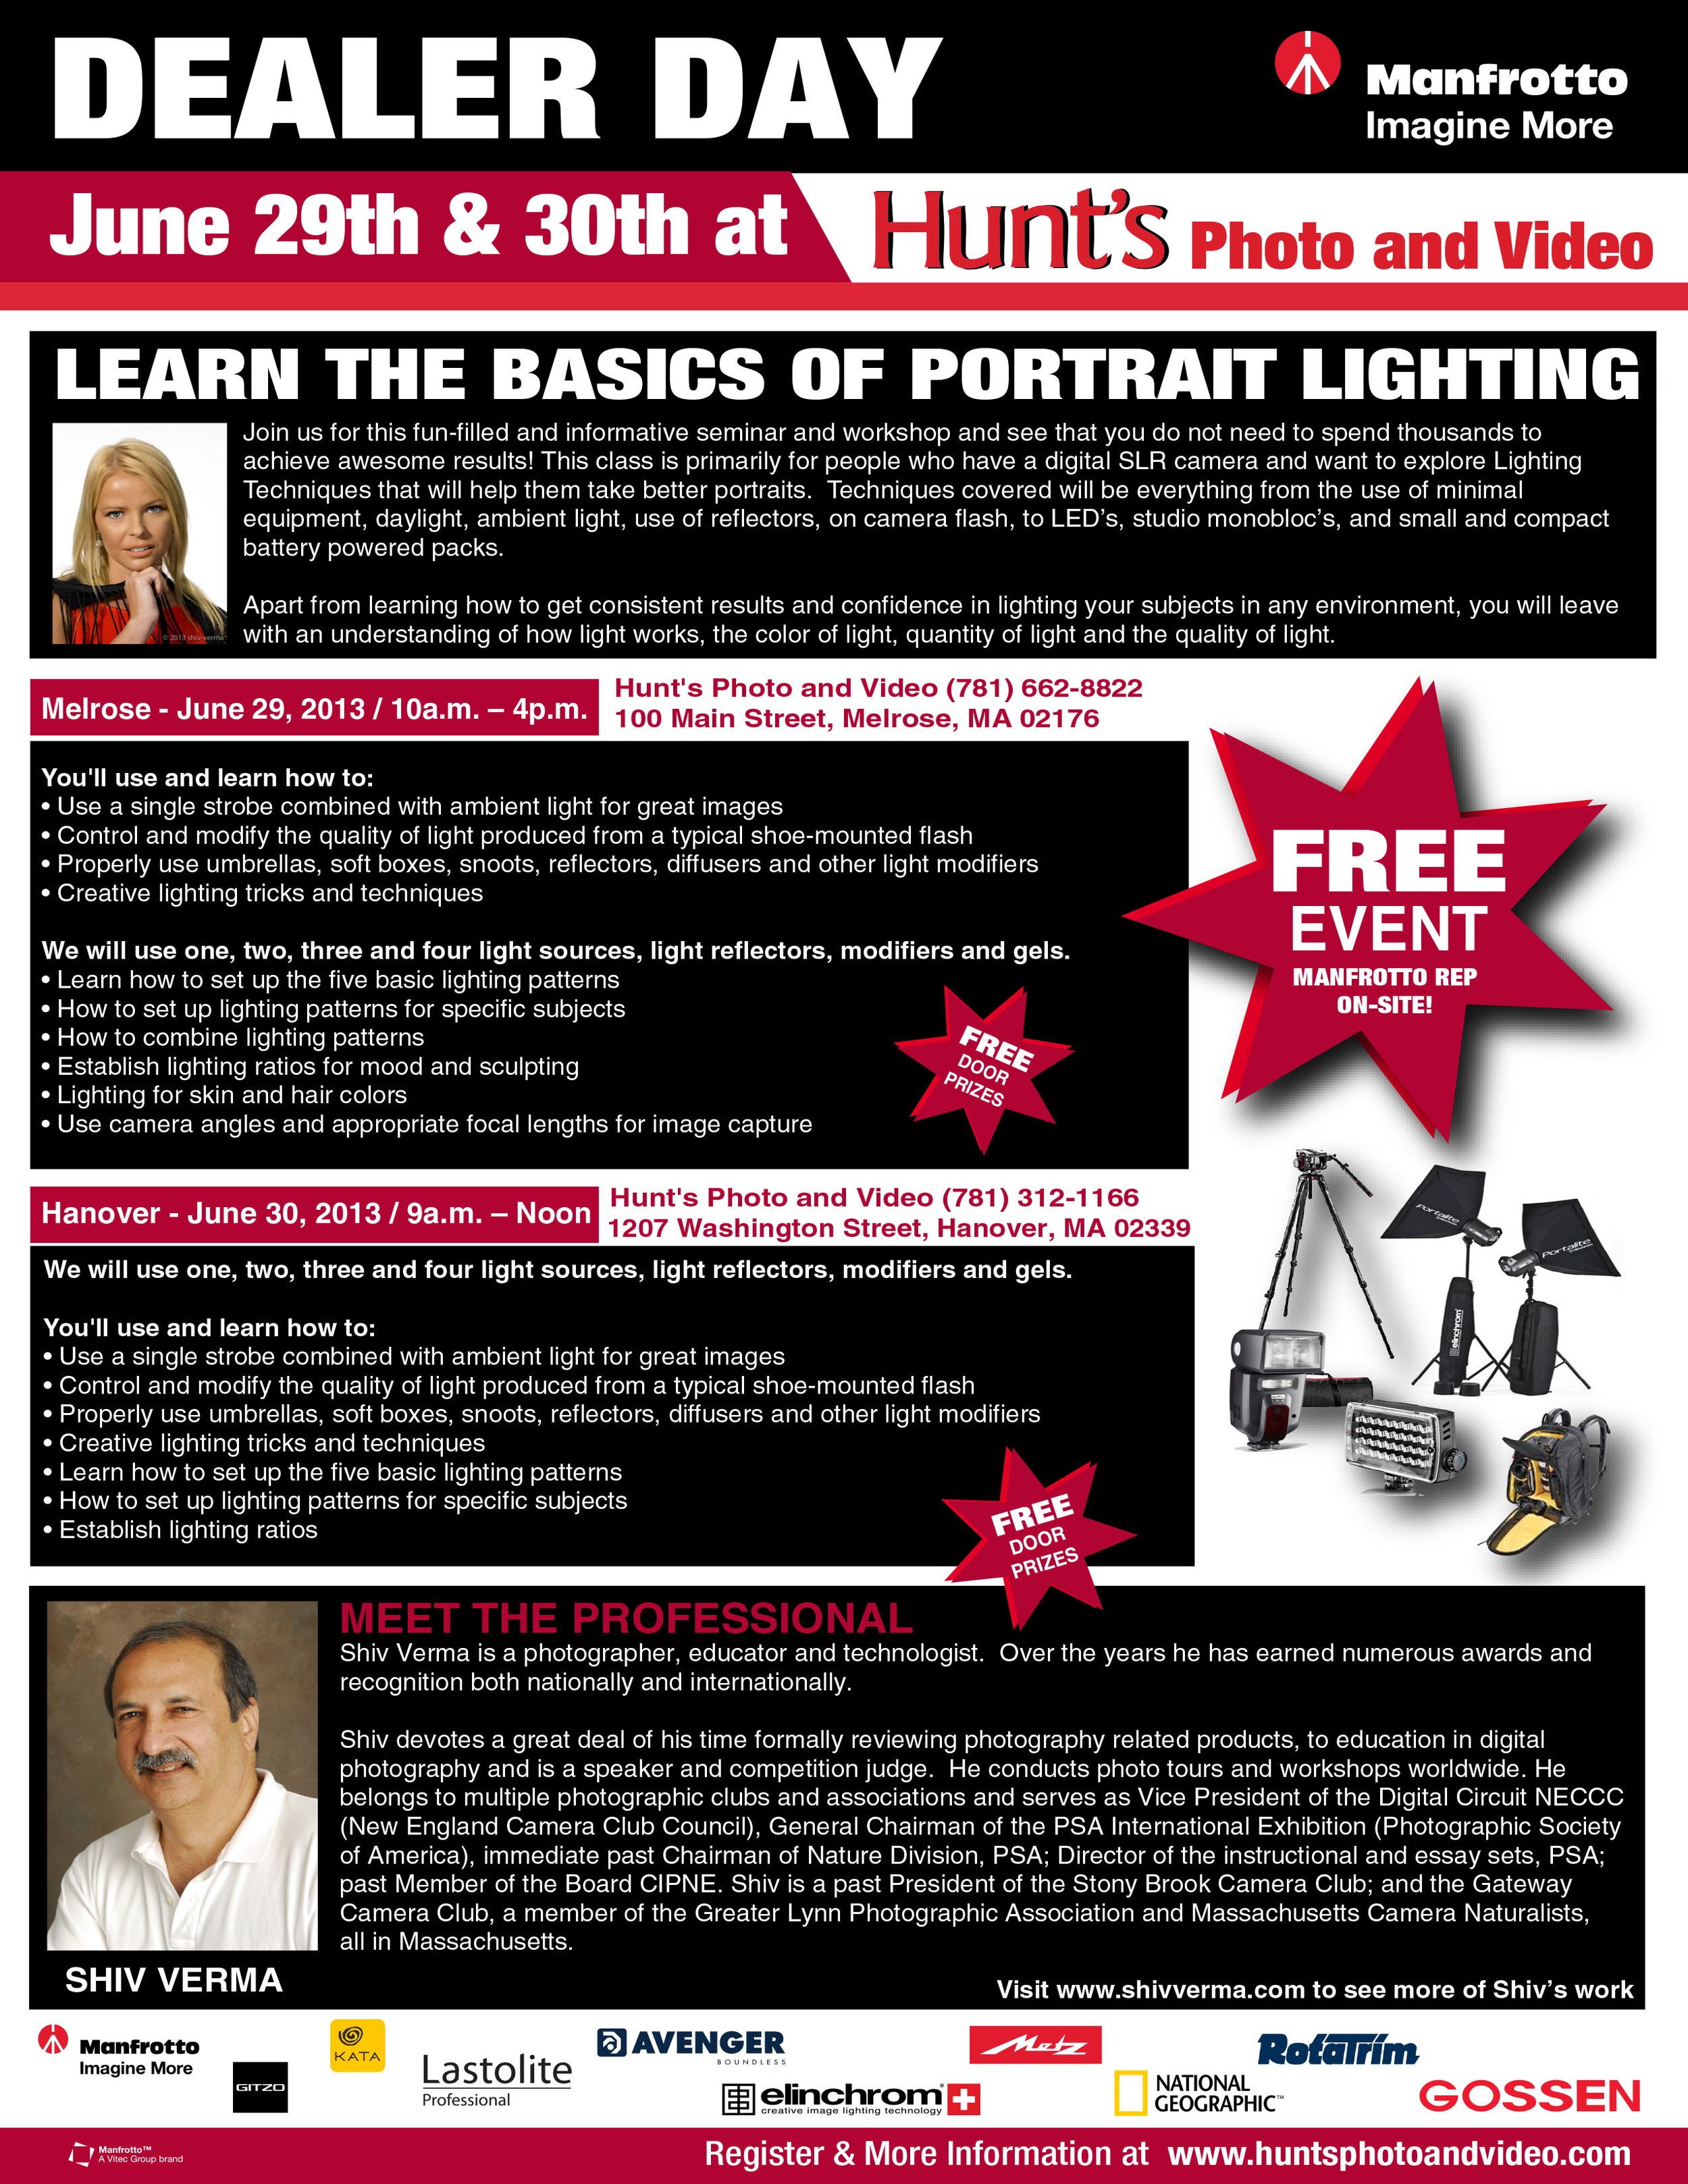
Lighting Demo and Educational Program
I am truly honored and proud to have been selected to demonstrate and teach lighting for Manfrotto. They represent Gitzo, Elinchrome, Lastolight, Gossen and more of the finest.Join me for a day at Hunts Melrose or a 1/2 day in Hanover.This is a great educational experience as well as an opportunity to check out some fantastic lighting gear. Some of the finest manufacturers products featured in one location.The event is free but you need to register.
Special Products and Special Prices
I would like to take this opportunity to thank each and every one of you for your support and helping my photography Photo Tours and Workshops gain momentum. For all who have participated in any way this year a special thank you and for those who will be joining me next year, I look forward to gaining your confidence.As I look back at 2012, I can't help but feel grateful to the wonderful people who have come into my extended photo family. I have enjoyed every moment with you all.As a small token I requested my friend, supporter and sponsor Gary Farber of Hunts Photo and Video to put together some VERY SPECIAL PRICING on some of my favorite products and accessories. As you look through this list, you might want to avail of these discounts and support Hunts as they have supported the photographic community.Wishing you and yours Happy and Safe Holidays and all the best for the New Year.With warm regards,ShivClick Here for the list and special pricing good through the end of the year
Yosemite and Mono Lake Workshop Day 1
After driving from San Francisco to the Yosemite Valley - our first destination was to capture "Tunnel View" at sunset. i will be posting images that were captured by participants as I receive them. I shill have a few spots open for the next two workshops in Acadia and the Cape.The weather was exceptional and the clouds were perfect for photography. The first image is a late sunset image where the light is just kissing the top of El Capitan: This second image is from the same location capturing the brilliant after glow:
 The flight path over the valley will ruin most images but on occasion a dissipating con trail can be an interesting feature:
 This next image is a 20 second exposure of the "blue hour" looking left from Tunnel View:
 Before packing up and returning for dinner I decoded to shoot one more image to capture the valley and the stars. The face of El Capitan and Half Dome show the lights from climbers headlamps as the bed down on the rock face for the night.
Late June and Early July One Day Workshops
Some images that hit it off
This past week I posted two images of left over flowers from last weekend's workshop. What wonderful comments and feedback. I truly appreciate what the viewers have to say - thank you all. Both images treated with NiK. Here are the two:

Weekend Workshops
Two awesome days, two awesome workshops with some truly great photographers. Yesterday's Lighting Demystified workshop was great - even the heat and humidity was not a hindrance. The Macro and Closeup workshop had many Ah Ha moments in particular with stacking.Here are a few images form the macro and closeup workshop participants:


EXPOIMAGING – The Rogue Product Line
For years I have been struggling with accessories that can be used with my hot shoe flash on- or off- camera. A good diffusion accessory was a plastic cap that fits over the flash head, then a cumbersome triangular unit with Velcro strips, adhesive and tape – reflectors and so many pieces that would drive anyone crazy. Not to mention the fact that this was dubbed “the fall apart”.My challenge was to get a system that was light, easy to carry, easy to setup and most important, effective.THE FLASHBENDERS: About a year ago I acquired a product from ExpoImaging called the Rogue FlashBender “large positionable reflector” – this accessory has not left my arsenal of gizmos and gadgets that I don’t leave home without. I use this to bend and shape the light, use it as a reflector, a snoot, and as a flag or gobo any time I have to eliminate flare.Rogue FlashBenders are shapeable light modifiers for shoe mount flash heads. The design allows you bend the reflector into any position and you can be sure it will stay in that position until you decide to alter it .After an introduction by Hunt’s Photo and Video a few weeks ago, ExpoImaging sent me a their product line to try out. Thank you Hunt’s and ExpoImaging. On opening the package, I immediately fell in love with the diffusion panel that works in conjunction with the large FlashBender. Now I have twice the effective use from the same product. This basically converts the FlashBender into a micro softbox.
 A smaller version of the same system is equally versatile and I was able to complete a jewelry product shoot with just two off-camera hot shoe flash units mounted with FlashBenders and diffusion panels. It was great not to have to use my large strobes and soft-boxes and achieve awesome results with the Rogues.In addition to the FlashBenders (large and small) they make a third product in this lineup called the bendable bounce card/flag. This is equally effective. If you are the type of photographer who uses elastic bands and white cards (business cards) you will love this. Each of these FlashBenders stay put. Installation is a breeze, collars and Velcro wrap around straps are superb. The system is designed to hold fast and stay that way no matter what size of a flash head you have. Event photographers you will feel you are in heaven. Moreover, attach the diffusion panel and you have beautiful soft light on the go.For one of my product shots I needed an additional reflector so I used the bounce card without mounting it to my speedlight. Needing additional light, I folded some aluminum kitchen foil over it and now I had a high reflection surface bendable in any direction. I have also created a sleeve made with gold reflective material that fits over the large flash bender when I need warmer light.GRIDS3-in-1 Honey Comb Grid and Rogue Gells
 If you have ever had the need to control your flash light output with a grid – look no further. The Rogue product line includes one of the mot ingenious honey-comb stacking system. A stacking system that includes a bezel, attachment straps, a 25 degree and a 45 degree honeycomb grid (combined they give you a 16 degree grid) all in a nylon carrying pouch. There is more, you can get a set of Rogue Gels that are specifically designed for the grid system. The set comprises 20 circular filters and a padded pouch. Each filter is identified by its color and f/stop loss (wow!!!!). There is no way you won’t fall in love with this system. That is if you want control and color. FILTERSRogue Gels - Universal Lighting Filter Kit
 There is no end to the number of options you have to gel your flash head. From pre-cut, to sample gels to cut it and fit it, Velcro, elastic bands, stick-on double sided tape and many other crazy options. I had actually given up looking for a good solution.The Rogue system is so well designed; you get a large gel band (not a rubber band) that you put around your flash head (this stays put). Now you insert one end of your gel that is tabbed under the band on one side and then the other side. You are free to stack gels as you please. Each gel is printed with its color and f/stop loss. All so well organized in a padded pouch. The gels fit – they cover the flash head and provide even gelled light.It is important to note that Rogue gels are manufactured by Lee Filters, renowned for their gels, glass and polycarbonate filters.Conclusion: I have found the Rogue product line to be simple yet versatile, giving you total control for your lighting requirements when used with your portable flash heads. They are durable and light, easily packed into the smallest of camera bags and ready for use. Best of all they are self contained and do not require you to stick or glue things onto your flash heads. I highly recommend the system to all photographers who need to control or modify the light from their flash heads.In addition to regular use of the FlashBender, I have now included the entire product line in my “Lighting Demystified” workshop.